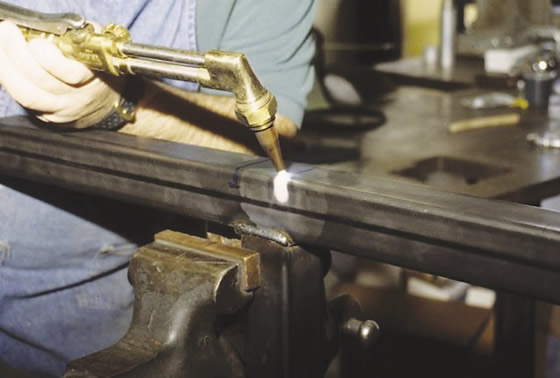
The flame straightening correction, called a “heat shrink,” is applied using a common oxyacetylene torch with a standard cutting-type tip. Oxygen acetylene is the preferred fuel combination, because it has a higher Btu/min. input than other common cutting fuel combinations, while tip selection is determined by the material type and thickness. Use a tip the same size you would for cutting when shrinking stainless steel, and one size larger than you would for cutting steel. Remember, you are trying to quickly heat a narrow zone.
When making corrections, the heat shrink is applied in the same manner that would be used for welding. Uniform travel speed and standoff distance are important for getting consistent results. The inner preheat cones of the flame should be held off the surface to prevent scarring.
A full heat shrink on steel will have the entire width of the shrink heated to a low red or cherry red color. All images courtesy T. Lipton.
A full heat shrink on steel will have the entire width of the shrink heated to a low red or cherry red heat at 1,000° to 1,300° F.
Stainless steel is heated only until a deep brown color is seen on the surface, at less than 900° F, because stainless steel is a poor heat conductor and can be damaged by overheating. Stainless steel expands about 1½ times more than steel, so less aggressive shrinking is necessary to get the same results. It’s best to go easy and add more correction than correct for overzealous application of shrinking.
Once you have heat along a particular line with a full shrink, no useful gain will happen by going over the exact same line. The exception is when less than a full shrink was used. Normally, if more correction is required, it is done alongside the original shrink line.
Here’s a rule of thumb: If the plotted distortion 12 " from the high spot is 1/16 " or greater, the width of the heat shrink is equal to the thickness of the steel. For stainless steel, reduce this by half for best results.
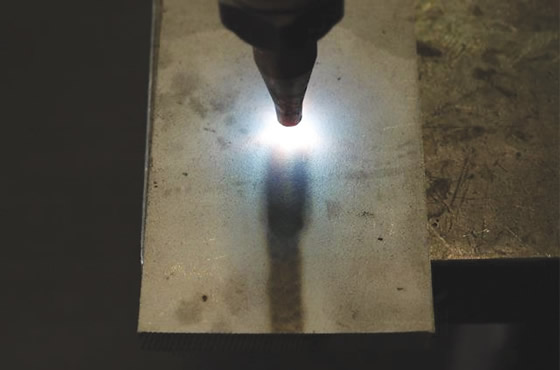
When straightening stainless steel, heat it only until a deep brown color is seen on the surface.
The heat shrink begins at an edge or in a single spot. For a full shrink on steel, the spot is heated until a dull red color is seen. The torch can now be moved along the length of the area to be straightened. It is important to consistently maintain the temperature as you move across the work. Remember, this process is like reverse welding, and travel speed and standoff distance are as important as they are in welding. Weaving is recommended for a wider shrink area on thicker plates.
There are limits to how much correction you can get from heat shrinking. Typically, these limits are encountered near edges, where plates are easily damaged in handling—it may not be possible to correct this type of damage without the use of aids, such as clamps or other mechanical devices.
The effects of corrective heat shrinking will always be enhanced by the application of mechanical assistance. Weights and clamps will greatly magnify your heat shrinking results.
How you cool the heat shrink is almost as important as how you heat the work in the first place. Eventually, the heat you put into the part will reach some equilibrium point if you leave it alone long enough. The effects of the heat shrink can be magnified by effective cooling of the heated metal. The cooling effectively freezes the upset from the heat shrink and gives more correction per shrink than if no cooling takes place.
For small jobs, a spray bottle of water or even a wet rag is suitable. For larger jobs, a stream from a hose works best. Remember that an accurate assessment of the correction cannot be done until the part is cool enough to put your bare hand on it. Additional shrinking should not be done in the same area until the part is cool enough to touch. Compressed air can be applied to blow off excess water so you can see a gap between a straightedge and the part.
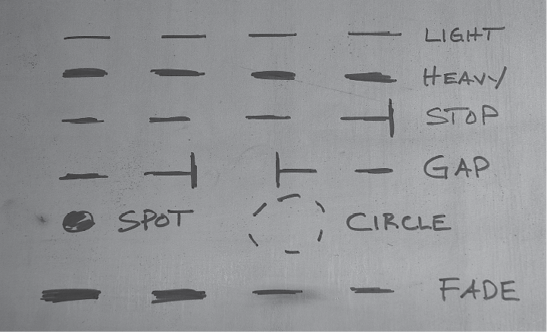
Figure 1. Flame straightening plotting symbols.
Cooling should start on the hottest section of the shrink first. This helps freeze the shrink in its new, contracted position. Thin tubing and sheet metal should be cooled immediately after the heat is removed.
It is OK to apply several heat shrinks in one heating and cooling cycle, but they must be separated by cool metal to be effective. Heat shrinks should never be applied side by side without cooling unless two torches are used simultaneously for a wide, heavy-duty heat shrink.
Figure 1 shows some of the flame straightening plotting symbols that I use. Most of these are easy to understand. The main point is that these symbols represent what you see when the plate or part is examined. If you trust your eyes and measuring tools, the symbols are only a reminder of what needs to happen for a particular section.
A light dashed line represents a minimal application for a minor correction. A heavy-handed mark means a full-power heat shrink. A stop shrink means the damage or distortion ended at that point. The same applies to a gap shrink. CTE
About the Author: Tom Lipton is a career metalworker who has worked at various job shops and lives in Alamo, Calif. Lipton’s column is adapted from information in his book “Metalworking Sink or Swim: Tips and Tricks for Machinists, Welders, and Fabricators,” published by Industrial Press Inc., South Norwalk, Conn. The publisher can be reached by calling (888) 528-7852 or visiting www.industrialpress.com. By indicating the code CTE-2015 when ordering, CTE readers will receive a 20 percent discount off the book’s list price of $44.95.
Related Glossary Terms
- metalworking
metalworking
Any manufacturing process in which metal is processed or machined such that the workpiece is given a new shape. Broadly defined, the term includes processes such as design and layout, heat-treating, material handling and inspection.
Author

Tom Lipton is a career metalworker from the San Francisco Bay area who has worked at various job shops. For more information, visit his blog and YouTube video channel.
 ARTICLES