Boring: Never dull start to finish
Boring: Never dull start to finish
Finishing boring processes with the right tools boosts accuracy and surface quality.
It may be a boring topic, but fine, or finish, boring is anything but dull to many machinists. Those involved in making a variety of common components often need to produce holes that are highly accurate in size and location to minimize wear and lengthen part life. Others are tasked with machining holes for bearings and pistons that must be very round and straight and also can require an excellent surrounding surface finish.
When finish boring is necessary, shops can turn to a number of tools capable of meeting demanding requirements. The latest offerings include standard finish boring tools, which can be made even more effective by employing best practices, and custom tools billed as timesavers and cost-savers compared with their off-the-shelf counterparts.
For those engaged in boring operations, due to variations in semifinishing processes, one of the main challenges is getting consistent hole quality.
"Issues with hole location, straightness and roundness are often byproducts of bores that were not sufficiently prepared," said Matt Tegelman, applications and product manager at BIG KAISER Precision Tooling Inc. in Hoffman Estates, Illinois.

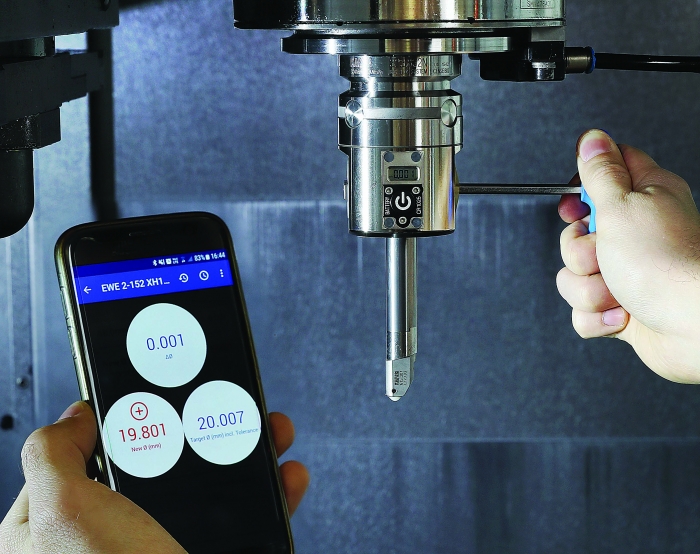
Featuring an embedded digital screen with Bluetooth technology, the EWE fine boring head is designed to make it easy for operators to monitor and configure the head when used with a special mobile app. Image courtesy of BIG KAISER Precision Tooling
He believes that rough boring is the best way to prepare a hole. A twin bore roughing tool with two cutting edges can be used to ensure that a hole is round and properly located for finishing, he said.
Finish Boring Basics
A finish boring step is needed to meet tight tolerance requirements for roundness, straightness, position and surface finish. For example, Tegelman said fine boring is necessary whenever diameter tolerances are tighter than ±0.05 mm (±0.002").
The cutting edge of a finish bar is moved by a micrometric mechanism to adjust the bore diameter. When using boring heads from BIG KAISER Precision Tooling, this usually is done with a micrometer screw, but other boring heads employ different mechanisms. Whatever the mechanism, he said the goal is the same: to adjust the cutting diameter in the finest possible increments to accurately control bore size.
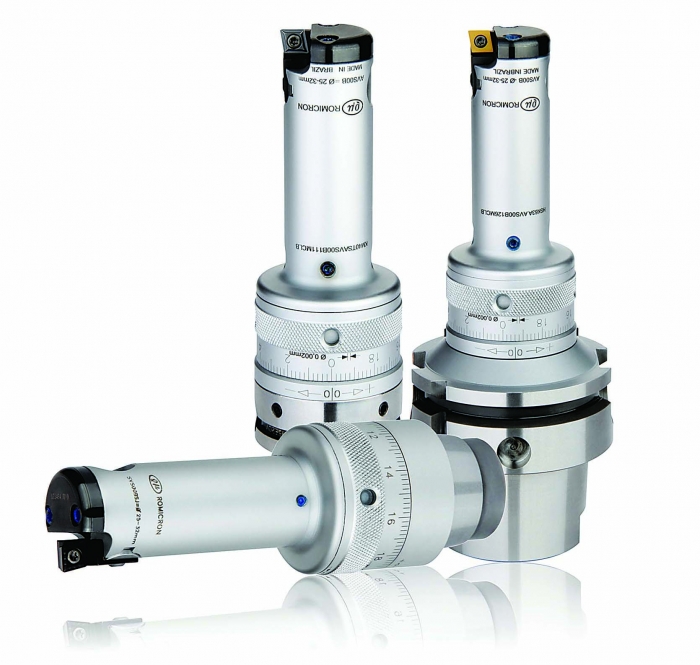
Although it may sound challenging, making very slight adjustments to fine boring tools can be easy. Using the Romicron fine boring system from Latrobe, Pennsylvania-based Kennametal Inc., for example, each 1 µm (0.00004") radial adjustment can be made simply by turning the adjusting ring until a click is heard, said Michael Hacker, senior global product manager for hole finishing at Kennametal Shared Services GmbH in Fürth, Germany.
Besides having finer adjustment mechanisms than rough boring tools, fine boring tools normally have just one cutting edge while rough boring tools typically have two or three.
"When you have two or three cutting edges, it is very hard to set them all exactly to the same size," Tegelman said. "So with a roughing tool, it is typically very hard to get a surface finish comparable to what you can get with a single-point tool."
Set to the right parameters, however, Hacker said a rough boring tool often can produce the same results as a fine boring tool if both tools are equipped with identical inserts. Frequently, he said, the key difference between a fine and rough boring tool is the relative ease of presetting a fine boring tool.
"It might take a lot of trials and time in the presetting room to use a rough boring tool instead of a fine boring tool," he said.
Tegelman said reamers also can equal fine boring tools in both accuracy and finish quality. A reamer typically includes a cylindrical shank and one or more carbide or industrial diamond cutting edges. Productivity can be high when using multiflute reamers because of the feed rates allowed by multiple cutting edges.

The Romicron fine boring system is designed to allow easy, precise manual adjustments. Image courtesy of Kennametal
On the downside, though, consumable costs associated with a reamer are high compared with indexable inserts on boring tools.
"When (a reamer) has reached the end of its life," Tegelman said, "it is generally recycled or tossed."
Moreover, he said allowable cutting-edge adjustments for reamers are usually small and limited to compensation for wear. By contrast, he said boring tools typically have a much greater adjustment range and can be used for several different bore sizes.
Best Boring Practices
To boost productivity and reduce cycle times, a fine boring tool and a reamer can work together. Hacker pointed out that fine boring provides better positional accuracy than reaming but is a comparatively slow process and does no better than reaming when it comes to roundness, straightness and surface finish. So shops can start by making a pilot bore with a fine boring tool — a depth equal to the bore diameter or even less is often sufficient — and then switch to a reamer with six or more teeth to quickly finish the hole.
When cycle time is not a primary consideration and the workpiece is a valuable one that the manufacturer can ill afford to lose due to a boring error, he recommends a two-step process in which twice the normal amount of stock is left in the hole for fine boring. In the first step, a tool removes half the stock and then is taken out of the bore so a probe can be inserted to measure the hole. This data is sent to the machine control, which uses it to calculate the deviation from the required bore diameter. Based on the calculated deviation, process parameters then are adjusted so boring will be even more precise in the second step, when the tool is reinserted in the hole to remove the other half of the stock.
Hacker said this two-step finish boring process can be particularly helpful in situations in which there are unknowns upfront about the workpiece — for example, the exact hardness of the material, which can affect the hole diameter cut by the tool.
When it comes to finish boring quality, Tegelman said, "the No. 1 issue I deal with is improper stock allowance," which results in poor surface finish.
For most standard applications, he recommends a diametrical stock allowance equal to or slightly more than the insert nose radius of the tool. For holes with extremely tight tolerances, he said the stock allowance should be reduced and inserts should have a sharp cutting geometry.

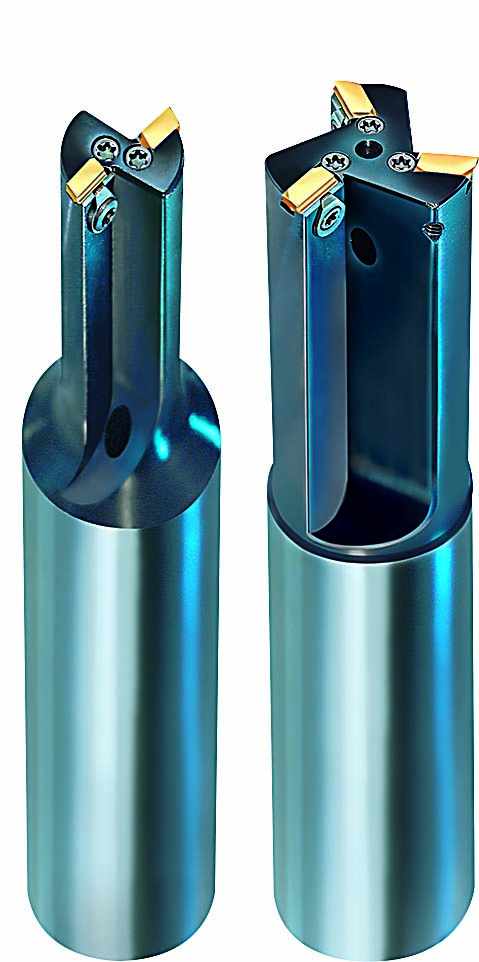
For adjustment purposes, the precision-ground inserts in these fine boring tools are pushed radially by means of a tapered screw. Image courtesy of Hollfelder-Gühring
Tegelman believes that in recent years, fine boring has gotten a boost from the appearance of boring heads with a digital display to show adjustment increments. Today, he said, BIG KAISER Precision Tooling's EWE digital fine boring heads can communicate with software not only to display and record offset adjustment information but to use the last measured bore diameter value to determine the output diameter of the next cut and then show where that diameter lies in the application's tolerance band.
The company currently is working on closed-loop boring tools that adjust themselves using back-and-forth communication between the tool and online probing equipment in the machine. These tools feature a boring head that replaces the fine adjustment screw mechanism with sensors and a small motor that makes size adjustments based on measurement data from the sensors. BIG KAISER Precision Tooling hopes to release products equipped with this technology later in the year.
Custom Options
In addition to standard finish boring tools, shops can opt for custom fine boring tools like those available from Hollfelder-Gühring GmbH in Nuremberg, Germany. (Guhring Inc. is in Brookfield, Wisconsin.) One of the main differences between custom tools offered by this company and competitive offerings is that Hollfelder-Gühring does not use typical ISO inserts, said Henry Hack, production and technology manager.
A typical insert is held in place by a screw.
"If the insert moves in the pocket seat, the customer loses part precision," Hack said. "But if you have a tight fit of your insert in the pocket seat, there is no movement."
Hollfelder-Gühring's fine boring tools have prismatically shaped pocket seats. Instead of using screws to hold inserts in place, he said the tools employ a self-clamping system in which cutting forces push the inserts into the prismatic seats and firmly hold the inserts in place.
In addition, Hack said the company's precision-ground inserts produce tighter diameter tolerances and better surface finishes than their ISO counterparts. He also touted the inserts' positive cutting geometries and very sharp cutting edges, which reduce cutting forces and therefore make the inserts suitable for fine boring of thin-wall parts and other delicate components.
He said Hollfelder-Gühring's fine boring tools benefit from systems that allow users to make micron-size adjustments to the inserts in their pocket seats to tightly control bore diameters. Together, he said, the precision-ground inserts and highly precise adjustment systems make it possible for the company to produce fine boring tools with two or three inserts instead of the single cutting edge on conventional finish boring tools.
This is a big advantage for high-volume production applications in the automotive industry and other industries.
Normally, "if your part requires three different diameters and step lengths in one hole, that means you need three tools and three manufacturing steps, which takes a long time," Hack said. "But we can do it with one customized tool made for all three diameters that machines the complete bore in one pass, which reduces cycle time."
Although Hollfelder-Gühring's custom fine boring tools are "a little more expensive" than competitive standard offerings, he said the benefits outweigh the heftier price tag.
"In the modern metalcutting world, everybody is talking cost per part," Hack said. "We believe you will be able to reduce cost per part by using our tools."


