Honing Comes Full Circle
Honing Comes Full Circle
Honing was originally a surface finishing operation that did not remove significant amounts of material. This article discusses brush honing, a process the authors say produces results similar to what honing was originally intended to produce. Proper boring is also discussed, because, according to the authors, a properly bored hole will not require further correction through modern aggressive stone honing techniques.
When Joseph Sunnen first envisioned the modern honing process at the turn of the century, he saw it as a surface-finishing operation. Over the course of its evolution, however, honing has become a material-removal process used by machinists as a corrective for inadequate boring. But honing, which uses abrasive stones turning at low speeds inside the bore of a hole, does not remove material efficiently. Using hones as machining tools rather than surface-finishing tools can actually damage a metal surface.
Brush honing represents a return to honing's original purpose. As a true honing process, brush honing can improve surface finishes without causing additional damage.
The First Hones
Honing began as a solution to the auto industry's problems with rough cylinder bores. Turn-of-the-century boring tools and machines left a washboard surface on the cylinder walls. The surface would not seal properly with a piston's ring pack, making it impossible for the rings and pistons to receive adequate lubrication. These inadequacies quickly wore an engine's first set of rings, which would be torn up as they repeatedly encountered surface irregularities. Typically, ring packs would have to be replaced after a very short break-in period.

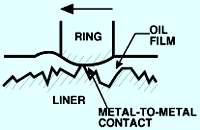
Figure 1: A peak on the surface of a cylinder wall breaks the lubricating film of oil, resulting in metal-to-metal contact when the piston ring passes over that point.
The roughly bored cylinder walls also scuffed the piston skirts so badly that they required dressing. The damage was caused by metallic contamination of the ring path. As the piston reciprocated in the bore, the ring pack broke off the microscopic peaks of the irregularities on the cylinder wall. These loosened metal pArticles tainted the oil supply, fouled ring bearings, clogged filters, and caused vertical scoring of the cylinder walls. This general contamination led to scuffed piston skirts. A second cause of scuffing was the poor lubrication caused by the microscopic peaks before they were smoothed out by the ring pack. The higher peaks broke the film of lubrication that coated the cylinder wall (Figure 1). When the piston encountered these voids at the top and bottom of its stroke—where ring-path velocity was at its slowest—metal-to-metal contact would result.
The short ring life, piston-skirt scuffing, and bore erosion that were the inevitable results of the pistons reciprocating inside rough bores led to engines that consumed excess oil and that were, overall, much less efficient than engines built today. Early car owners had to tolerate motors that burned too much fuel, generated too little horsepower, and performed poorly in general.
Prior to Sunnen's honing process, the only documented method used by an automaker to smooth the cylinder wall's surface was an operation the Winton Motor Co. tried. Winton machinists adapted a technique that was being used on smaller bores. To remove surface irregularities, the machinists pushed ball-bearing-quality steel balls through the bore. The balls, which were 0.002" to 0.003" larger than the cylinder bores, burnished the surface as they passed through.
The process, known today as ballizing, is still used for applications other than cylinder bores. But in the early auto industry, ballizing proved to be inadequate. Inconsistencies in the bored cylinders led to excessive contact pressures that, in some cases, were large enough to crack the cylinder walls. Also, the
balls contaminated the walls with trapped material they pulverized and pressed into the surface.
When Sunnen offered a more effective alternative, the auto industry embraced it wholeheartedly. Sunnen's honing process employed abrasive stones set into a honing head. The head was rotated within the bore by a hand-held power tool or drill press while the operator reciprocated the head by hand.
Honing tools were originally designed to be flexible. The stones were held against the workpiece by spring assemblies that allowed the abrasives to follow the existing geometric form of the bore. Stock removal was minimal, ranging from 0.0001" to 0.0020". With honing, machinists could achieve a surface roughness of about 24 Ra.

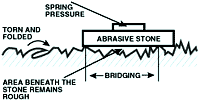
Figure 2: Early hones, which applied only light pressure to rigid stones, could not prevent the stones from bridging across high points on the workpiece's surface.
Automakers viewed honing technology, at this point, as a process that could modify the bore's surface without substantially changing its geometric form or dimensions. Because of the flexible fixturing of the abrasive stones, the honing tool exerted little pressure at the stones' points of contact with the cylinder wall. The light touch of the tool allowed it to smooth the surface without causing further damage. However, the stones were prone to bridging across depressions in the surface (Figure 2). As a result, honed surface textures lacked uniformity.
Honing Becomes Machining
As honing evolved, automakers saw the opportunity to expand its role in the manufacturing process. Because parts were honed after they were bored, machinists began to use honing as a way to correct problems created by the boring process. This involved material removal, and to do this, the machinists needed more rigid hones. Hones were constructed with manually operated screws to apply pressure to the stones. These mechanisms were superseded first by automatic mechanical expansion systems, and then by hydraulic systems. Each stage demanded harder and more cohesive stones that would not fail when the pressure was applied.
This developmental path turned honing into a very expensive stock-removal process. Modern hones are precise, well-engineered, high-pressure tools that employ high-tech metal-bond superabrasives. These tools range from single-pass hones capable of finishing holes as small as 0.125" to gigantic hones that can finish holes as large as 36".
There is a downside to this increase in capability, however. In the process of removing material, these tools can generate a significant amount of damage. The tools' relatively low sliding velocities, combined with the high pressure, produce torn and folded work material and generate a network of microfractures. The size and dispersion of these flaws depend on the material. For instance, honing tears cast iron to a depth of 2µin. and folds over areas that are 4µin. square. The user can control this damage somewhat by reducing pressures and incorporating more spark-out passes. A stone with a softer and more flexible bond material will not tear up the material as severely, because it cuts more freely and removes less material. However, these corrective measures also make the process harder to control and more time-consuming.
Cooling and lubricating materials being honed with today's more rigid stones is another problem. The bore must be flooded with specially formulated sulphonated petrochemicals. Without these fluids, the process's low speed and constant contact tend to load the stones. Sulfur is used because of its ability to encapsulate pArticles of removed material and prevent them from bonding to the stone's matrix. Although these coolants and lubricants do the job, disposing of the hazardous chemicals can be difficult and expensive. Repeated exposure to them can lead to dermatological problems for the operators who must work with the fluids day after day. As a result of these environmental and safety concerns, coolant manufacturers must develop a whole new family of water-soluble chemicals to serve the needs of this specific operation.
Brush Honing Fills a Need

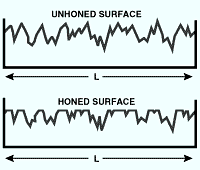
Figure 3: Proper honing removes only the peaks on the surface of a workpiece. These two drawings depict a surface's roughness over a given assessment length (L) before and after honing.
Despite the metalworking industry's move away from low-pressure honing, there is still a need for this type of operation. Rigid honing of the type Sunnen developed can reduce dimensional variances introduced by poor upstream machining processes. And honing can improve surface finishes with consistency, correcting microfractures caused by other machining operations. But honing yields these benefits only if it is not used as a machining process. A hone should never remove more than the microscopic peaks above a mean line on a surface trace, and it should never cut deeper than a few microinches. Figure 3 shows how honing, when properly executed, can modify a surface that demonstrates a random amplitude distribution over an assessment length (L). The top drawing shows an unhoned surface with rough and jagged surface peaks. The bottom drawing shows the same surface after honing has removed these peaks. If this section with the surface peaks honed away were part of a cylinder wall, it would provide greater load-bearing contact with the piston's ring pack and contribute to improved oil retention. When the surface's bearing ratios before and after brush honing are compared, the ratio after honing reveals a greater proportion of the surface close to the surface's peak level. The bearing ratio curve characterizes a surface by comparing the length of the bearing surface material at a specified depth in the profile to the evaluation length.
Brush honing is a process that can improve surface finishes without removing excess material or damaging the workpiece's surface. Brush hones resemble brushes. Their nylon filaments hold the abrasive, which constitutes up to 40% of the hone material. Brush hone manufacturers supply tools with Al2O3, SiC, CBN, or diamond abrasive embedded in the nylon matrix. The brushes are typically sold as inserts to be mounted in a tool body that is similar to a standard multiple-insert boring head. A package of inserts will hone more than 20,000 bores when used at a tool pressure of 40 psi.
Users that are accustomed to standard high-pressure honing will find the brush-honing process considerably different. The abrasive is applied to the surface in a flexible medium made up of numerous discrete elements. The tool works with much lower pressures, although power consumption is about 10% higher than it is with high-pressure honing. Unlike a typical honing stone, the brush hone's elements can act on the surface independently. This avoids bridging by giving the brush the ability to hone the surface while conforming to any minor depressions and peaks (Figure 4).

Figure 4: A conventional, rigid honing stone cannot reach low areas on a surface without removing relatively large amounts of material. A brush hone's flexible elements, however, can reach and hone these areas with minimal stock removal.
Brush honing accomplishes the task for which honing was developed. It reduces surface peaks and removes the torn and folded material left by other processes. Brush-honed surfaces with a roughness of 5 to 6 Ra can be achieved consistently.
Although the principle users of brush hones are auto and engine manufacturers, the technology can be integrated into a broad range of applications. The flexible tools require smaller and less rigid machines than high-pressure hones. High-production operations use the tools in automated lines. Some shops may use machines specifically designed for brush honing, but even boring machines can be adapted for brush honing with specially designed tooling and holders.
Quality Boring Needed
For brush honing to yield satisfactory results, users must remember that the process is not intended to correct deficiencies in upstream processes. The operators who control the boring process should understand the fundamental mechanics and dynamics of the machining process to avoid vibration and produce holes with sufficiently accurate surface finishes, dimensions, and shapes.
|
The boring process is characterized by a number of independent and dependent variables (Figure 5). The surface finish, dimensional size, roundness, and cylindricity of the bore depend on variables that are indicative of the process condition and that are affected by control variables. Machining is, mechanically speaking, a shearing process that results in a chip being formed. Chips can be continuous, serrated, or discontinuous, or there may be a built-up edge on the tool. The type of chip that a process forms is often a good indicator of the process state.

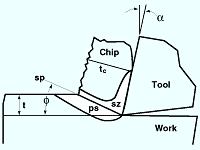
Figure 6: The compressive and shear stresses generated by the cutting process determine the type of chip created.
Figure 6 depicts simplified orthogonal machining and the stresses that the cutting process creates. The tool moving relative to the workpiece produces compressive and shear stresses in the primary shear (ps) and secondary shear (sz) zones. These stresses cause the shearing that takes place to be concentrated in the inclined (Ø) shear plane (sp). They also cause the chip to flow up the tool's rake face. This action is shown in Figure 6 on a tool with a positive rake angle (a). The chip thickness (tc) differs from the DOC (thickness t) measured in the feed direction due to chip compression.
A boring process's independent variables affect chip formation directly. The resultant cutting force often is described by its components, which are the tangential and feed forces or the normal and friction forces. The cutting process results in reactive forces acting between the tool and workpiece that cause relative displacement. The coupled relationship between the response of the machine structure and the cutting conditions leads to a feedback mechanism and process modulation that is inherent in the dynamic machining process.
The dynamic response of the machining system is exhibited as vibration. There are three forms of vibration. The operator must be able to identify which type of vibration is affecting the process and understand its dynamics to correct and control the size and shape of the bore properly.
As a simple illustration, consider all the components of a machining system—the workpiece, the fixture, and the machine tool—to be rigid compared to the flexibility of the boring tool, and imagine that only one significant or dominant mode of vibration is affecting this system.
Free vibration is one of the types of vibration the system may be experiencing. It is the response of the tool to initial conditions when it is free from externally applied force. During the noncutting period in interrupted machining, the cutting force is eliminated, and the tool springs back from its deflected position. An analogous behavior occurs following the sudden displacement of the tool when it comes to the end of the surface interruption and begins cutting the workpiece once more. Given the structural damping that is present in all physical systems, if the machining process is stable, the amplitude of the vibration will decrease with time, although the frequency or period will remain at the system's natural frequency. The effects of free vibration can be seen during the boring of two-stroke engines as the tool passes in and out of the transfer ports or across the intake and exhaust ports. The resulting surfaces are often undersized following the interruptions in the machining direction, and the bore is out of round.
Another type of vibration is forced vibration. This is the response of the system to a periodic excitation, and it occurs at the same frequency as the excitation. The amplitude of the forced vibration is constant (neither decaying nor increasing) over time, assuming the magnitude of the excitation remains fixed. A common example of forced vibration is the radial tool displacement in a particular direction that occurs when the tool's imbalance results in a shaking force when the tool rotates. This imbalance will cause a period force occurring once per revolution. The magnitude of the force will be related to the speed of rotation squared. A boring tool that is subjected to this force will exhibit maximum displacement prior to experiencing any cutting forces. This displacement often leads to an oversized area where the tool enters the bore. This problem is characterized by a taper or bellmouth.
Self-excited vibration may occur when the machining process contains a response feedback. A self-excited system is capable of modulating a constant input force (such as the cutting force in a highly stable machining process that is producing continuous chips) into a periodically varying response. The response amplitude may decay (indicating a stable system), remain constant (a marginally stable system), or increase (an unstable system) with time. Chatter is an example of self-excited vibration. This is often the problem when a stable, well-conditioned rough-boring operation on a casting suddenly begins to suffer from noise and vibration. Because the width of cut is the principal gain factor in machining where chatter is a problem, the onset of chatter during the boring of a casting may be attributed to the increasing radial DOC due to the draft angle.
By measuring the vibrational response of the machining system, the operator or manufacturing engineer may be able to establish process-stability limits, determine the cause of various undesirable machined conditions, specify optimal cutting conditions, and, where necessary, employ specially tuned tooling or dampers. Microfracturing of the machined surface, which also is related to the relative vibration level, can be reduced by achieving a highly stable machining process.
The operator can control cutting forces by selecting a machining geometry that will limit workpiece distortion, especially when the workpiece possesses thin walls. The roundness and straightness of the bore will be enhanced with the use of a tool that is effectively balanced with multiple cutting edges.
It should be noted that the stability of the machining process is affected by the cumulative width of the cut summed over all of the engaged edges. When a well-behaved process begins producing size variations, special attention must be paid to very thin finishing cuts. As the DOC decreases, becoming small relative to the tool's end radius, the effective rake angle may vary from positive to 0 or even become negative. As a result, the dead zone becomes significant and can lead to edge buildup, a poor surface finish that includes torn and folded material, increases in plowing forces (push-off and part distortion), and workpiece material compression (partial elastic expansion on the relief face, increased friction, and size variation).
When operators observe sound machining principles, they can produce bored holes that do not need to be corrected with a rigid, high-pressure honing operation. For example, one manufacturer of aluminum two-stroke-engine cylinders was able to eliminate its high-pressure honing operation entirely by fine tuning its boring operation. Even though the cylinder wall was interrupted with intake, exhaust, and transfer ports, the manufacturer was able to produce a high-quality bore. Through the bore operators' careful tool and parameter selection, the operation produced cylinders that possessed a maximum out-of-roundness tolerance of 0.0003" and a Cpk of 1.33 before honing. Typical roundness values in the ring-travel region of the cylinder were within 100µin., the bore straightness approached the controller limit of 40µin., and the surface roughness ranged from 9 to 20 Ra. At one time, the manufacturer used conventional high-pressure honing tools to hone the bores to the proper size and shape after they had been nickel plated. But with the upgraded boring process, the manufacturer found that conventional honing was unnecessary. Brush honing on a few of the cylinder models was all that was used.
About the Author
Guy Carmichael is president of Carmichael Enterprises Inc., Olmstead Township, OH. Elliot Stern is president of Design & Manufacturing Solutions Inc., Lutz, FL.


