Ready, Preset, Go
Ready, Preset, Go
This article reviews the basics of coordinate systems and machine programming as a basis for presetting tools. The process for setting tool offsets is described with an explanation of the G-codes involved. In an accompanying article, the author tells how his company built its own presetter.
Offline tool setting is one of those things shop managers and machinists often read about but seldom try. One reason is the intimidation factor. Setting tools offline may require you to re-evaluate how you set up and plan jobs.
If yours is like most shops, you're always under the gun. When you finish one job, you clear off the chips—maybe—then start reloading tools and reprogramming the CNC. You also probably clamp the part in the vise or fixture, put the tool in the spindle, touch the tool off the top of the workpiece and then touch the toolholder." title="Gage mounted in the spindle of a vertical mill and used, while rotating, to find the center of a part relative to the toolholder." aria-label="Glossary: edge finder">edge finder to the workpiece.
This method is wasteful. Offline tool setting eliminates some of this waste.
But what about the expense? Few shops can afford all of the extra tooling needed, let alone purchase one of those fancy tool presetters featured in magazines.
Consider for a minute, though, the cost of machine downtime. Let's assume that a one-person shop charges $70 per hour and averages one hour of setup time for each job. Of this hour, half could easily be spent preparing tooling: clamping cutting tools in holders, inserting holders in the machine and touching off the tools. If one job is set up every day, more than 125 hours a year would be spent setting tools. This adds up to $8,750 in lost machine time annually. A larger shop, one with 10 machines working two shifts, for instance, could easily lose $175,000 in a year.
Moreover, these examples don't take into account the machine time lost after a job is up and running. Tools break or become dull and need to be changed. A machine that sits idle while the operator scrounges around for a new tool is losing money—often, more money than the value of the tool being replaced. Compared to the cost of an idle machine, the price of a spare tool and toolholder is insignificant.
The aim of a machine shop is to keep its machine spindles turning continuously. That, of course, is impossible to achieve. But any shop, including yours, can boost machine uptime by setting tools offline. Accomplishing this takes a little planning, money and, perhaps most importantly, a basic understanding of coordinate systems and machine programming.
The Fundamentals
Machining centers vary from one manufacturer to another, but they all share similar features. They have at least one spindle into which the cutting tool is inserted and one motor that rotates the spindle.
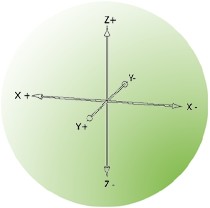
Every toolchanger. See automatic toolchanger." title="CNC machine tool capable of drilling, reaming, tapping, milling and boring. Normally comes with an automatic toolchanger. See automatic toolchanger." aria-label="Glossary: machining center">machining center also has a toolchanger, either human or mechanical, and a coordinate system with at least three axes of motion: x, y and z. These three axes are based on the Cartesian coordinate system, devised in 1637 by Rene Descartes and Pierre de Fermat (Figure 1).
And, like humans, machine tools need a place to call home. A machine's home is called "reference zero." All of its movements are made relative to this point.
 Figure 1: Every machining center has a coordinate system with at least three axes of motion - x, y, and z - which are based on the Cartesian coordinate system.
A machine with a Fanuc or Fanuc-compatible controller uses G- and M-code programming, which is the MS-DOS of the CNC-machining world. The different coordinate systems used by the machine tool are called up with G codes. For example, G53 specifies the machine coordinate system, which is tied directly to reference zero. When you clamp a part to the machine bed, you must tell the machine where it is in relation to reference zero (G53 X0 Y0 Z0).
Each workpiece has a unique work offset, assigned with a G54 or G55 code (there are many others). These codes tell the machine where the part is located on the machine bed in relation to the G53 machine coordinate system. You need to decide ahead of time which work coordinate (x, y or z) to assign to a part by placing either a G54 or G55 code into the program. This tells the machine where the workpiece is in the machine coordinate system.
When you touch off the workpiece with an edge finder, you are simply finding the x and y coordinates for that specific part. These are then placed in the appropriate work coordinate. Next, you place these values in the appropriate work offset, and the machine takes this offset into account as it moves the tool according to the part program.
The x and y locations of the workpiece are only part of the story, though. The machine also needs to know where the top of the part is (Z0). Most shops determine Z0 by touching off each tool to the top of the workpiece. This gives each tool a negative offset that's equal to the distance from the tip of the tool to the top of the workpiece.
This tool-setting method works fine until it's time to start the next job. If the next part to be machined is not the same thickness as the previous part, for example, you will have to touch off all your tools again. You could also manually adjust all of the tool-length offsets, but this would entail adding or subtracting the difference in part thickness to each offset.
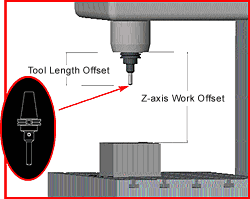
An alternative to all this extra work is to establish a z-axis work coordinate for each workpiece. This is accomplished by determining the distance from the face of the spindle to the top of the workpiece. To measure this distance, bring the spindle face down to the top of the workpiece, record the machine coordinate value and place this value in the appropriate z-axis work offset (Figure 2).
 Figure 2: Z-axis work offsets are the distance from the face of the spindle to the top of the workpiece. Tool-length offset is the distance from the gage line of the toolholder to the tip of the tool.
Using the z-axis work coordinate this way lets the spindle face serve as a known reference plane that doesn't change from job to job. Once this is done, you will no longer have to touch off each tool individually every time you set up.
However, it's not always possible to touch off the workpiece with the spindle face. Your spindle may not reach the top of the workpiece, or the spindle's drive lugs may prevent you from touching the part with the actual spindle face. There are several solutions to these problems.
The simplest is to set a spacer of a known length on top of the workpiece and touch the face of the spindle to that. Then, shift the z-axis work coordinate down by the length of the spacer. A 4" gage block makes a fine spacer (if you can sneak one out of inspection). A 1-2-3 block can also be used, as can commercially available electronic indicators designed specifically for this task.
A simpler alternative to adjusting the z-axis work offset is the workshift. It is usually referred to as the 00 offset, with G54 being the 01 offset, G55 the 02 offset and so on. In other words, it is the work offset immediately before G54 in the offset table.
The workshift usually appears on the same screen as the work coordinates and looks like just another offset. In a way it is, except any value plugged into it shifts all of the work coordinates.
So instead of adjusting the work offset by the gage-block value every time you set up a job, the workshift allows you to enter the shift amount once and forget about it. This is a convenient feature, especially if you are using multiple work coordinates. Another benefit is that you can temporarily "zero" the workshift and prove out your programs well above the workpiece.
Tool-Length Offsets
Now that you have found the z-axis work coordinate, you need to consider tool length. Since each tool is a different length, it will need a unique offset. When using a z-axis work offset, tool-length compensation is probably defined differently than you are accustomed to. It is the distance from the gage line of the toolholder to the tip of the tool. By measuring tool length from the gage line, a presetter is able to determine a length independently of the machine or work-coordinate systems.
This brings up another good reason to use a presetter. Since the presetter measures the distance from the gage line of the toolholder and the gage line is where the toolholder taper and spindle face meet, this now means that the tool length (H value) equals the amount that the tool sticks out of the spindle. This fact makes it easy to double-check the tool-length offset by holding a machinist's scale against the face of the spindle. The measurement you get here should equal the offset you have entered into the machine control for a specific tool.
Once you have input the tool length into the appropriate offset table in the machine control, the G43 command uses it to determine tool-length compensation. G43 reads the value specified for the offset and adds it to the current machine position. The machine shifts the tool down toward the workpiece if the specified value is negative and away from the workpiece if the value is positive.
G43 uses an H code to specify the tool-length offset used, which usually corresponds to the tool number. For example, if Tool 1 were in the spindle, the program would read G43 Z.1 H1. This command would drive Tool 1 to a position 0.100" above the part while allowing for the amount specified by Tool-Length Offset 1, or H1. If the offset were 5", for example, the machine would shift the current coordinate system up by 5" prior to moving the tool to Z.1.
Briefly, the process requires you to:
-
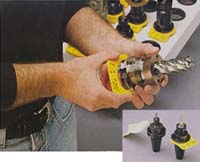
Measure the distance from the gage line of the toolholder to the tool tip. Once you've clamped the tool in the holder, load the toolholder into the presetter. Then measure the distance from the face of the tool fixture, which should be at the same level as the gage line, to the tip of the tool. Record this measurement on a piece of paper and impale it on the tool. You can also use a commercially available tag that attaches to the toolholder (Figure 3).
 Figure 3: Pertinent tool-setting data can be recorded on commercially available tags that attach to toolholders.
 - Determine the z-axis work coordinate. After the x and y work coordinates are determined, measure the distance from the face of the spindle when the z-axis is at reference zero to the top of the workpiece (Z0). If you can touch the spindle face directly to the top of the workpiece, enter this value in the appropriate work coordinate. Otherwise, touch the spindle face to the top of a gage block or electronic gage and adjust the work offset accordingly.
- Enter the offsets—correctly. This may seem obvious, but a simple mistake like transposing a digit or dropping a decimal point can make for a really bad day. Although it is beyond the scope of this article, be aware that there are alternatives to manually entering these offsets. They include Custom Macro-Programming and Programmable Data Input (the G10 command).
Confused? Remember that:
-
All tool-length offsets should have a positive value, equal to the amount the tool sticks out of the spindle.
- All three work coordinates (x, y and z) should be negative. These work coordinates are the distance from machine zero to part zero.
- The z-axis workshift should also be negative. This value is the same as the length of the standard (gage block) used when touching off the spindle face.
Need for Presetters
Your goal when setting tools offline is simply to find the distance from the gage line to the tip of the tool (H value). This can be accomplished with presetters of varying sophistication.
Commercial units are expensive, with prices starting at about $5,000. These products come with a lot of nice features, though. Many of the models available today offer a computer interface, printing capability and a function that permits diametric measurements of cutting tools. It may be difficult to justify spending thousands of dollars on one, though, especially if you're just starting out. If you can live without some of the bells and whistles, there are alternatives.
Offline tool setting in its simplest form can be accomplished with a height gage and a surface plate, as long as you always use the same fixture to hold the tools. The fixture can be purchased or homemade, but it must be the same shape and have approximately the same dimensions as your machine spindle.
If you aren't prepared to spend a lot of money on a presetter, build your own. With the right equipment and a little ingenuity, any shop can make a homemade presetter for less than $500 (see sidebar below).
For that price, almost any shop can—and should—consider measuring tool-length offsets offline. Machining centers cost too much to sit idle while tools are being set.
Offline tool setting can offer many benefits to a machine shop: quicker setups, more uptime and fewer crashes due to improperly set tools. In short, it can make any company more profitable and more competitive.
About the Author
Kip Hanson is general manager and manager of quality at Allen Co., Edina, Minn.
Presetting on the Cheap
If you aren't prepared to spend a lot of money on a presetter, you can make your own. The shop I work at, Allen Co., did just that.
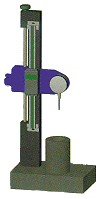
 Allen Co. built a presetter with a dial indicator, a 12" glass scale and some items it had laying around the shop.
Like many small shops, we needed to cut setup times. We weren't convinced, however, that spending thousands of dollars on a tool presetter was the answer. So we decided to make our own.
We used a dial indicator from the inspection department, a 12" glass scale ordered from a local distributor and some odds and ends from around the shop. The glass scale was attached to an aluminum post, which was bolted vertically to a base plate. The scale came with a bolt-hole pattern on the back of the reader head, making it easy to mount a travel indicator for touching off the tools.
The presetter, though crude, was a success. It allowed the machining center to continue making parts while the machinist measured the tools for the next job. The machinist simply sets the tools in a tightening fixture on the presetter base, zeroes the indicator on the face of the fixture and measures the tool length. Each machine has an edge finder, which is measured in the same fashion. The tool length for the edge finder is stored in the z-axis workshift.
After a brief learning period, our machinists quickly became accustomed to the convenience of measuring tool lengths at their workbench instead of leaning into the machine. Crashes due to improperly set tools are a thing of the past.
The next step was to design a better presetter. We made use of our solid-modeling software, SolidWorks, to design the next one. The second-generation presetter includes a quick-release mechanism for sliding the carriage up and down and a vertical fine adjustment used for dialing in the tools. We also added a larger tip to the dial indicator, as machinists sometimes found it difficult to line up the end of the tool with the indicator using the first presetter. The second presetter cost under $400.
For our next presetter, we plan to incorporate a printer output on the glass scale for recording tool measurements. And maybe even add a motorized z-axis so machinists don't have to work so hard. It doesn't hurt to dream.
—K. Hanson


