Vital Signs
Vital Signs
How to recognize the signs that lead to bandsaw breakdowns.
Recognizing the signs that lead to bandsaw blade breakdowns.
After a hard day of cutting, some bandsaw blades look worse than others do. And though we all know appearances can be deceiving, bandsaw blades generally are not deceitful. So when cutting goes awry, look to your blade to find the reason.
Learn to recognize what the visible signs indicate about machine setup and material positioning. Then make the necessary adjustments dictated by those signs. You'll prevent problems from recurring and benefit enormously from your renewed sawing efforts.
Start by taking care of your sawing equipment. Although equipment maintenance might not sound exciting, the results will be. You'll save money on saw blades and machine repairs. You'll also save yourself the exasperation of trying to revitalize a blade with worn or stripped teeth—or worse.
Key to bandsaw blade nomenclature: 1. Blade Back: body of blade, excluding tooth portion. 2. Set: Bending of teeth to left or right to allow clearance in cut. 3. Tooth: Cutting portion of saw blade. 4. Tooth Pitch: Distance from tip of one tooth to tip of next tooth. 5. TPI: Number of teeth per inch. 6. Gullet: Curved area at the base of tooth.
Worse for Wear
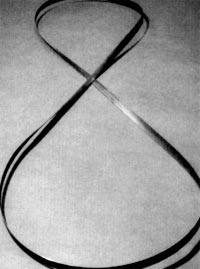
If a band twists into a figure 8 instead of its normal shape when its sides are held together, then blade flatness was altered during use.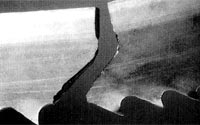
This angular fracture originated in the gullet and immediately traveled to the band backing.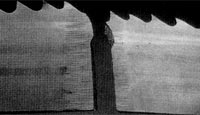
If a fracture breaks at the back edge, a flattened area on the surface of the fracture indicates the origin. Excessive backup-guide preload may have workhardened the back edge and caused the cracking.
Some find the easiest way to deal with bandsaw-blade tooth wear is to declare the cutting tool a "bad blade," replace it and move on. However, it's likely the blade-wear problem will continue after replacement. Your sawing jobs will be more successful if you spend a little time learning the real cause or causes of wear.
Begin with a review of blade break-in. First, check for heavy, even wear on the tips and corners of the teeth. Is the wear smooth across the tips with a rounding on the corners of the set teeth? If so, the wear may be the result of improper break-in.
Blade break-in should be similar to sharpening a pencil. You need to hone the tool steadily. Rushing often results in breakage or uneven wear. Refer to a sawing guide for useful break-in formulas or ask your blade rep to demonstrate proper break-in at your plant. Skipping the break-in procedure altogether is a sure way to minimize blade life.
Other causes of tooth wear are utilizing too high a band speed, which accelerates wear by generating high heat, and a very low feed rate, causing the teeth to rub against the material instead of cutting it. Too low of a feed is a common error on work-hardenable materials such as stainless and tool steels. Keep an eye on the band-tooth tips. Tip discoloration, from excessive frictional heat, may alert you to excessive band speed or an improper feed rate.
A band installed backwards will also wear at an excessive rate. Sound unlikely? It happens more frequently than you might expect and is worth checking.
Chip welding is another source of premature bandsaw wear. If chips are welding to the tips and faces of teeth, check for a worn, missing or poorly positioned chip brush. The brush is designed to clear chips from the work area. A faulty or missing brush causes the blade gullets to fill with material, allowing chip welding to occur. The solution could be as simple as adjusting the brush.
Insufficient gullet capacity from using a blade with too fine a tooth pitch is another cause of filled gullets. For instance, a 10/14 tooth pitch wouldn't be effective for cutting an 8"-dia. piece of steel.
When using a tooth pitch that's too fine to penetrate a particular material, an operator may try to compensate by increasing the feed rate. Doing that generally results in additional problems. An excessive feed rate may lead to the production of chips that are too large for the gullet. This situation is appropriately called "hogging in."
Wear along the entire length of the band is often caused by it unintentionally contacting the machine. For example, heavy wear markings on both sides of the blade teeth can result from broken, worn or missing backup guides. Faulty or missing backup guides allow teeth to come into contact with the side guides. Using incorrectly sized guides for the band's width also promotes contact wear.
You also might notice uneven wear or scoring on the sides of the band. For instance, wear patterns might border the gullet area on one side and be present along the back edge on the opposite side.
Like many wear marks, these may be caused by the side guides. Check first for loose, chipped, worn or defective guides. Additionally, chips can accumulate in the side guides, so make sure they're clear.
Heavy wear or swaging on the blade's back edge and/or corners may give the blade a polished appearance or wear abnormal grooves into its surface. The marks also may result from an excessive feed rate or backup-guide "preload," which occurs when the machine is left idling too long and the blade rides heavily against the backup guides. Avoid an extreme feed and preload and you'll avoid these markings.
Improper band tracking can happen when the blade's back edge is rubbing heavily on the wheel flange. Check for worn or defective backup guides.
Marks on the blade also may indicate that the operation has an inadequate amount of cutting fluid or an incorrect fluid-to-water ratio, either of which can cause near-dry sawing that will lead to blade damage. The proper ratio is 10 parts fluid to 1 part water.
Distortion
Learning to "read" the signs on a bandsaw blade will help extend its life.
Blade distortion is a serious problem, because it prevents the continuation of cutting. A distorted band is called "long" on the tooth edge when the teeth are on the outside of the arc made by a blade lying on a flat surface. A band is called "short" on the tooth edge when the teeth are on the inside of the arc. A straight band will not arc.
A long arc may be caused by tight side guides rubbing near the gullets, or from an excessive preload condition. Other possibilities include uneven tension from worn band wheels or an excessive feed rate. A short arc can result from tight side guides rubbing near the blade back edge, an excessive feed rate or worn band wheels.
Anything that causes body breakage also can cause butt-weld breaks.
Either type of distortion can occur if the guide arms are spread to their maximum capacity. If the components are all in good working order, check the band tracking to determine if the back edge is rubbing heavily on the wheel flange. Adjust the wheel if necessary.
An extreme example of blade distortion is caused by excessive band tension. It is easy to identify. If a band twists into a "figure 8" instead of returning to its normal shape when its sides are held together, then blade flatness was altered during use.
Band Breakage
Most causes of tooth wear eventually cause tooth breakage. The problems previously mentioned relating to blade break-in, chip brush and tooth pitch cause sections of teeth to break away from the band backing.
The shape and composition of the material being cut determines proper tooth pitch. A tooth-selection chart is a handy reference for pinpointing the proper pitch for a specific job.
Incorrect tooth pitch is not the only reason that teeth break. Opening a packaged or folded band incorrectly can also cause it to break. So can excessive feed rates or feed pressures, poor positioning, movement or vibration of the material being cut, hard spots in the material and too slow a band speed for the material grade.
A fracture that originates in the gullet and immediately travels in an angular direction to the band backing may be from an excessive, twist-type of stress. Guide arms spread to capacity cause an excessive twist from the band wheel to the guides. Guide arms spread too wide when cutting small cross sections also can cause the blade to twist. Another possibility is the ever-present threat of excessive backup-guide preload.
If a fracture breaks at the back edge, the worn area around it indicates the origin. Again, excessive backup-guide preload may be the problem. Preload will workharden the back edge and cause cracking.
Additional causes of breaks could be an excessive feed rate, blade back-edge rubbing on the wheel flange, worn or defective backup guides, improper band tension or even notches in the back edge caused by damage during handling.
The butt-weld break is another type. To determine if the band broke at the weld, inspect the sides at the fracture for grind markings from the weld-finishing process. Keep in mind that anything that causes body breakage also can cause butt-weld breaks.
Remember, too, that most of the problems that lead to bandsaw wear and breakage are equipment-related. Learning to "read" the signs on your blade is the first step in correcting these types of problems.
About the Author
Ann Marie Rooke is communications coordinator for American Saw & Mfg. Co., East Longmeadow, Mass.