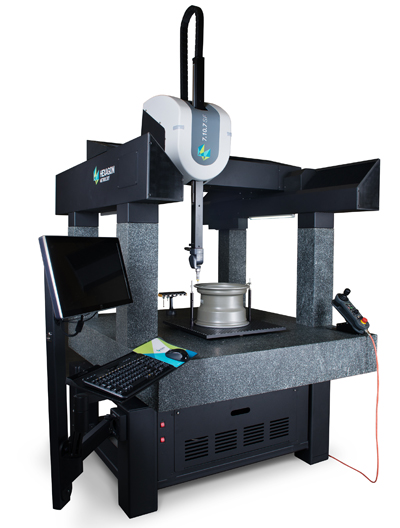
7.10.7 SF Coordinate Measuring Machine
7.10.7 SF Coordinate Measuring Machine
Hexagon Metrology announced the launch of the 7.10.7 SF, a new generation of shop floor coordinate measuring machines (CMMs) specially designed to excel in harsh industrial environments.

Hexagon Metrology announced the launch of the 7.10.7 SF, a new generation of shop floor coordinate measuring machines (CMMs) specially designed to excel in harsh industrial environments. The new product line introduces significant advancements based on decades of experience, the implementation of thousands of shop floor machines, and the support of those CMMs in the field worldwide. The 7.10.7 SF offers distinctive usability enhancements aimed at making the CMM more convenient and productive for manufacturing operations. The 7.10.7SF is available immediately worldwide.
The 7.10.7 SF's computer, controller, and interface boxes are housed in one self-contained unit for easy transport on the shop floor. The CMM has a measuring stroke of 710mm x 1010mm x 680mm, and uses standard 110/220 volt single phase outlets with no need for shop air. A major new feature is the integrated and flexible part fixture system enabling customers to locate up to four 300mm x 300mm fixture plates or one 500mm fixture plate on the table. Using a unique kinematic locating system, the fixture plates can be quickly loaded and unloaded, allowing users to swap individual parts or part types in a matter of seconds.
"The 7.10.7 SF is our new generation offering in the SF series, and a natural progression from the original 4.5.4 SF design and its quantum leap in CMM usability," said Eric Bennett, product manager of bridge CMMs from Hexagon Metrology. "The 7.10.7 SF continues the trend of pushing dimensional inspection from the quality lab to the shop floor so inspection becomes simply another operation in the manufacturing process. Our attention to detail and focus on usability has resulted in a CMM with great value and exclusive benefits for our customers."
Other user experience improvements include fully integrated workspace lighting and message lighting. The workspace lighting feature fully illuminates the measurement volume addressing the concern that a poorly lit measurement volume is a major impediment to productivity. Message lighting on the CMM's Z-axis cover displays the status of inspection operations on the shop floor, and eliminates the need to "baby sit" the CMM. Status lights visually indicate when the inspection process is complete, whether a part passed or failed, or if an unexpected problem occurred during the operation.
PC-DMIS Touch, an optional software feature on the SF series, features an intuitive touch screen interface that expedites measurement tasks and creates, selects and launches inspection programs. Shop floor personnel do not require CMM expertise to inspect parts using PC-DMIS. With a few selections on the touch screen, PC-DMIS Touch graphically guides users through part setup and measurement, and then produces concise, meaningful reports for immediate action.


