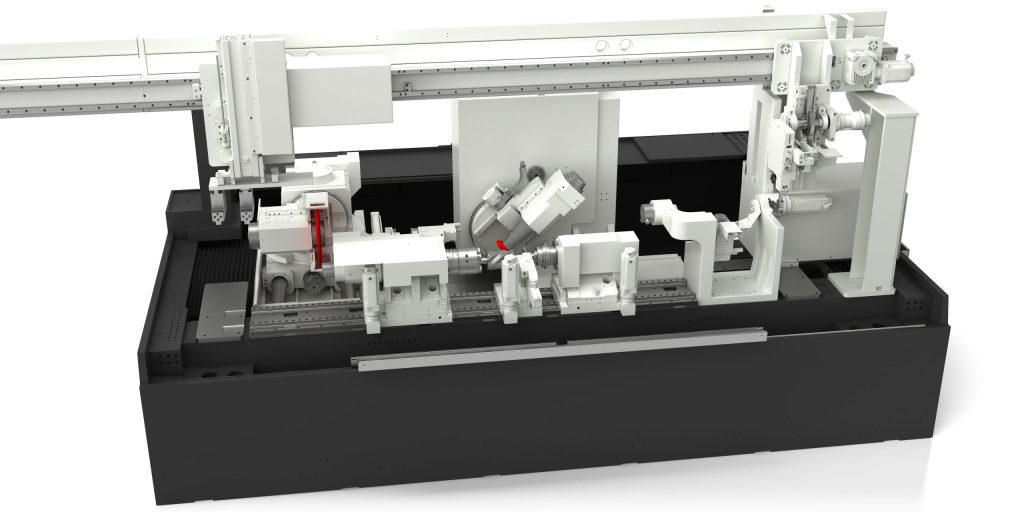
JUMAT 6L 40-30 Grinding Machine
JUMAT 6L 40-30 grinding wheel or other abrasive tool for the purpose of removing metal and finishing workpieces to close tolerances. Provides smooth, square, parallel and accurate workpi…" title="Powers a grinding wheel or other abrasive tool for the purpose of removing metal and finishing workpieces to close tolerances. Provides smooth, square, parallel and accurate workpi…" aria-label="Glossary: grinding machine">Grinding Machine
Junker demonstrates its pioneering spirit to use complete machining in rotor production. The JUMAT 6L 40-30 grinding machine works on complex workpiece geometries for rotor pairs in profile and Quickpoint machining in a single clamping process.

Junker demonstrates its pioneering spirit to use complete machining in rotor production. The JUMAT 6L 40-30 grinding wheel or other abrasive tool for the purpose of removing metal and finishing workpieces to close tolerances. Provides smooth, square, parallel and accurate workpi…" title="Powers a grinding wheel or other abrasive tool for the purpose of removing metal and finishing workpieces to close tolerances. Provides smooth, square, parallel and accurate workpi…" aria-label="Glossary: grinding machine">grinding machine works on complex workpiece geometries for rotor pairs in profile and Quickpoint machining in a single clamping process.
Junker combines the individual machining steps for rotor pairs, whether pre-assembled or cast, in a single machine. Complete machining on the JUMAT 6L 40-30 shortens auxiliary process times, reduces the operating workload, improves quality and increases the efficiency of the end product. Air and gas compressors, expanders and vacuum and fl uid pumps use the rotor pairs. The JUMAT 6L 40-30 grinds rotors with a length from 200 to 650 mm and a swing diameter of up to 190 mm.
The rotor grinding machine processes and measures the workpieces and compensates for deviations from the nominal geometry – all in a single machine. The resulting repeat accuracy means that the rotor pairs are perfectly coordinated. The grinding operations comprise rough grinding the profile, grinding the OD and flat shoulders in a Quickpoint process and subsequently finishing the screw profile. Subsequently brushing the workpiece in the same
clamping setup is an additional option. The wheelheads for the Quickpoint and profile grinding include an integrated, automatic, dynamic balancing system and a proximity sensor. The Junker quality hallmarks for which the company is known are also present in the new machine concept in elements such as the sophisticated operating concept and highly stable machine bed.
Thanks to the fully toolchanger/" data-glossary-id="142091" data-glossary-teaser="Mechanism typically included in a machining center that, on the appropriate command, removes one cutting tool from the spindle nose and replaces it with another. The changer restor…" title="Mechanism typically included in a machining center that, on the appropriate command, removes one cutting tool from the spindle nose and replaces it with another. The changer restor…" aria-label="Glossary: toolchanger/" data-glossary-id="142091" data-glossary-teaser="Mechanism typically included in a machining center that, on the appropriate command, removes one cutting tool from the spindle nose and replaces it with another. The changer restor…" title="Mechanism typically included in a machining center that, on the appropriate command, removes one cutting tool from the spindle nose and replaces it with another. The changer restor…" aria-label="Glossary: automatic toolchanger">automatic toolchanger">automatic toolchanger with up to 20 different tools and inclusive, independent data management, the machine operator no longer needs to manually fit and remove the tools for profile grinding, including the associated cooling and rinsing nozzles, during the retooling process.
The machine concept comes equipped with a 3D scanning measurement process that determines corrections without the need for an external measuring machine and optimizes the machining parameters in a single work step. The result is a stable, enclosed process that leads to significantly better grinding results with current profile shape accuracies of +/-3 μm in practice.
What's more, the machine can execute a range of simulations in advance, for example the dressing path and the corresponding diamond wheel geometry as well as the effect of changes to the grinding wheel profile on the workpiece.
Other rotor grinding machines measure the profile and gradient progression of an already-ground workpiece after the workpiece arrives at a measuring machine. The corrections determined on the basis of the measurement protocol are then read in, so that the workpiece can be ground again. This process repeats until the desired result is achieved – a quite costly and time-consuming process that the Junker machine renders unnecessary.
The new profile scan process by Junker, in contrast, makes it far quicker to perform the grinding, measuring and correcting steps in a single clamping process. In addition, users can save valuable time since the ceramic-bonded CBN grinding wheel is correspondingly dressed and the workpiece is ground again without requiring another clamping process. Scanning the gradient progressions directly into the machine makes it possible to compensate for and correct errors in concentricity, infeed and outfeed.
The machine concept is rounded off by a fully integrated, internal loading gantry, which takes on the task of frictionless workpiece handling within the machine and the option to transfer the finished parts outside the machine. The loading gantry can be retooled for a new workpiece confi guration effortlessly using the quick-release
fastener.


