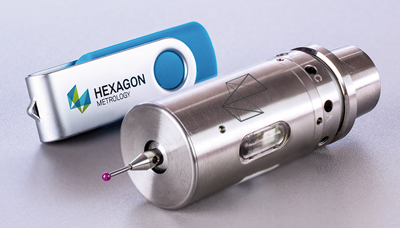
m&h IRP40.50 Infrared Touch Probe
m&h IRP40.50 Infrared Touch Probe
Hexagon Metrology announced the availability of the m&h IRP40.50 infrared touch probe for the North American market.

Hexagon Metrology announced the availability of the m&h IRP40.50 infrared touch probe for the North American market. The IRP40.50 is ideal for inspection in tight spaces, and was designed to address the needs of miniature machining centers. The m&h IRP40.50 is a small self-contained wireless CNC probe with a diameter of 25 millimeters, a length of 44.2 millimeters without shank and stylus, and a probing force of 0.7N (XY). The probe's small dimensions enable measurement of small and delicate workpieces. With the shank and stylus included, the IRP40.50 is slightly larger than a standard USB stick. Typical applications for the probe include micro-manufacturing in the firearms, medical, dental, additive manufacturing and electronic industries or any manufacturing which involves small parts with complex geometries and tight tolerances.
Small parts with tight tolerances are difficult, if not impossible, to measure because there is little room in the Z-axis direction and the tool magazine. The IRP40.50 eliminates this concern and leaves enough room to measure in the Z-axis without the danger of collision. The stylus threading is M2 but allows fast probe cycles at speeds up to 2,000mm/min.
"The IRP40.50 works with PC-DMIS NC-Gage v2.1, the revolutionary software that simplifies CNC probe operations into simple, user-friendly instructions that any operator can understand. The probe was designed to inspect and correct the machining process before a bad part can be made," states Adrian Johnson, Business Manager of In-process Inspection. "The IRP40.50 is able to inspect parts that were once considered too difficult or too small to inspect on machine tools. The miniature touch probe enables in-process measurement to drastically reduce scrap and rework."
Even with its small profile, the IRP40.50 has proven high data rate (HDR) infrared transmission. This feature guarantees that only the system's own signals are processed, and disturbances caused by extraneous light are ignored. Newly developed electronics in this mini-probe enables them to use less energy, providing 400 hours of continuous run time.


