Modular Reference Frame
Modular Reference Frame
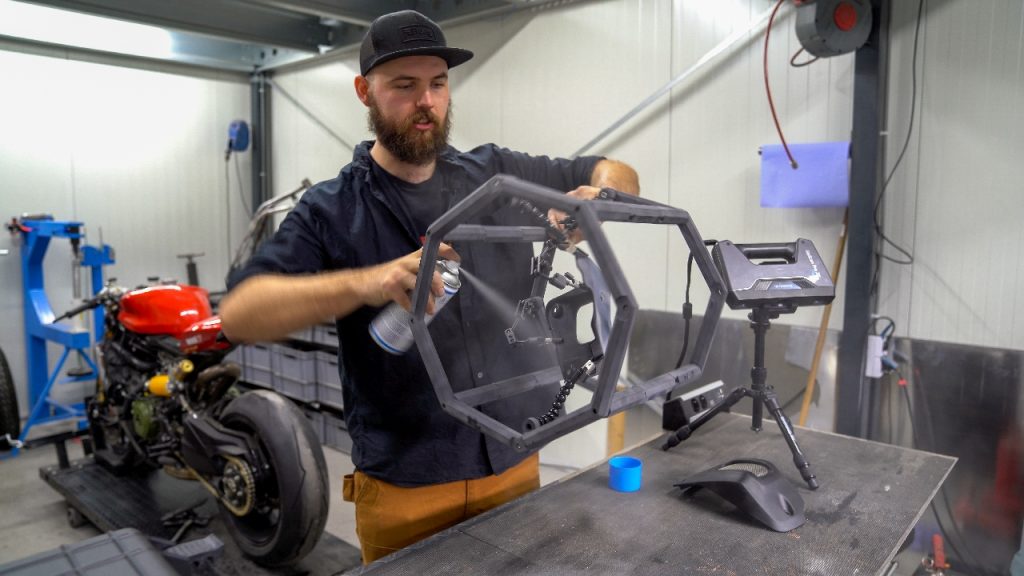
The height of the frame is based on the size of the part. The components present in the set permit a maximum set-up height of 300 millimetres. With add-on sets, the frame height can be extended in increments of 100 or 200. The part to be measured is held within the frame by hinged brackets.

If component parts are to be measured all the way round, specialised equipment is needed. For small parts, fixed, customised devices are often too pricey. That's why there is now a modular reference frame available which, in combination with reference markers and a scanning spray, offers a suitable alternative.
Reference frame holds small parts
The modular frame from AESUB consists of approx. 30 individual components from which a measuring device with a diameter of 200 or 300 millimetres is assembled within just a few minutes. Its constituent elements are black and hence ideal for scanning tasks. They are produced from aerospace material and are only half the weight of comparable aluminium components. Thanks to additive manufacturing, the plug-in and screw connections are directly integrated, which means that the components can be screwed or fitted together without the need for tools. The set is housed neatly in a carrying case. It saves space and is particularly suitable for mobile use.
The height of the frame is based on the size of the part. The components present in the set permit a maximum set-up height of 300 millimetres. With add-on sets, the frame height can be extended in increments of 100 or 200. The part to be measured is held within the frame by hinged brackets.
Reference points on the frame - 360° measurement in one go
For orientation purposes, most scanners require 'reference points' which are generally glued directly onto the parts. But depending on the nature of the surface, removing them may be problematic and may damage the part. With larger parts, there is the risk that individual points are missed.
With the reference frame, it is no longer necessary to glue the parts because the points are applied directly on the frame. Hence they can also be used as a reference for all further parts.
By means of the reference frame and the points, the dimensions of the part can be captured in one all-round scan – rapidly and precisely.
AESUB – the spray for scanning black and shiny parts
Since the contours of black parts are barely visible, scanners often find them hard or impossible to detect. Equally difficult is the measurement of shiny and reflective parts. With transparent surfaces, the scanner light is not reflected by the part but passes through the surface. Hence the structure cannot be captured.
Reflective surfaces are similarly problematic as they don't reflect the light but focus it. And the surface structure is also crucial to the measurement result. For example, big indentations cause reflections on the walls, thereby influencing the light pattern. The interference manifests itself in the scan as "artefacts" or inaccurate data.
To ensure error-free data collection, shiny, reflective or black parts are prepared prior to the scan. A scanning spray is the easiest way to do this.
However, the disadvantage of many conventional scanning sprays is that they contain pigments and also titanium dioxide, which a health hazard and is reputed to have carcinogenic effects, for example. More and more companies are stopping their use of conventional sprays.
A further shortcoming is that the spray layer sticks stubbornly to the surfaces and is difficult to remove. It's not uncommon for parts to be damaged or even become unusable from being cleaned.
With these newly developed scanning sprays from AESUB, these disadvantages are a thing of the past. They contain no pigments, and there is no risk from titanium dioxide. What is more, the applied layer evaporates automatically, meaning that no cleaning of the measured objects is needed.
After spraying, a homogenous white layer is generated within a few seconds, which produces high contrast values on the surface. The scanner can now detect the structure without a problem. The layer thicknesses of the AESUB spray are between 1µ and 15µm. The matting layer is touch-dry, which means that the parts can also be handled and repositioned during the scanning process. The sublimation times of the AESUB sprays vary between four and twelve hours depending on the spray variant.
AESUB spray and dots
The AESUB spray and dots are a handy addition to the reference frame. The reference points can be placed on the object to be measured both before and after spraying with the AESUB scanning spray. The reference points stick to the spray layer and can be easily removed.


