ZEISS ROTOS Roughness Sensor
ZEISS ROTOS Roughness Sensor
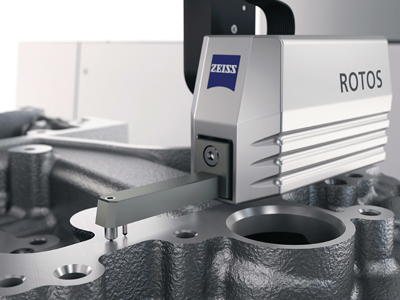
The ZEISS ROTOS roughness sensor enables the standard-compliant measurement of roughness and waviness on a single coordinate measuring machine (CMM).

The ZEISS ROTOS roughness sensor enables the standard-compliant measurement of roughness and waviness on a single coordinate measuring machine (CMM). Therefore, all features of a technical drawing can be fully captured with one CMM and displayed in one report. It is no longer necessary to transfer a workpiece to a surface measuring instrument. Various measuring positions can be reached without rechucking and a fully automatic run is possible without the operator influencing the surface measurement.
The roughness sensor enables a new, simpler workflow in quality assurance and is particularly suitable for the quality inspection of powertrain components. "ZEISS ROTOS creates true added value for customers: the simplified workflow provides more measuring certainty and enormous time savings," says Dr. Dietrich Imkamp from ZEISS Industrial Metrology business group.
ZEISS ROTOS is intended for users that inspect size, position or form on a coordinate measuring machine and also need to measure roughness and waviness on the same workpiece. Instead of clamping the workpiece on a contact stylus instrument, ZEISS ROTOS is used via the stylus changer interface on the probe of the CMM – under full CNC control. The plus for users: this takes just a few seconds compared to the previous several minutes. "Because it is no longer necessary to transport and clamp the part, the susceptibility to errors throughout the process and operator influence are eliminated," states Dr. Imkamp.
ZEISS ROTOS can be positioned flexibly to reach most surfaces on a part without rechucking. Furthermore, the sensor features a rotating/tilting axis. The rotary axis can turn a full 360 degrees. The sensor can be tilted perpendicularly via the tilt axis to provide a tilt range of 160 degrees.
ZEISS ROTOS is connected to the measuring machine via the ZEISS VAST line of active probes, which dampen interferences from the machine and environment, and also determine the measuring position. Measurement data from ZEISS ROTOS is transmitted via Bluetooth to the analysis computer. The data is then imported into ZEISS CALYPSO software and can be exported with other measurement data in a common report.
In short, the three key benefits of a workflow with ZEISS ROTOS are: improved measuring productivity, reliable and fully automatic measuring runs, and the common report. They are based on the seamless interaction between the sensor, measuring machine and software.
ZEISS ROTOS, the new roughness sensor, is compatible with the ACCURA and PRISMO CMMs from ZEISS Industrial Metrology.


