

Avoiding machine crashes, part 2
Presented this month are more programming tips to help prevent machine tool crashes.
Presented this month are more programming tips to help prevent machine tool crashes:
■ Reduce the “rapid” speed (G00) during setup and debugging by activating a lower rapid-speed percentage button. This is a precaution that gives you more time to hit the feed-hold button if something doesn’t look right. I often use these lower percentages during setup and debugging, especially when machining expensive parts.

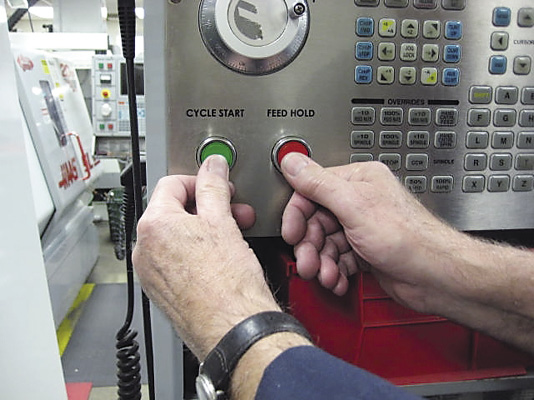
A machinist should toggle between the cycle-start button and the feed-hold button as the cutter approaches the part. If there is a programming error, the machinist is in a good position to catch the error before any material is cut. All images courtesy J. Harvey.
■ For first runs and debugging, toggle between the cycle-start button and the feed-hold button on the controller as the cutter approaches the part. It is difficult to see where a cutter is in relation to a part when the spindle is at machine Z zero (retracted). The closer the cutter gets to the part, the easier it is to see the relationship between the part and cutter. Sometimes I toggle half a dozen times when a cutter is on its way down, especially when engraving expensive mold cavities.
■ Insert M1 optional-stop commands in the program before each tool change. For first runs and debugging, it is useful to have the optional stop activated so you can be at the machine when a new tool is actuated. Often, the first few moves a new tool makes will let you know if there is a problem. Once you determine all tools are running OK, you can deactivate the optional stop button and start running.
■ Clamp large remnants in place or remove them so they can’t fall behind the machine table. One time I screwed up one of the back-column sheet metal covers on a machine because I failed to remove a remnant that had fallen behind the machine table. When the table moved toward the column while a program was running, the remnant got jammed between the machine table and the cover, which destroyed the cover.
Review the print ads from this magazine to continue
This quick advertiser review unlocks the rest of the article and keeps the full-screen reader focused on the ads instead of the page chrome.
Advertisers included in this article experience
Print placements connected to this article
Hbcarbide
Tired of waiting? Let us help you.
H.B. Carbide has been delivering our full offering of carbide preform blanks with shortened lead times for over two decades. - Competitive lead times - Quick quote response - High percentage of on-time delivery - Near Net Shape (minimal grind stock) - CNC controlled consistency H.B. CARBIDE COMPANY Subsidiary of Star Cutter Company.
Tired of waiting? Let us help you. H.B. Carbide has been delivering our full offering of carbide preform blanks with shortened lead times for over two decades. - Competitive lead times - Quick quote response - High percentage of on-time delivery - Near Net Shape (minimal grind stock) - CNC controlled consistency H.B. CARBIDE COMPANY Subsidiary of Star Cutter Company
Visit Hbcarbide View this placement in the issue recordPrint ads from this magazine
H.B. Carbide has been delivering our full offering of carbide preform blanks with shortened lead times for over two decades. - Competitive lead times - Quick quote response - High percentage of on-time delivery - Near Net Shape (minimal grind stock) - CNC controlled consistency H.B. CARBIDE COMPANY Subsidiary of Star Cutter Company.
Tired of waiting? Let us help you. H.B. Carbide has been delivering our full offering of carbide preform blanks with shortened lead times for over two decades. - Competitive lead times - Quick quote response - High percentage of on-time delivery - Near Net Shape (minimal grind stock) - CNC controlled consistency H.B. CARBIDE COMPANY Subsidiary of Star Cutter Company
Continue reading
March 2016
■ The pilot hole for a reamer has to be drilled deep enough so that the reamer won’t jam against the bottom of the pilot hole. When you ream blind-holes, it is a good idea to check the program at the machine to make sure pilot holes are drilled deep enough to avoid this interference.
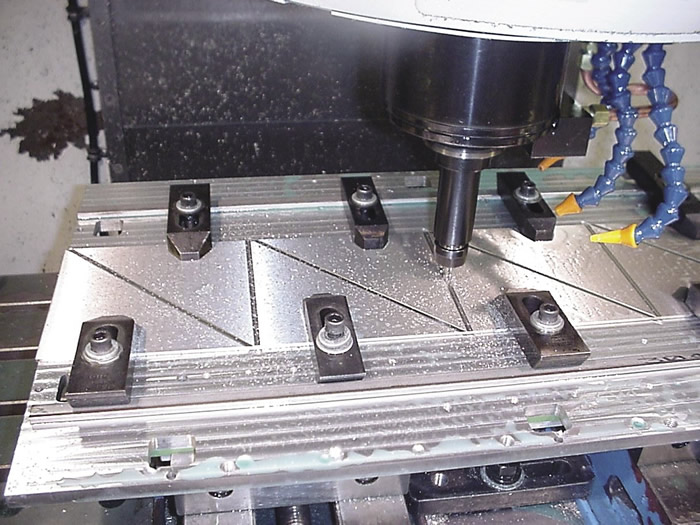
Tie-down clamps are something that a tool can easily run into. When using tie-down clamps, program with generous rapid planes.
■ Be extra cautious when using tie-down clamps. Except for simple setups, I try to avoid using tie-down clamps unless I know there is little chance of having a tool run into them. Besides just sticking up in harm’s way, machine operators frequently place the clamps inconsistently. Instead of using tie-down clamps, I prefer bolting parts down. I try to avoid special programing that may be needed to “jump” over clamps. These special programs can be nightmares for someone trying to set up the job at a later date.
■ Be cautious of protruding bolt heads. With bolts, a default rapid plane of 1″ is usually adequate to jump from one location to the next without having to concern yourself with interference—as long as the bolt heads don’t stick up higher than the rapid plane.
■ Manually edit programs to avoid crashing long tools into tall parts. If a tool extends below the top of the part at any time during a tool change, be careful with both your programming and setup. You want to avoid crashing the tool into the part during a tool change. If you are careful, it is possible to work around any possible interference. Remember to move the part out of the way before manually cycling the toolchanger. Then, before running the program, you may need to edit the program manually to move the part out of the way before a tool change.
Glossary terms in this article
Related


Subscribers can use MFGAxis notes, saves and discussion tools with their innoNET account.