Automated inspection takes flight
Automated inspection takes flight
The next generation of in-line inspection instrumentation is in development for aerospace and other industries.
With ongoing development in composite materials, the aerospace industry faces the challenge of finding ways to improve manufacturing processes.
One collaboration is determined to advance a key goal of aerospace manufacturing: automating the inspection of composite assemblies with real-time measurement.
The National Research Council, Ottawa, Ontario, and Fives Machining Systems Inc., Hebron, Kentucky, are partnering to develop the Sentry, the next generation of in-line inspection instrumentation, suitable especially for composite applications in aerospace and other industries.

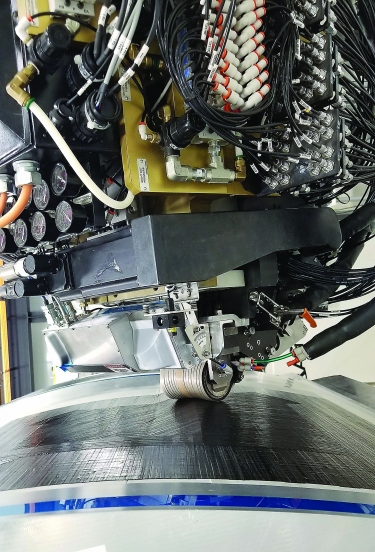
The Sentry enables high-quality, real-time, in-process inspection of composite assemblies. Image courtesy of Fives Group
The Sentry generates a 3D map of the assembly surface. This enables the measurement of gaps and overlaps between fiber tows, the beginning and ending points of fiber tows, and ply angularity; the detection of missing tows; and the capture of any other phenomenon that manifests as a change in surface profile or dimension. The tool eliminates the need for manual inspection, saving up to 30 percent of production cycle time, the partners say.
Existing technology uses line laser triangulation (LLT), which wields the geometry of the beam to capture dimensional information.
"This restricts the effectiveness of LLT to relatively simple surfaces," said Ken Wright, chief technology officer at Fives' metalcutting and composites unit. This approach "fails to capture a high percentage of measurements on more complex surfaces."
In addition, he said, LLT is sensitive to the type of material being measured, because of variations in reflectivity of surfaces that reduce the fidelity of generated images.
A final limitation of LLT is size.
"The technology requires a separate location for the sending and reception of the laser beam," Wright said. "This limits the ability to design a compact unit that can integrate onto the fiber placement device and take real-time measurements."
To overcome all these limitations, the Sentry uses an advanced form of interferometry, which he said has not been deployed previously in these applications.
The Sentry is mounted on the fiber placement equipment just before curing the material. As a result, the tool can take real-time measurements while the fiber is assembled into a structure.
"This provides immediate status of the quality of the process and prevents the creation of scrap," Wright said.
The NRC and Fives say these improved measurements will enable composite manufacturers to shorten their production times and reduce defects.
"We are in discussions for initial deployment right now and are demonstrating it to customers on a placement machine, which is operating in the Montreal area," Wright said.
For more information about the NRC, call 877-672-2672 or visit www.nrc-cnrc.gc.ca/eng. For more information about Fives, call 937-231-0226 or visit www.fivesgroup.com.


