X-ray specs
X-ray specs
X-ray scanning a part with internal features is useful because it creates 2-D images of those features in a nondestructive manner. Industrial computed-tomography, or industrial CT scanning, which is based on X-ray scanning technology, takes it a step further by providing a complete 3-D view for internal and external analysis.
X-ray scanning a part with internal features is useful because it creates 2-D images of those features in a nondestructive manner. Industrial computed-tomography, or industrial CT scanning, which is based on X-ray scanning technology, takes it a step further by providing a complete 3-D view for internal and external analysis.
The 3-D part scans are typically used for part-to-CAD deviation comparison, defect and porosity analysis, internal assembly analysis, first-article inspection layout, verification of key product characteristics and geometric dimensioning and tolerance (GD&T) analysis to meet production part approval process (PPAP) requirements.
"CT scanning is the only technology in the world where you can nondestructively see inside your nonhomogenous part in a full, 3-D volumetric way," said Ben Connors, inspection services manager for North Star Imaging Inc. (NSI), Rogers, Minn., a provider of X-ray and CT scanning services and machines. "If you have an assembled component and need to see inside, that's where CT scanning really shines."
Jesse Garant & Associates Metrology Center provided a brief animated view of various computed-tomography (CT) scanning analysis systems.
Jesse Garant, president of Jesse Garant & Associates Metrology Center, Windsor, Ontario, cautioned that with underpowered systems or unqualified machine operators, assemblies of mixed materials are difficult to scan because of changing X-ray path lengths and the defraction properties of photons. He added that for scanning metal parts larger than 1½ " in diameter, a standard 225kV system is inadequate because it is not able to fully penetrate the part with X-ray beams. Therefore, the CT scanning service company purchased a 450kV cone-beam system for $1.1 million to collect high-quality data and maintain scan accuracies while meeting customers' internal-resolution requirements, according to Garant.

Courtesy of Carl Zeiss Industrial Metrology
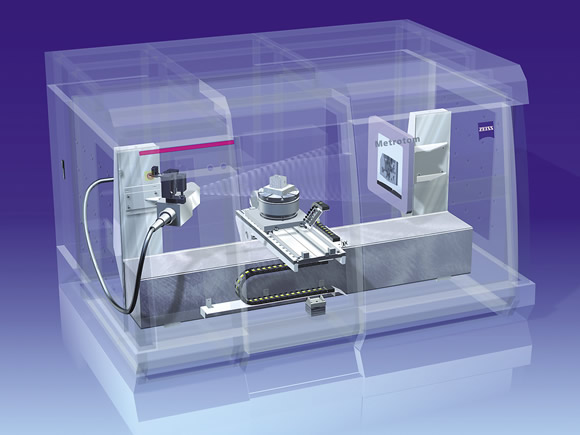
In an industrial CT scanning machine, such as the Zeiss Metrotom, a tube generates X-rays that penetrate a part while it rotates on a stage. An X-ray detector on the other side of the part absorbs and interprets the X-rays.
"Our new system is primarily being used for solid metal parts 5 " in diameter or less or for mixed-material parts 24 " in diameter or less, where clients are seeking an internal resolution of 100µm or less," Garant said.
Connors used the analogy of an airport X-ray baggage scanner to explain the primary benefit of CT scanning. The 2-D X-ray shows, for example, shoes with a carry-on bag but doesn't distinguish whether the shoes are on top, inside or underneath the bag. This is because there is no depth of field, which a 3-D dataset from CT scanning provides. "If you have 50 wires stacked on top of one another, you can't see the difference in each wire until you make a 3-D dataset," he added.
An industrial CT scanner has three basic components: an X-ray tube, or source; a rotary table to manipulate the part being scanned; and an X-ray detector (see illustration above). The tube generates the X-ray energy, which passes through the part as it rotates on the table in increments of less than 0.5°, depending primarily on the scan settings and required resolution, and the detector collects the X-ray data on the other side of the part. Visualization software reconstructs the 2-D X-ray images into a 3-D volume rendering of the internal and external part geometries and enables users to manipulate the data, for example, to peel off and view individual layers of the internal structure.
Picture This
Raghuram Bhogaraju compared CT scanning to a megapixel digital camera. Said the Brighton, Mich.-based applications engineer for Carl Zeiss Industrial Metrology LLC, which has headquarters in Maple Grove, Minn., "The more megapixels you have, the better your ability to zoom in on an image."


Courtesy of NVision
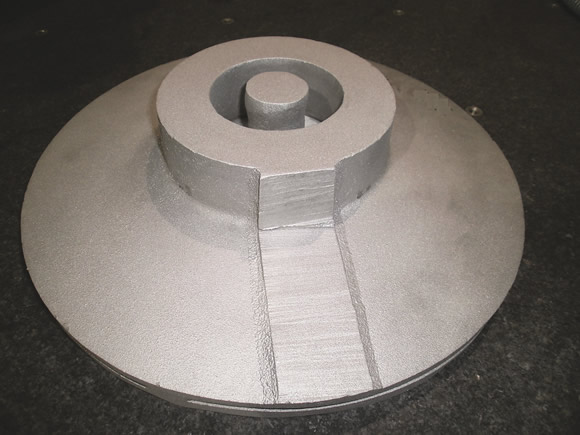
A large enclosed rotor for fluid-moving equipment (top) and the STL (stereolithography) data rendered from a CT scanning of the rotor.
However, instead of a square, 2-D pixel, where image resolution is based on the length of the square, computed tomography creates cubic pixels called voxels, where the size of the voxel is the scan resolution, and the smaller the voxel, the higher the resolution, Bhogaraju explained. "With CT data, you take from 1,000 to 1,200 2-D images and stitch them up into a 3-D dataset as the part rotates on the rotary table, so you end up with a cube and not just a square," he said. "Voxels are the building blocks of the data."
The number of images taken increases to 4,000 when a user heavily oversamples for frame averaging to minimize data stepping, according to Garant.
From the perspective of a metrology equipment builder, Bhogaraju pointed out that the two main aspects of CT scanning are data acquisition and data reconstruction. He added that the quality of the data acquisition is only as good as the quality of the components integrated within the system, and the guide ways, scales, drives, rotary table and controller of the Zeiss Metrotom CT scanning machine are technologies incorporated from Zeiss coordinate measuring machines. "These play a critical role when building a system from the ground up as a measuring machine and not just a system in which you want to look inside your parts for defects like cracks and porosity," Bhogaraju said. "Data reconstruction gives us the ability to take these 2-D images and build the 3-D dataset."
Although no touch probes are involved, Carl Zeiss refers to its CT scanning machines as CT CMMs because the company integrated its knowledge about CMMs, such as drives, accuracies and specifications, into the CT technology, Bhogaraju noted.
He added that because Zeiss CT CMMs import part scan data into the popular Calypso CMM software for manipulation and analysis of measurement accuracy, if someone writes a program to measure a specific part on a CMM using that software, he can use the same program to measure from native CT data-sets. "A lot of times, customers who have Calypso seats will just send us the parts and we will scan them and send the data back," Bhogaraju said.
Carl Zeiss provides scanning services in addition to building expensive CT scanning machines. "I always tell people if you have a half-million-dollar problem, we have a half-million-dollar solution," Bhogaraju said. "If you have a $100 problem, we have a $100 solution as well."
Serving Medical
NVision Inc. is not opposed to supplying customers with CT scanning machines. However, Steven Kersen, vice president of sales and marketing for the Coppell, Texas, company, noted that all of its customers have so far selected scanning services, in part because of the equipment's high cost.
A CT scanning machine starts at about $350,000 to $500,000 and goes to $2 million or more, depending on the requirements, according to Kersen. "If you're running enough parts or using CT scanning in daily inspection, then you would want it in-house," he said.
NVision typically scans parts that range from the microscale to large enclosed rotors for fluid-moving equipment, engine manifolds and engine blocks. The company, which has provided 3-D, noncontact optical scanning services and machines for more than 22 years, is also seeing an increase in medical CT scanning projects for reverse engineering, inspection and measurement.
"Advanced medical technology has created a growing need for ever-more-precise medical component scanning capabilities," Kersen said. "Sometimes there is no other way to check it. CT scanning tells component makers how accurately the parts they made conform to their CAD models."
NVision typically performs CT scanning when a customer's requirements exceed the capabilities of laser scanning. For example, the technology can detect hidden flaws in castings and inspect features that remain obscure with laser scanners.
For small parts that require a high-resolution, high-accuracy scan, Kersen noted lasers are limited compared to CT scanning, which can achieve an accuracy of ±0.0004 ". "That is just incredibly accurate for 100 percent coverage," he said. "Our lasers can still scan the small parts, but if you don't pick up data on specific areas, you can't measure that data."
NSI's Connors pointed out that the major advantage of CT scanning over laser scanning is computed tomography is not concerned about a part's color, transparency or reflectivity, which might require adding a coating of some sort prior to laser scanning and then removing it afterward—a time-consuming and labor-intensive process.
"It's an exciting, fun technology because we get to meet people who have engineered products for 6 months, a year, 10 years and they have never seen inside this way," Connors said. "It's a cool thing to be sitting with a customer as the part comes alive."

Courtesy of NVision
A surgical scalpel is an example of a metal part suitable for CT scanning.
In the medical industry, Connors sees implantable devices as the biggest application for CT scanning because of their complex and critical nature. "Many implants get X-rayed or CT scanned," he said.
Other than an operator or robot placing a part into the CT scanning machine, scanning does not involve touching the part. This is particularly beneficial when working with sensitive medical implants and devices.
Because medical parts often take years to get to market, they typically require inspection throughout the product development process, from prototyping through production. "Judging from the number of inquiries we've received for CT scanning of medical components," Kersen said, "this is a segment of our contract services that will continue to increase for the foreseeable future."
Technology Limitations
CT scanning's abilities to perform metrology applications, inspect for part defects and peer inside an assembled product before and after use to see how internal components react are beneficial, but the technology is not appropriate for all applications. In the world of industrial computed-tomography, everything depends on the combination of part size and material density, according to Carl Zeiss' Bhogaraju.
High-density materials, such as nickel, titanium and gold- and chrome-plated metals, are quite challenging for X-rays to penetrate without losing energy. Carl Zeiss focuses instead on lower-density applications, including thin-wall stainless steel circuit boards, aluminum pistons and magnesium parts that can physically fit inside a machine.
JG&A Metrology Center's Garant explained that X-ray reflectivity is a concern when CT scanning gold, tungsten and platinum coatings or when attempting to achieve an extremely high scan resolution on high-density materials. This is because reflectivity creates shadows in the scan.
According to Kersen, CT scanner energy settings range from about 225kV to 9MeV (megaelectron volt), but if the energy is increased enough to penetrate high-density metals, scatter and meaningless data can result. Problems can also occur when scanning parts made of dissimilar materials, such as plastic and metal. This creates data "noise," or scatter, that makes it difficult to distinguish one material from another.

Courtesy of Carl Zeiss Industrial Metrology
Software aligns the CT scanned part to the original CAD model.
However, filtering algorithms in the visualization software are available to help clean up the noise generated from mixed materials. "That's not necessarily a challenge," Bhogaraju said.
Part size affects not only the ability to accurately scan a part, but also the scan resolution. When scanning the tip of a ballpoint pen, for example, achieving a resolution in the single-digit microns is possible, but the resolution for a 6 "×6 " cube increases to 50µm to 200µm, depending on the material, machine panel resolution and how much of that part a customer wants to see, NSI's Connors explained.
In addition, part shape creates issues because unless it's a perfect cylinder, the part gets thinner or thicker as it rotates, Connors noted. He added that closely examining product details helps reveal the core goal of a CT scan plan or machine.
"We really work on communicating that to our customer base and trying to dig down to the root of what they want to see, why it's important to them, how big the feature size is, how big the defect is and then make a plan to meet that need," Connors said.
Built for Speed
Depending on the application, a typical part scan with conventional computed tomography equipment takes 10 to 90 minutes, whereas an engine block might require several hours. However, builders of CT scanning machines have drastically reduced measurement time.
In 2010, NSI introduced the eXpress-CT inline computed tomography system, which performs complete scans every 6 seconds on a small assembly product, according to the company. The system reportedly provides 100 percent product quality verification on a production line, inspecting almost any small to medium-sized part for defects, such as cracks and porosities, and providing 3-D control of external and internal features. It can be manually operated, automated with robots or a combination of both.
In addition, Carl Zeiss Industrial Metrology plans to offer an inline computed tomography system this year for quickly scanning parts. "It's called Volumax, where the scan time is literally around 10 seconds per part," Bhogaraju said. "We're beta testing it now."
However, the resolution for fast scans is compromised, according to JG&A Metrology Center's Garant. For example, a CT scan that achieves a 50µm resolution on a given part will take 45 minutes, whereas the resolution will be 400µm for a scan that takes 1 to 5 minutes.
Whether a manufacturer is sending parts to a CT scanning service or operating the equipment in-house, potentially on the shop floor, industrial computed- tomography performs nondestructive inspection, metrology and reverse engineering by revealing the entire part picture—inside and out. CTE
About the Author: Alan Richter is editor of CTE. He joined the publication in 2000. Contact him at (847) 714-0175 or [email protected].

Courtesy of NVision
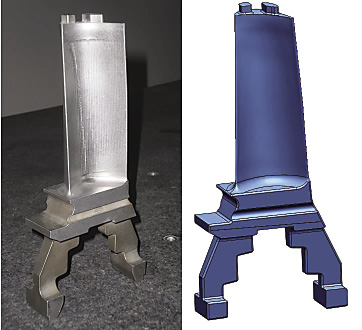
To reverse engineer a turbine blade (left), Power Plant Services produced a digital image of the blade using an NVision HandHeld laser scanner.
Laser scanner cuts reverse engineering time
Turbine parts manufacturer Power Plant Services reverse engineers turbine blades, airfoils and other parts. It also performs repairs on major turbine components for more than 40 utility plants and supplies an array of components and services to the power generation, pulp and paper, petroleum refining and steel industries.
Of the more than 10,000 parts the Melrose Park, Ill., company produces each year, Project Manager Chad Fisher estimates about 45 percent are reverse- engineered. Delivery time is critical because customers often place orders after power generation equipment has broken down, which can cost them hundreds of thousands of dollars per day in lost revenues.
Unfortunately, Power Plant Services found that reverse engineering some parts using a conventional coordinate measuring machine was consuming too much time. Producing a 3-D CAD file from a customer's turbine blade, for example, required 15 hours. That was cut to 6 hours after Power Plant Services implemented an NVision HandHeld laser scanner, which is mounted on a portable CMM.
The shorter scan time allows Power Plant Services to deliver a new blade a day sooner, Fisher noted. "Previously, we used a contact probe to measure part elevations point by point in different cross-sections and entered the measurements in solid modeling software. Then we created lofts between the elevations," he said. "We felt laser scanning could improve on this process by capturing the entire part profile and eliminating the need for measuring elevations and lofting."
According to NVision, the scanning device is attached to a mechanical arm that moves about the object, freeing users to capture 3-D geometry from objects of almost any size and shape. As a part is scanned, the device generates a cloud consisting of millions of points, and integrated software converts the point cloud to an STL (stereolithography) file-format polygon. Data is output to all standard 3-D CAD packages, such as SolidWorks, which Power Plant Services uses.
Power Plant Services evaluated several laser scanners and liked the portability of the NVison unit. Also, NVision provides all the hardware and software for the scanner, which was not the case for its competitors. "We wanted a single point of contact for the hardware and software so we didn't get into a situation where the hardware guy is saying the problem is a software issue and the software guy saying it sounds like a hardware problem," Fisher said.
Fisher noted NVision also provided training, spending a week with the company's reverse engineering group.
Saving time wasn't the only benefit of the laser scanner, he added. "We are also more confident in the results because we get many more points of data than in the past."
Contributors
Carl Zeiss Industrial Metrology LLC
(800) 327-9735
www.zeiss.com
Jesse Garant & Associates Metrology Center
(855) 962-5300
www.jgarantmc.com
North Star Imaging Inc.
(800) 635-8392
www.4nsi.com
NVision Inc.
(972) 393-8000
www.nvision3d.com
Power Plant Services
(708) 345-8600
www.ppsvcs.com


