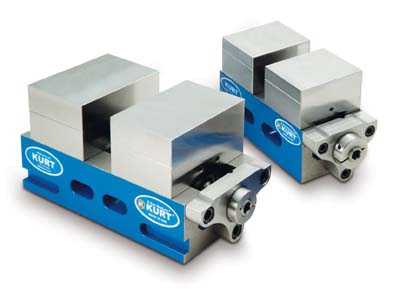
Kurt announces the expansion of its 5-axis vise offering with the addition of two new MaxLock models. These are smaller models with a 2-½ inch and a 4-½ inch jaw width in addition to the present 4 inch jaw width model.
The new, smaller MaxLock models are designed for precision small part machining. They are ideal for clamping parts for continuous 5-axis cutting motion of complex pockets, sculptured and contoured surfaces, and intricate 3-D features with repeatable high precision.
The MaxLock has a self-centering design along with Kurt's patented Anglock feature. They align parts in the vise and reduce part lift to a minimum by pulling parts down and holding them with maximum rigidity for close tolerance repeatability in all axes. Holding parts up to 6-½ inches in length (with machined jaws), these self-centering vise model sizes clamp both OD and ID. They feature an adjustable center line. Their tall jaws provide increased spindle clearance and are machinable to include a "step" for eliminating the need for parallels. The jaws also are reversible, providing even more flexible clamping options.
The two new MaxLock vise models have quick alignment features. They have SHCS for mounting and 5⁄8 inch dowel holes for fast mounting on risers using sine keys. They also feature auxiliary clamping slots for mounting flexibility.
"Kurt's MaxLock has been an overnight success for five-axis machining," reports Steve Kane, global sales and marketing manager for Kurt. "These new model sizes give small part manufacturers using smaller machining centers in the medical, aerospace and related industries additional workholding solutions to fulfill their needs for repeatable accuracy. The timely introduction of these new MaxLock models demonstrate Kurt's commitment and fast response to the needs of the manufacturing marketplace."
Contact Details
Related Glossary Terms
- 3-D
3-D
Way of displaying real-world objects in a natural way by showing depth, height and width. This system uses the X, Y and Z axes.
- centers
centers
Cone-shaped pins that support a workpiece by one or two ends during machining. The centers fit into holes drilled in the workpiece ends. Centers that turn with the workpiece are called “live” centers; those that do not are called “dead” centers.
- clearance
clearance
Space provided behind a tool’s land or relief to prevent rubbing and subsequent premature deterioration of the tool. See land; relief.
- inner diameter ( ID)
inner diameter ( ID)
Dimension that defines the inside diameter of a cavity or hole. See OD, outer diameter.
- outer diameter ( OD)
outer diameter ( OD)
Dimension that defines the exterior diameter of a cylindrical or round part. See ID, inner diameter.
- tolerance
tolerance
Minimum and maximum amount a workpiece dimension is allowed to vary from a set standard and still be acceptable.


