Tiny medical parts, mass-produced automotive components and multiple-ton power generation parts share a common activity: inspection. Generally, inspection is seen as a nonvalue-added activity and most companies encourage the reduction of inspection time. However, because verifying that parts are made correctly is critical to maintaining profitability, inspection will never go away.
Selecting and using the best gage for the job can be a challenge. Accuracy and resolution are often the primary selection drivers. When discussing accuracy, the conversation typically starts with resolution, or the number of decimal places the gage can accurately report. Therefore, resolution often becomes the primary decision driver. Many are familiar with the rule of thumb that’s says a gage should have a resolution that is 10 percent of the tolerance. For example, if the tolerance on a diameter is 0.001 ", the gage would need a resolution of 0.0001 ".
Customer specifications, internal requirements and certifications, however, may override this rule of thumb. Parts with tight tolerances often require gages not capable of 10 percent resolution.

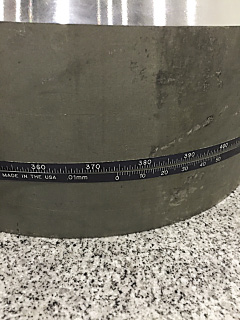
One of the drawbacks to a PI tape, shown here measuring a cylinder, is its Vernier scale, which, in the digital age, is unfamiliar to some.
Accuracy is just as important but is often confused with resolution. Accuracy describes how closely the measurement provided by the gage is to the actual feature size.
Gage repeatability is probably the next most important consideration. Repeatability is a measure of variability in results. Repeatability is determined by a gage repeatability and reliability study, or gage R&R. In this study, several people measure parts with the same gage to determine the amount of variation. Having high repeatability ensures consistent measurement and is a key factor in statistical capability.
Ease of use is often overlooked when selecting a gage. That’s a mistake because if the gage is difficult or cumbersome to use, it will probably be ineffective. It’s important to have the people who will use the gages help evaluate them.
In the power generation industry, parts are large and gaging often involves more than one person. Mitsubishi, for example, began replacing micrometers and calipers with PI tapes for diameter measurements, and the tapes require two or more people. PI tapes are thin, steel bands with graduations across the length and a Vernier scale on one end (see photo on page 36). Their size makes them easy to fit in tight places and measure large diameters. PI tapes often produce more repeatable results simply because they are manageable.
The gage design should also be appropriate for the environment. Micrometers, calipers, indicators and similar devices are relatively sturdy, but need to be kept clean to function properly. In addition, rough handling can knock them out of calibration or damage precision surfaces.
In many production environments, these types of gages may not be appropriate. In places where the same features are being repeatedly measured and the need for actual dimensional data is not required, GO/NO-GO gages are effective. Examples include snap gages, threaded plug gages and pin gages, which are inexpensive, durable and provide simple “good/no-good” feedback. Because they have no moving parts, dropping one probably won’t damage it.
Training on gages is another essential, but overlooked function. Having the right gage operated by an untrained person can be just as bad as having no gage. Results from all gages, no matter how simple, must be interpreted—a capability that comes from training and experience. Proper interpretation of measurement results is critical to a stable manufacturing process.
Machine operators often do not fully understand how to use a gage or have improper instructions, which results in variable measurement data. Trying to solve machining problems with bad or questionable measurements is almost impossible.

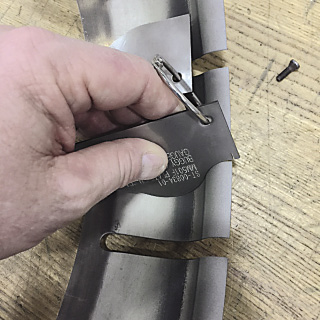
The small slot in the upper edge of this template gage lets the operator determine part length and form.
It’s important to match the measurement complexity to the capability of the gage. When I first started at Mitsubishi, we measured all parts on coordinate measuring machines. While the CMM is a useful tool, it is not appropriate for all measurements. For instance, we form lots of sheet metal parts in the combustion shop and need to verify their shapes. Production time was lost waiting for parts to be measured on the CMMs. The solution was to cut sheet metal GO/NO-GO templates and place them in the forming cells so operators could quickly verify if they had good parts. Templates also allow visual interpretation of a form, which is easier than interpreting a CMM printout.
Having the right gage for the job is vital for successful machining. Carefully consider all factors and try different ones to see which gages are best for your operation. CTE
Related Glossary Terms
- calibration
calibration
Checking measuring instruments and devices against a master set to ensure that, over time, they have remained dimensionally stable and nominally accurate.
- tolerance
tolerance
Minimum and maximum amount a workpiece dimension is allowed to vary from a set standard and still be acceptable.


