DRIVE-CLiQ Interface
DRIVE-CLiQ Interface
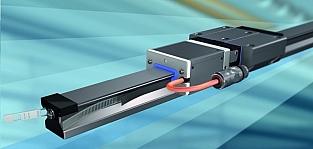
Leading drive and control specialist Bosch Rexroth has further enhanced its IMS-A position measurement system with the introduction of a DRIVE-CLiQ interface, enabling even more rapid setup. An innovative, robust and accurate measuring system, the IMS-A is, uniquely, fully integrated in the linear guide, resulting in a mechatronic system that combines the functions of guiding mechanical loads and measuring their absolute positions in a single unit.

This Ethernet-based DRIVE-CLiQ interface automatically recognizes the electronic nameplate of the IMS-A system, making machine setup effectively a plug-and-play process. This provides further versatility over and above the HIPERFACE and the Rexroth IndraDrive interfaces already available on the IMS-A system.
Through the addition of the new interface, IMS-A is suitable for use with a full range of machine tools, additive production processes and other applications requiring high levels of precision.
Combining guiding and measuring functions in a single component significantly reduces the mechanical installation effort in the machine. The DRIVE-CLiQ interface now also shortens electrical start-up when it is used with Siemens drives and controls. With the plug-and-play encoder system, the person performing the setup merely has to determine the respective zero point of the machine and the measurement section. As well as the retrieval of diagnostic information, DRIVE-CLiQ also enables all other information to be transferred automatically from the electronic nameplate of the IMS-A.
The absolute position is transferred with a resolution of 25 nm, while repeatability is better than +/- 0.25 µm. The integrated scale is available at an accuracy of up to +/- 3 µm/m, and lies in the glass scale range. With the IMS-A, engineers can use several runner blocks on a long profile rail of up to 4,500 mm independently and without any accuracy limitations. Even after a power failure, the measuring system still reports the exact position of the axis on being switched on again, without a homing cycle.
Integrated into the linear guides, the absolute position measuring system operates without contact and is therefore wear-free. Even in working spaces with coolants, dust, shavings and other contaminants, the IMS-A does not require elaborate air purge systems which can add further to energy cost. This means the regular replacement or cleaning work that would usually be necessary for glass scales in these environments is no longer required. The machines are not available while such work is being carried out.
Furthermore, the measuring system is not sensitive to magnetic fields or vibrations and shocks. The sensors and evaluation electronics are located in protective housing on the end face of the runner block, meaning design engineers save the space which would be taken up by external measuring systems. Rail guides equipped with the IMS-A fit into existing machine designs without any constructional alterations in virtually every case.


