Inspection Manager Version 5.1
Inspection Manager Version 5.1
Inspection Manager is a comprehensive database-driven solution for manufacturing quality management throughout the production and supply chain process. The centralized database contains manufacturing inspection plans, ballooned drawings, inspection results, First Article Inspection (FAI) and process control (SPC)">Statistical Process Control (SPC) reporting and incorporates all quality requirements that enables accountability, traceability, and repeatability. The streamlined quality inspection process eliminates paper documents, prevents human interpretation errors, standardizes best practices, and increases efficiencies in collaboration and compliance on the shop floor. n

High QA, a leading Manufacturing Quality Management automation software provider, has released Version 5.1 of its innovative Inspection Manager™ (IM) software. This latest version features next level Quality 4.0 standards, increased automation and enhanced workflows.
Inspection Manager is a comprehensive database-driven solution for manufacturing quality management throughout the production and supply chain process. The centralized database contains manufacturing inspection plans, ballooned drawings, inspection results, First Article Inspection (FAI) and process control (SPC)">Statistical Process Control (SPC) reporting and incorporates all quality requirements that enables accountability, traceability, and repeatability. The streamlined quality inspection process eliminates paper documents, prevents human interpretation errors, standardizes best practices, and increases efficiencies in collaboration and compliance on the shop floor.
Version 5.1 continues support for key industries and compliance standards including Aerospace (AS9100/EN9100, AS9102), Automotive (QS-9000/ISO/TS16949, APQP, AIAG guidance), Medical (21CFR, ISO 13485), Defense, Heavy Machinery, Oil and Energy and others with multiple best practice standards.
Inspection Manager v 5.1 delivers several enhancements to improve workflows, efficiency and traceability.
In-Depth AQL Based Sample Planning
Integrated AQL based sample planning in Inspection Manager Version 5.1 provides a more efficient workflow with data and plans in one centralized database. Set up a sampling plan once and use it across multiple jobs, lots, and orders. Modifications to the plan can be simply made with just a few clicks and are immediately visible. Integrated AQL based sample planning allows for repeatability, scalability, and consistency. Inspection Manager sample planning is based on MIL-STD-105 and Z1.4 AQL standards and supports many other common AQL tables.
Manufacturing Key Sets
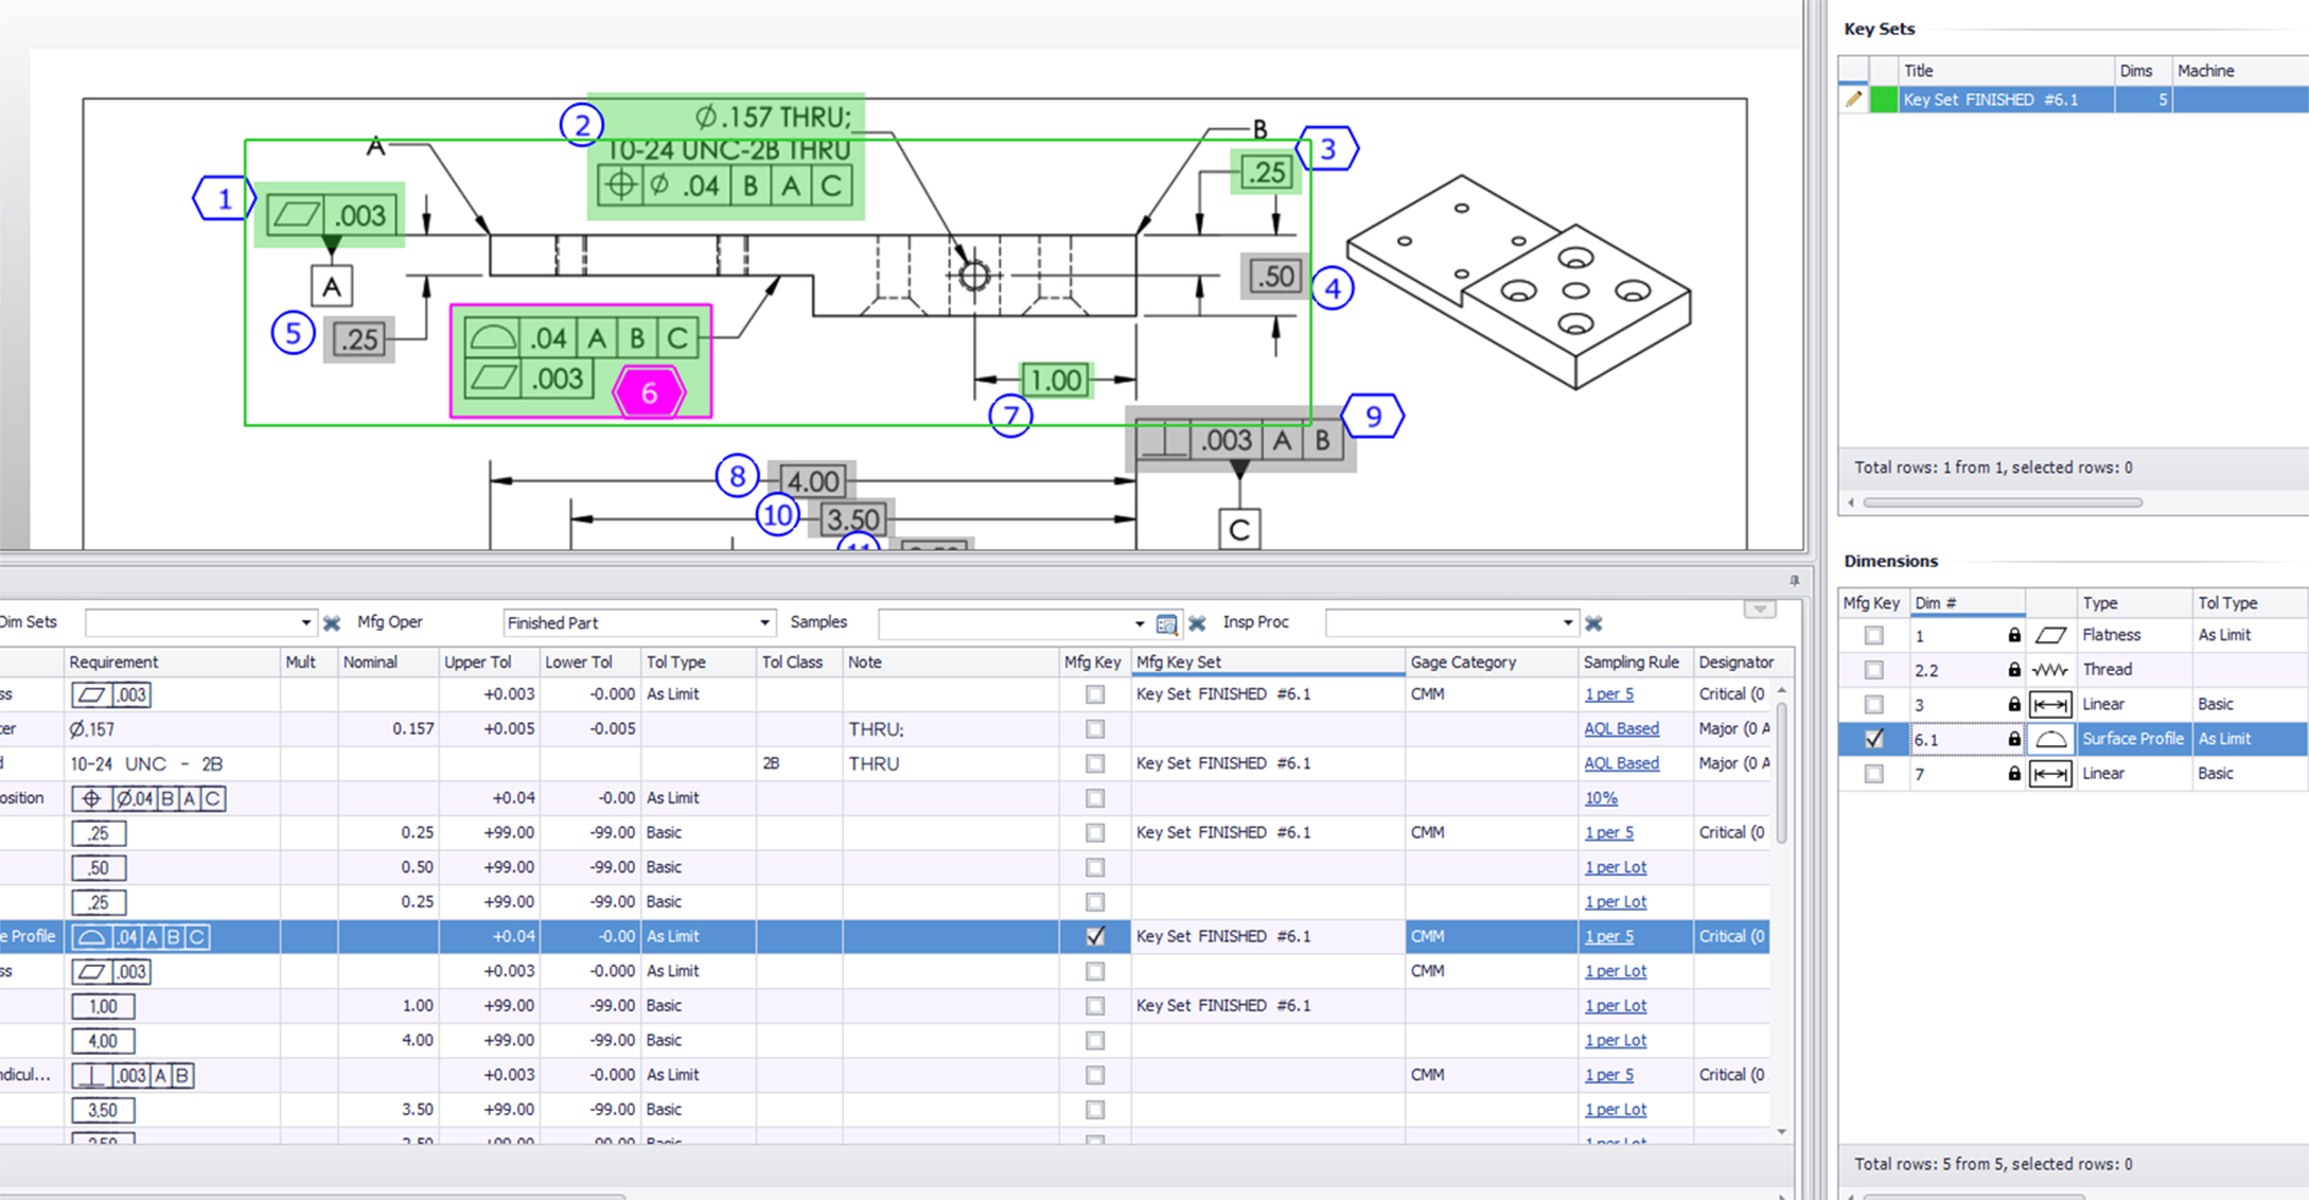
The new Manufacturing Key Sets feature works the way you do. It enables you to group dimensions by cutting tools the same way parts are made on the shop floor. Dimensions affected by the same cutting tool are added to a Manufacturing Key Set group and color-coded on the print for easy identification of each group. The most critical dimension in each Manufacturing Key Set is marked as a Key dimension and made identifiable on the ballooned print. When the Key dimension passes inspection, the remaining members of the Manufacturing Key Set are marked as passed. Manufacturing Key Sets is an integrated feature working together with AQL Based Sample Planning and the centralized database system to maintain the integrity of the GD&T and inspection results data. The all-in-one system provides full, automated traceability to the source.
Robust User Access Control
Control access to sensitive part data with Inspection Manager's integrated security control access system. Define security groups by location, department, role, or individual user to restrict part record access based on a 'need to know' or ITAR requirements. Add or remove users from access groups in a central location eliminating the need for the IT department to manage separate secure and unsecured servers.
Workflow and Usability Enhancements
More advancements in IM v5.1 include the ability to see inspection status for a part showing completed, to be inspected and failed results. Each sample shows the inspector and time stamps for the first and last results increasing visibility and traceability across the lot/job. Real-time notifications and alerts are trigged for failed dimensions and lot acceptance status and can be configured for each part or job. Gage management now automatically tracks detailed usage history for each gage with the ability to sort or filter gage usage by part, job, inspector, date range and more. Gage information is accessible in seconds for detailed lookups.
An enhanced OCR system captures a higher percentage of GD&T from poor quality drawings, adds new balloon shapes and arrows and incorporates a drag and drop feature for adding custom requirements if not found in the drawing.
Included with the new release are expanded materials, process management and template libraries.
All features benefit from the centralized database. A single information source for production and manufacturing data extracted from a drawing, inspection plans, inspection results and SPC information reduces the need for spreadsheets. The integrated database ensures data integrity and avoids misinterpretation of key data.
"This release is dedicated to supporting our community of customers by enhancing collaboration and automation between the manufacturing and quality process," said Sam Golan, High QA CEO and Founder. "Inspection Manager continues to improve productivity and efficiency starting with the planning phase, through in-process and final inspection, inspection data collection, SPC data collection and reporting by at least 5-10 times. This release will further increase this productivity metric."


