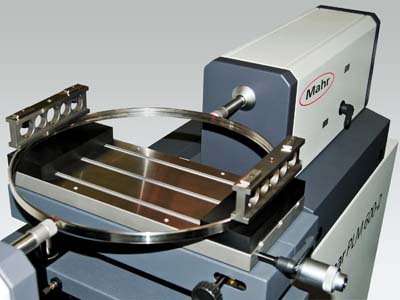
Precimar PLM 600-2
Precimar PLM 600-2
In the world of high-precision metrology, all parts are elastic, which means they will deform to some extent under applied force, even if only by a few millionths of an inch. But certain parts, like thin-walled bearing rings, deform much more readily than others, to the point where it is extremely difficult for quality control technicians to obtain accurate measurements of their undeformed size. In other applications, such as precision balls and spheres, standards call for reporting size in an undeformed state, which frequently calls for a theoretical calculation. Now Mahr provides the capability to measure such parts in their undeformed state as a standard feature on their Precimar PLM 600-2 high precision length measuring systems.

In the world of high-precision metrology, all parts are elastic, which means they will deform to some extent under applied force, even if only by a few millionths of an inch. But certain parts, like thin-walled bearing rings, deform much more readily than others, to the point where it is extremely difficult for quality control technicians to obtain accurate measurements of their undeformed size. In other applications, such as precision balls and spheres, standards call for reporting size in an undeformed state, which frequently calls for a theoretical calculation.
Now Mahr provides the capability to measure such parts in their undeformed state as a standard feature on their Precimar PLM 600-2 high precision length measuring systems. This capability is especially important for measuring thin-walled work pieces, such as the rolling bearing ring pictured. If a technician checks the inner or outer diameter of a bearing on a length measuring machine during quality control, the bearing can be deformed even at low applied forces, thus distorting the measurement results.
Traditionally, deformation correction was achieved by spreading the measurements out over multiple diameters, or by the use of air gaging on small parts. Parts have also been clamped down and probed using CMMs, but this adds forces in other directions and can complicate deformation correction even further. More recently, optical systems have been developed which provide a non-contact means of making these measurements, but the systems are expensive to purchase and, to date, have not achieved the same resolutions as more traditional precision length measurement machines.
The Mahr deformation correction function is fully automated and available as part of the standard application tools set in the Precimar PLM 600-2 system's controller. The procedure automatically modifies the measuring force in a specified sequence, while reliably recording the corresponding change in the part's measured size. This allows the system to determine the actual elastic properties of the part, which are used, in turn, to calculate the given length in the unloaded, measured force-free state of the part.
The measuring machine initially generates a measuring force of 1.2 N, then, invisible to the user, automatically reduces the measuring force in steps of 0.02 N from 1.2 N to 0.8 N, and determines the corresponding measured values. The principal advantage of this procedure over other static measurements is that the calculated length value is based on a number of individually measured values and therefore yields an uncertainty level lower than any respective single measured value. The Precimar PLM 600-2 is designed to test a wide range of equipment and suitable work pieces quickly and easily, and with the smallest possible uncertainty.


