‘Transparent’ Receiver
‘Transparent’ Receiver
Pinpoint Laser Systems is introducing the "Transparent" Receiver to the Microgage 2D family.

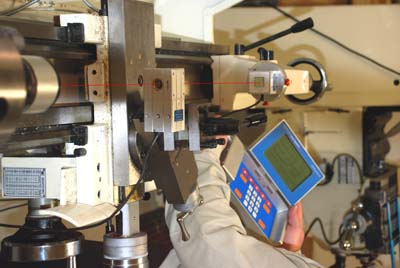
Pinpoint Laser Systems is introducing the "Transparent" Receiver to the Microgage 2D family. This receiver allows a laser beam to pass clearly through it while making a precise position measurement for aligning machinery and equipment. The receiver is compact and will fit into small places for bore alignment, checking extruder barrels, shaft bearings and much more. The receiver and the host Laser Microgage 2D are versatile and can be adapted to many industrial measuring and alignment tasks.
The method of operation is simple — a narrow laser beam provides a measuring reference line. This Transparent receiver is placed on a machine or moving assembly to determine its position relative to this laser reference beam. This new receiver will operate over distances of 100 feet or more and deliver a measuring precision of 0.0005 inch; ideal for demanding industrial alignment applications. The Laser Microgage system and this newest receiver are well suited for lathe and spindle alignment, checking machine tool runout, roll and web alignment, precision bore alignment, and more.
The Microgage 2D is easy to use with instructions that guide operator through their alignment project. Several simple accessories allow for alignment of straightness, runout, parallelism, squareness, roll and web alignment, shaft and bore alignment, flatness measuring, and more. The 2-Axis Laser Microgage operates on batteries for added convenience and all components are machined of solid aluminum with a hard anodized coating for wear resistance. A sealed push button keypad and large LCD display make the Microgage 2D easy and convenient to use in demanding industrial environments.
A serial and USB interface connect easily to a laptop or PC and link to popular spreadsheets for plotting and analyzing data for maintenance records, customer compliance and other uses. This Microgage system includes a compact carrying case to store the components and is easily carried right out onto the manufacturing floor.


