Machining With a Shear
Machining With a Shear
The pros and cons of broaching with a spiral-gullet tool.
If you have ever broached, you may not have given a second thought to machining with a broach that has a shear angle, or spiral gullet. More than likely, you were never given the option. When machining with a tool that has a shear angle on its cutting edge, the tool enters the workpiece with a lead corner and gradually increases engagement.
Many other types of cutting tools come standard with some kind of shear angle, even though their cutting properties are not the same as a shear on a broach. For example, virtually all endmills have spiral flutes.
Be aware that one tool design, such as a spiral flute, rarely fits all applications. Similar to other applications, when selecting the appropriate tool for a broaching application, cost is always a consideration. A spiral-gullet broach, which usually broaches internal part features, normally costs more than other types of broach tools. However, flat broach inserts that have a shear angle on their cutting teeth do not always cost more than broaches without the shear angle.
Shear Advantages
The first advantage to broaching with a spiral-gullet tool is that the tool continuously engages the part with the same number of teeth. As a result, the load on the machine tool stays constant, eliminating the fluctuation of the load against the machine. In contrast, a conventional button broach's tooth engagement may go from two to three teeth and cause the force to increase 50 percent. With a spiral-gullet tool, the tooth engagement might be a constant 2.133333. A constant tooth engagement also reduces harmonics and chatter when broaching.
 T
T
The cutting section of a spiral-flute broach. All images: Alliance Broach & Tool
he second advantage of a spiral-gullet broach is that there is more distance between each cutting tooth than with a conventional broach. The distance from one tooth's cutting edge to the next is referred to as the pitch. A spiral broach may have a larger pitch because of the continuous engagement, so it will also have a larger land and, therefore, the ability to be sharpened more than a conventional broach.
Also, with the continuous engagement that the shear angle provides, more than one part can be broached at a time. The shear allows broaching multiple parts simultaneously because the stack of parts is held together by the pressure of the tool passing through it. This arrangement is possible only if the part geometry allows two or more parts to be stacked together end to end without an interrupted cut between the parts.
In addition, a spiral-gullet broach, with its larger pitch, may allow more aggressive cutting than a conventional broach because a spiral-gullet broach has more area between its teeth for the chips to be carried and evacuated out of the part without compacting them between the teeth and preventing evacuation.
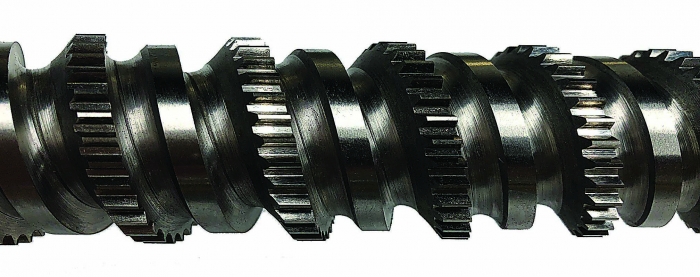
A spiral broach can cut a minor diameter of a part.
A similar comparison is with a high-helix endmill and a standard-helix endmill. The high-helix tool might cut smoother than the standard endmill, but it might not cut as aggressively.
One aspect that can be confusing when broaching with a spiral gullet is that the tool will act as if it has reduced the cutting force. Even though a spiral-gullet broach almost always cuts smoother than a conventional broach, be careful not to confuse smoother with easier. The psi needed to remove material will remain constant as long as the workpiece material properties remain the same, regardless of whether you're turning, milling, drilling or broaching. One theory about why it seems easier to cut with a spiral flute or gullet is that the cutting force is displaced in more than one direction. Also, as previously mentioned, the cutting tooth engagement is constant when broaching with a spiral-gullet tool, adding to the illusion.
Going Without
On the flip side, with so many pros for broaching with a shear, what could possibly be the advantage of machining without one? Or what would be the disadvantage of a spiral-gullet broach other than it might initially cost more? When cutting a groove, there is a danger of the shear angle driving chips into one side of the groove. If that occurs, a large burr will form on one side of the groove as the tool exits the cut.
This burr would most likely be on the side of the groove or spline called the trailing side, meaning the last portion of the cutting edge that contacted this side. The trailing side of the cutting edge forms an acute angle against the side of the groove, whereas the leading side of the cutting edge forms an obtuse angle against the side of the groove. This condition always exists when broaching with a spiral-gullet tool. Make sure the tool is sharp to minimize burr formation.
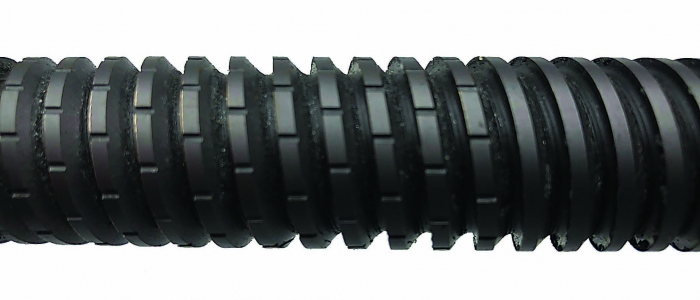
This used spiral broach shows that sometimes the smaller teeth don't last as long as the larger ones.
If the broach is not applied properly, the condition could become extremely severe. It could actually start to tear the workpiece material as the chips start to build pressure against the side of the groove where the cutting edge forms an acute angle. The opposite condition would then exist on the obtuse side of the groove, where chips move away from the part.
If you are broaching a groove with a conventional tool, the cutting edge is always at a 90° angle to the side of the groove, and the burr will be equal on both sides of the groove. The pressure is then equal on both sides of the groove, and chips do not drag against the part.
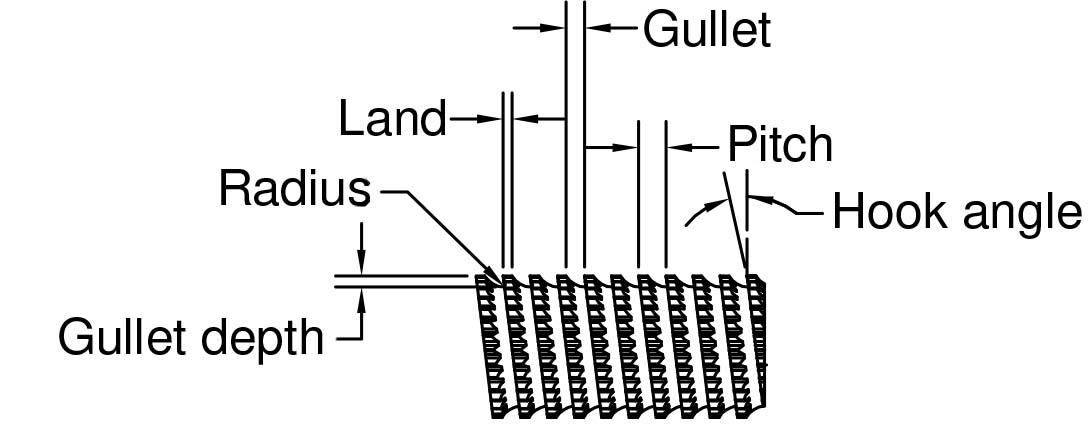
The geometric features of a spiral-gullet broach.
Because broaching with a conventional tool offers a cost advantage, a small-quantity job does not typically justify paying extra for a spiral-gullet broach. Even tool sharpening will cost more for a spiral-gullet tool.
Depending on the application, a conventional broach can perform as well as a spiral-gullet broach. This comparable performance usually occurs when the length of machining is long and the number of teeth engaged in the cut is large enough that the cutting force fluctuates less than 15 percent. For example, if the number of teeth engaged in a conventional tool fluctuates from seven to eight teeth, the force required to pull the broach through the part will fluctuate by only 12.5 percent.
As the machining industry continues to evolve, expect to see more small, incremental enhancements to broaches and other cutting tools. It is everyone's responsibility to find these tools and apply them the best way possible.

