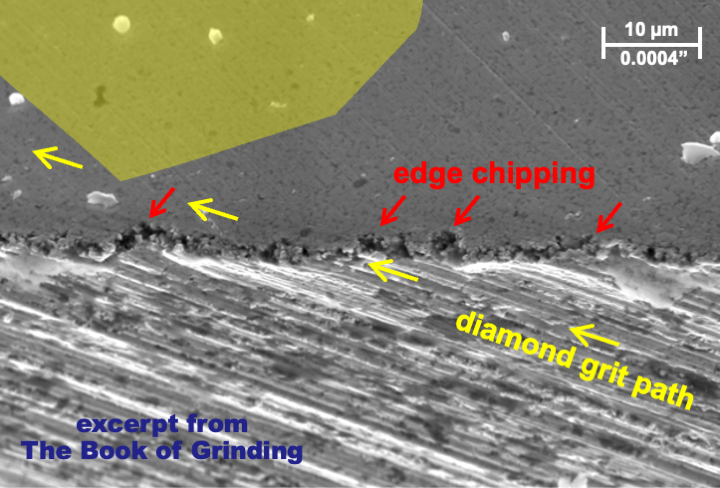
Reduce Edge Chipping
Reduce Edge Chipping
The Grinding Doc offers three ways to reduce edge-chipping
Dear Doc: We grind brittle materials (carbide, cermets, ceramics) and are trying to reduce edge-chipping. Any advice?
The Doc replies: Here are three things you can do:
1. Try a smaller grit size. (Example: Switching from 280-mesh to 400-mesh.)
2. Try a lower grit penetration depth (or aggressiveness, chip thickness, chip load, etc.). Depending on the geometry, this is usually accomplished with a slower feed rate, faster wheel speed and/or smaller depth of cut.
3. Try a sharper wheel. For carbide, this typically means a wheel that isn't loaded. For cermets and ceramics, this typically means a wheel that isn't loaded and a wheel that doesn't contain diamond grits that have become dull.
Remember, you will never eliminate edge chipping in brittle materials. All you can do is reduce it.
These suggestions should reduce chipping.
Or they might not help at all. Why? Because your excessive edge-chipping is caused by chatter or vibration. If the wheel is chattering, that means it's bouncing up and down on the workpiece, causing surges in the forces and grit penetration depth, which in turn increases chipping. Get rid of that chatter and you'll reduce chipping.
How to reduce chatter? Here are some common solutions to chatter: a stiffer spindle; in surface grinding, slow and deep cuts (instead of fast and shallow cuts); in cylindrical-plunge grinding, slower workpiece RPMs; in cylindrical-traverse grinding, an overlap ratio closer to 1.0.
The excessive edge-chipping may be caused by intermittent wheel-workpiece contact from an imbalanced or eccentric wheel, which causes surges in forces and grit penetration depth. Balancing your wheel or making it concentric with the spindle will help. But here's something you can do to practically eliminate that intermittent contact: true your wheel—on the same machine and spindle you grind on (without removing the adaptor), at the same wheel speed you use for grinding, and at the same point at which you grind. (If you're using a resin or metal-bonded wheel, follow up with a wheel sticking.) This doesn't have to be fancy. Just a few passes to make sure the wheel is running concentric with the spindle.
Finally, you can change the direction of the grits so they are entering and not exiting. This is rarely feasible because of geometric limitations. But occasionally it can be done. Also, putting a dummy workpiece at the exit also helps. Again, it's usually not feasible.