Crib Control
Crib Control
An organized toolcrib is necessary to ensure that tools will be available when needed. This article reviews the techniques and equipment different shops have used to keep track of their tools.
Coffee cans, baby food jars and cheap plastic organizers. All of these things are perfectly acceptable for storing tools in your garage or home workshop—but not in your toolcrib at work.
Too much time and money can be lost if a machine operator has to search high and low for a tool to complete a setup or finish a part. Organizing your toolcrib won't ensure that you will never have problems finding tools, but failing to get organized almost always guarantees that you will.
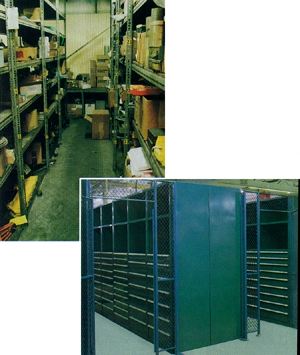
A disorganized toolcrib, like the one shown above (top), holds up machinists searching for tools. Suppliers of toolcrib storage equipment offer everything from insert dispensers to secured areas lined with multidrawer cabinets.
Does it take expensive equipment and extra personnel to operate an organized toolcrib? Definitely not. But it does require a common-sense, systematic approach to cutting tool organization. And the best way to ensure success is to make your system as simple as possible.
Organize Your Tools
The first step is to assign each tool to a group. Most shops group tools by type. Others organize them by job or vendor. Use whatever method makes the most sense for your company.
Next, dedicate space (shelving, cabinets, etc.) to each tool group and label it clearly. Color-coding is an excellent way to distinguish stocking locations for each group.
Another excellent method comes courtesy of Kirby Risk Precision Machining, Lafayette, Ind. It stores tools in some old oak filing cabinets. An alphabetized list on top of the cabinets gives the exact location—drawer number and slot—where each type of tool is stored.
This simple and inexpensive system has eliminated "toolcrib chaos" at Kirby. The machine shop's tooling specialist, Jay Evans, recalled that before getting organized, "we had tools that didn't have a designated place, and that led to items kept in different places at different times."
Another good idea, particularly if you store tools in multidrawer cabinets, is to glue to the front of each drawer a sample of the tool it contains. This is especially useful for things like inserts. Operators tend to be more familiar with the appearance of an insert than with a written description of it.
With the cost of carbide inserts being so high, you should glue used inserts to the drawer fronts. Make sure, though, that details such as color and shape are still evident.
Buy Good Storage Equipment
If you decide to purchase storage equipment designed specifically to store tools, choose what best meets the requirements of your inventory. And don't buy cheap. Under the weight of tools, a heavy-duty, welded cabinet will long outlast a light-duty, bolted-together one. Cabinets, drawer units and shelving should be of the highest quality you can afford. Many a tooling manager has found out the hard way that trying to save money here is a mistake.
Also, whenever possible, choose storage equipment that makes it easy to see what you have and what you don't. No one has the time, much less the inclination, to go through drawer after drawer of, say, HSS endmills to do a piece count. Consider how you can display items so that one quick glance makes shortages obvious. This means using storage equipment that clearly displays numerous types of tools.
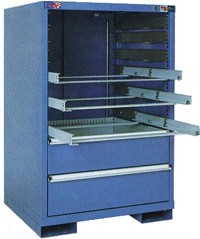
Manufacturers offer cabinets that can be ordered with different sizes of drawers. This lets customers configure units to meet their specific needs.
Several suppliers offer slant-shelf units that allow compartmentalization of up to 80 items of varying lengths. These are good for shank-type tools—drills, taps, endmills and reamers. An empty or near-empty slot in these units immediately signals that it's time to replenish stock.
Small drawer units are available that are excellent for storing items such as inserts, screws, seats and clamps. Adjustable compartments inside the drawers can be arranged in a variety of ways. These units allow you to control a lot of inventory in a small space and are compact enough to fit inside larger cabinets.
If you purchase an enclosed cabinet, install a small fluorescent light inside of it. Connect the light to a door switch (the kind used on refrigerators) so that the light only turns on when the cabinet is open. Don't hard-wire the light inside the cabinet, because you may want to rearrange your toolcrib someday.
Maintain Your Inventory
Once you have your tools organized, it's time to focus on your system for restocking inventory. Establish a process that guarantees tools are replenished regularly.
Ordering information (part number, description, vendor) and inventory-level requirements (order quantity, bin minimum) should be kept with each toolcrib item. Record the information on file cards and then laminate the cards.
Aisin USA Manufacturing Inc., Seymour, Ind., records all pertinent ordering information on stickers attached to 4"-square pieces of Plexiglas. Aisin's assistant manager of MRO purchasing, Eric Renbarger, collects these "cards" daily from a central location to avoid any delay in replenishing inventory.
Another good idea is to have a second set of cards marked with the words "Item on Order." These should be a different color than your regular information cards. Whenever a tool needs to be ordered, the regular card should be turned into the toolcrib attendant. He or she should record on the "Item on Order" card when the tool was ordered and place it in the tool's storage compartment or drawer until the inventory is back to the normal stocking quantity.
If your shop doesn't employ a full-time toolcrib attendant, implementing an efficient system for controlling tool inventory will require the cooperation of all manufacturing personnel. Anyone who notices that the inventory level for a particular tool is at or below the required minimum must pull the information card and deposit it in a specified location. This makes it easy for the person who orders tools to gather the information. Make operators aware that they are a vital part of the system that keeps your toolcrib well stocked. Emphasize that always having the necessary inventory on hand helps them and their company operate at peak efficiency.
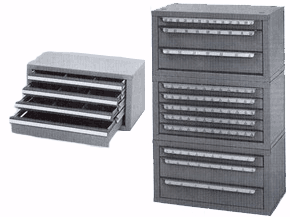
Dispensers are available for almost any type of tool. At left is an insert dispenser. Most drawer-type storage equipment is stackable. The top photo shows three stacked drill dispensers.
A fringe benefit of a well-stocked toolcrib is that operators feel confident that the tools they need will be there when they need them. Good machinists want the tools they need to do their jobs. If history has indicated that there will be times when they won't be able to get what they need, they'll store tools in their toolboxes.
Companies cannot afford to have operators stockpiling expensive tooling. One way to reduce hoarding is to make everyone accountable for the items they take from the toolcrib. This can be accomplished with something as simple as a checkout sheet for perishable items. If you make your expectations clear, most people will cooperate.
No matter how organized your toolcrib is, sooner or later you will run out of something. To help reduce the chances of that, estimate what quantities of tools you will need to complete an order. Place those tools in a secure spot, away from the rest of the stock. When the bin for a particular tool is empty, place the segregated stock in the bin until the new shipment arrives. Repeat the process by reserving stock from the new shipment.
Aisin USA employs what Renbarger calls a "modified two-bin system." The second bin contains the reserve stock. The order-information card is placed on top of this stock and is pulled when the first bin is empty. Placement of the card on top of the reserve stock forces the operator delving into it to alert someone that that stock is low.
Another good application for segregated-stock systems is special items that have long lead times. Completely separating the inventories of specials allows them to be monitored more closely than standard items.
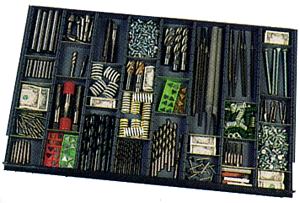
When considering a drawer unit, buy one with drawers that can be configured in multiple ways.
Set up a "specials" cabinet if you have enough items to warrant it. Make sure all ordering information (part numbers, vendors, prints, etc.) is readily available to the person responsible for starting the replenishment process.
Your system should also provide operators with the technical information required to efficiently use any given tool. In folders or binders, place manufacturers' recommendations for speeds and feeds for every tool. Keep this information in one place in the toolcrib, update it often and encourage operators to use it.
Maintain Your Crib
To keep your toolcrib running smoothly, you must regularly purge obsolete inventory. There is no place in an organized crib for useless clutter. How do you determine if something is useless? Conduct a test like the following.
Imagine that you have five boxes of one type of insert that you suspect could be eliminated. Tape four of the boxes together and date them. If the tape isn't broken after two months or six months or a year—whatever time frame you feel is adequate—get rid of the boxes. (Your vendor may issue you a credit for the items.)
Also, as new tools become part of your machining processes, eliminate the ones they replace. Before you do any wholesale purging, though, establish a procedure that ensures that eliminating a tool won't adversely affect any of your processes.
Kirby Risk's Evans cautioned against eliminating stock too quickly, because operators often have differing opinions on the value of a specific cutting tool. "One guy may think that a new insert is great and another may think it's worse than the old one," he said by way of example. "You have to be careful what you eliminate."
To avoid having operators surprised by the sudden disappearance of an item, Evans posts a notice stating when a tool will be phased out and what tool will replace it.
To ensure that you can get the tools you need in a pinch, establish business relationships with suppliers that require them to keep a certain amount of the tools you use on their shelves. This doesn't have to be a single-source supplier arrangement—just good working relationships with a few key vendors.
Other types of relationships are possible, too. A sister division of Aisin USA, Aisin Automotive Casting Inc., London, Ky., has committed to five tooling vendors and depends on them to maintain the stock at its facility. AACI Production Engineer Russ Vanover said, "Each vendor does a piece count every week and updates inventory quantities in our computer, located in the crib."
Clearly, AACI has taken control of its toolcrib and tool inventory. So can your shop with a little planning and a few dollars. The payoff will be machinists spending less time looking for cutting tools and more time cutting parts.
About the Author
Brent Chandler is tool design supervisor at Roots Division, Dresser Equipment Group Inc.—A Halliburton Company, Connersville, Ind.


