Eccentricity Rings True
Eccentricity Rings True
Any shop that either makes a large volume of finished parts or does prototyping knows the utter importance of having and using soft jaws to hold those
Any shop that either makes a large volume of finished parts or does prototyping knows the utter importance of having and using soft jaws to hold those parts. There are two main reasons behind this importance, a custom fit to the actual part, and not marring the surface you just spent time finishing. A vast majority of soft jaws are used on lathes, primarily of the three-jaw universal type. The versatility is unmatched, as just about every shop has a lathe with a three-jaw chuck on it. Clamping something and having it run true in the hard jaws is nearly impossible (unless you have a set-thru chuck), so the ability to machine jaws true to the spindle's rotation and provide a solid workholding solution is a no-brainer.
Sometimes, as we all know, the actual cutting of said soft jaws is as much of a nightmare as the expensive workpiece to be held! We also know the myriad ways of clamping the jaws down to cut the contour in the jaws can be mind-boggling, so how can your shop adopt a singular way to alleviate this headache? Enter the eccentric ring. The concept isn't necessarily new, but not everyone knows of it. It has saved our shop from having to consume bottle after bottle of migraine relief pills.
So let me share the idea with your shop, too. See Figure 1.
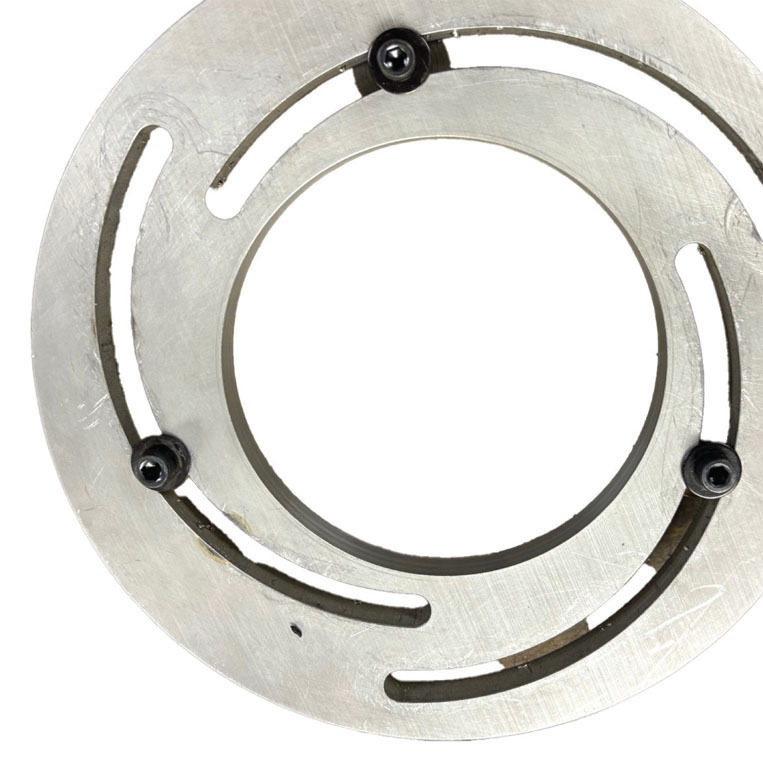
Essentially a doughnut-type ring, the "eccentric" part comes from the three radial arc-shaped slots whose centers are offset from that of the ring itself. This design is easily adapted to fit the needs of your specific machine, but the basic principle is the same. The OD of the ring should be at least the same diameter as your lathe chuck while not being larger than your machine's swing, of course. The ID should start out only as large as you need for it to easily clear. See Figure 2. A word to the wise, invest the time and material to make a few of these things, along with enough pins to outfit each ring, and maybe a spare pin or two. We have found these rings to be extremely helpful in cutting down on setup times and scrapped parts from marred surfaces. They do get used up, as you may need to cut some of the ID away to fit other jobs, so having extras on hand is highly advisable.
The three radial arcs or slots should have enough arc length to allow generous movement of the jaws. The reasons for this are many, but here are two:
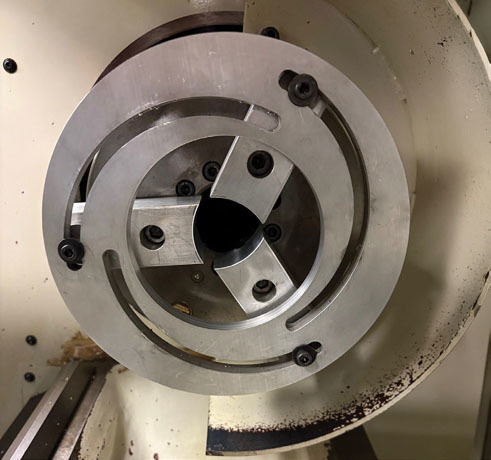
- First, you may have to adjust your bite a bit to get things to seat properly.
- Second, unless you have dedicated soft jaws for each job, you're probably going to reuse a set for another job (this scenario being most prevalent in prototyping shops like the one I work in), and they'll get chewed up. This necessitates being able to adjust the ring as needed to get the most use from it and your workholding parts. Of course, these rings are also the perfect fit for making dedicated jaws.
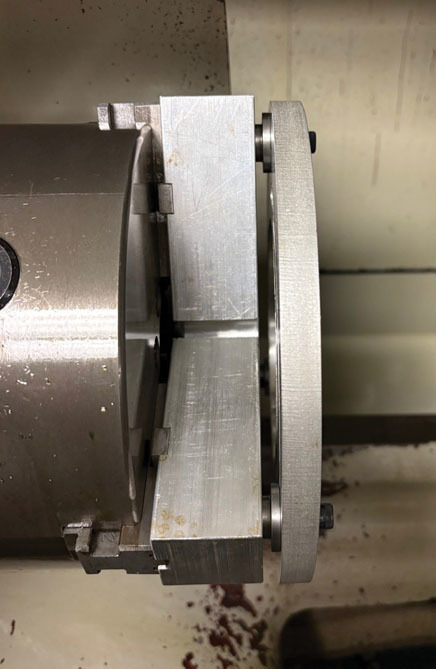
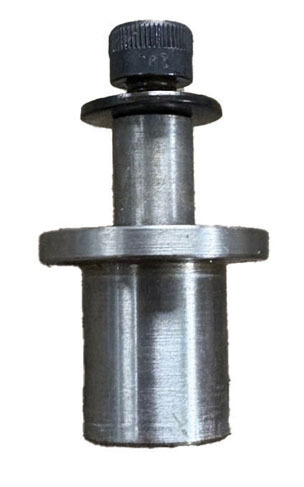
Attaching the ring to the jaws is done using stepped pins, as seen in Figures 3a and 3b. These feature a stem with a slip fit diameter to the counterbored holes in your jaws, a collar for the ring to rest on, and a rebated diameter that is a slip fit for the radial slots. The length of this rebated diameter should be about 0.0156" shorter than the thickness of your ring. We used a 0.5" aluminum plate to make ours, so 0.4844". Make your pins to suit whatever plate thickness you use, and I would suggest using steel to make the pins. A hole is drilled through the center of each pin and tapped for whatever screws you have available to lock the ring to the pins. In our case it was 1/4-20s. So long as the head of the screw or the washer bottoms out on the ring to provide clamping force, you're in business.
Use of the ring is pretty straightforward. The process is as follows: The pins are inserted into the counterbored holes of the jaws to be machined. You then get the jaws as close as possible to where you want them, adjusting them until the ring slides onto the rebated diameter. Insert and tighten the screws, and then gently tighten your chuck. You are now ready to cut your jaws!