The Secrets of HSK
The Secrets of HSK
Some North American end users have been disappointed in the performance of their HSK toolholders. This article discusses why and looks at ways the toolholder design developed in Europe for high-speed milling may need to be adapted for machining practices in the United States.
To put these high-speed toolholders to work in North American machine shops, tooling manufacturers and end users must understand the intricacies of the design.
By Dr. Eugene Kocherovsky and Bruce Travis
The HSK toolholding system developed in Europe has been touted in the United States as the system for advanced machining. It is the one toolholding system designed specifically for high-speed, close-tolerance machining. To some extent, HSK has lived up to its promise. U.S. manufacturers, like their European counterparts, have found that using HSK toolholders will improve quality and productivity. But some end users in the United States and Canada have reported lackluster performance using HSK toolholders. There are subtle, yet fundamental, reasons for these disappointing results related to misunderstandings of the proper utilization of HSK. Having invested thousands of hours of R&D time in this new toolholding technology, engineers at Valenite Inc., Madison Heights, MI, are in a good position to clear up some of these misunderstandings and offer guidelines on the proper implementation of this new technology. Through their work with HSK, these engineers have learned what designs, materials, and manufacturing techniques will produce high-performance toolholders that will satisfy the North American market's needs and conform to the habits of U.S. manufacturers. Their research has also revealed ways to tweak the HSK system for better performance in extraordinary situations.
HSK's Past
HSK toolholders are a German development. The abbreviation HSK stands for "Hohl Shaft Kegel," which, literally translated into English, means "hollow-shank taper." Among U.S. end users it is more commonly referred to as "hollow-taper-shank tooling."
The HSK design was developed as a nonproprietary standard suitable for both rotary and stationary applications. Its developers believed a single standard design was preferable to the growing number of tooling interfaces that were proliferating at the time. The working group that produced the HSK standard consisted of representatives from the academic world, the Association of German Tool Manufacturing, and a group of international companies and end users, including Valenite. Their effort produced the German DIN standards 69063 for the spindle receiver and 69893 for the shank.
It is important to note that the HSK working group did not adopt a specific product design, but rather a set of standards that defined HSK toolholders for different applications. As these industry representatives considered design alternatives, they had a very specific set of performance criteria in mind. They were looking for a toolholding system that would be rigid, lightweight, and capable of high radial and axial accuracy. In addition, the system had to be suitable for very-high-speed rotary applications.
In the end, the group chose to define not one, but a total of six HSK shanks. These shank styles are designated by the letters A through F. Each model is also identified by the diameter of the shank's flange in millimeters. Styles A, B, C, and D are for low-speed applications. E and F are for high speeds. The main differences between the styles are the positions of the drive slots, gripper-location slots, coolant holes, and the area of the flange. Each style was defined for certain applications. It is critical that the proper type of HSK tooling be specified on high-speed machine tools, not just the correct size.
Shank and Receiver Features

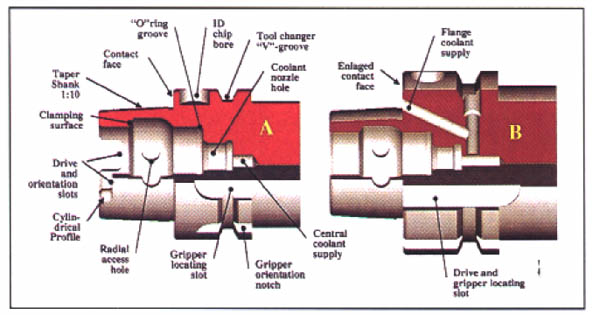
Figure 1: These cutaway drawings of A-style (left) and B-style HSK shanks show the basic features included in the DIN standard
Figure 1 illustrates a typical shank design and its basic features. The shank itself is made as a hollow taper with a ratio of 1-to-10 (taper angle 2O 51' 78"). Two drive slots are located in the end of shank style A. Their unequal depths ensure that the toolholder can be oriented in only one way. Figure 1 shows the drive slots, which feature a cylindrical profile to increase the surface of the contact and reduce stress as torque is transmitted from the spindle to the toolholder. The surface inside the shank is cut with a 30O chamfer, making it possible to clamp the toolholder from the inside. As we shall see later, internal clamping offers some unique advantages. The wall of the HSK shank is designed to be thin enough to flex slightly. Radial access holes are located in the wall some distance from the contact face. These access holes allow a manual clamping mechanism to reach the actuation screw (not shown).
Inside the shank, there is a groove for a rubber O-ring and a central coolant-nozzle hole. They are designed to protect the internal clamping components from corrosion. The coolant nozzle is an optional feature that is not included in some clamping-mechanism designs. When the nozzle is positioned in the holder, it has about Ä 1O of angular motion. This degree of freedom is provided to compensate for any misalignment of the clamping-mechanism components during the clamping process. On the outer surface of the shank flange, there is a traditional toolchanger V-groove and slots for locating and orienting an automatic toolchanger's gripper. In addition, there is a radial bore for a tool-identification microchip.

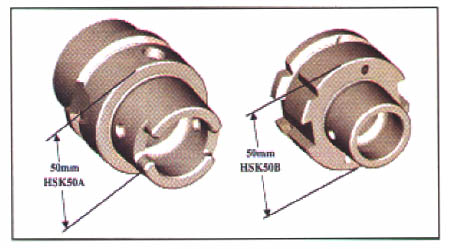
Figure 2: On the left is a typical HSK50A shank with a 50mm-dia. flange. The HSK50B shank on the right, which also has a 50mm-dia. flange, has a shank one size smaller.
(Click for larger image)
The principal difference between shank styles A and B is the size of the taper. The B-style shank will have a taper one size smaller than an A-style shank with a flange of the same size (Figure 2). For example, an HSK50B shank will have the same 50mm-dia. flange that an HSK50A shank has, but its taper will be equal to an HSK40A taper. This is true of the D and F shanks as well; all three will have tapers one size smaller than A, C, and E shanks with the same flange diameter. The smaller taper leaves more room on the flange's face to mate with the face of the receiver. The bigger flange area allows manufacturers to locate drive slots on the flange and combine drive slots with gripper-locating slots to transfer high torque. The bigger flange also makes it possible to supply coolant through the face if it is necessary to reroute coolant to protect the internal clamping mechanism from corrosion. Shank style C was designed exclusively for manual use. It is a copy of shank style A, with the elimination of features that style A has to accommodate automatic toolchangers. Style D differs from style B in the same way.
To handle extremely high rpm and the machining of light materials, shank styles E and F were designed to be totally symmetrical. Their symmetry minimizes unbalance, which can be a significant problem at high speeds. Torque is transferred from the spindle to the toolholder only through friction between the tapers and faces of the mating shanks and receivers.

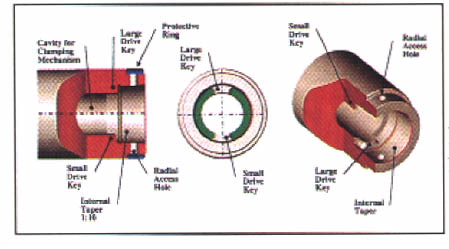
Figure 3: The basic features of an HSK spindle receiver are shown in this series of cutaway views.
Figure 3 presents cutaway views of typical A- and C-style receivers. The receiver design includes an internal taper with a 1-to-10 ratio and milled drive keys with heights that match the unequal depths of the shanks' drive slots. The partial profile of the drive keys also is cylindrical. The internal space of the receiver is designed to house the clamping mechanism, which is not yet standardized. If a manual clamping unit is incorporated, the receiver's radial access hole can be used for clamping or releasing tooling shanks. When the access hole is to be used, a protective ring covers it to keep out coolant and chips. An internal coolant supply can be included as part of the clamping unit.
Receivers for B and D shanks are slightly different from the A- and C-style receivers. B - and D -style receivers feature external drive keys similar to the design of traditional steep-taper spindles. In these receivers the coolant supply can be routed through the flange, bypassing the clamping unit. Some people in the industry believe that A - and C - style shanks are interchangeable with B - and D -style shanks. This is not true. The HSK developers were going to make these shanks interchangeable, but they abandoned this idea in the final version of the standard.
Receivers for E - and F -style shanks, like the shanks themselves, are totally symmetrical. Because the receivers do not have any drive keys, torque must be transferred entirely by friction.
How HSK Works

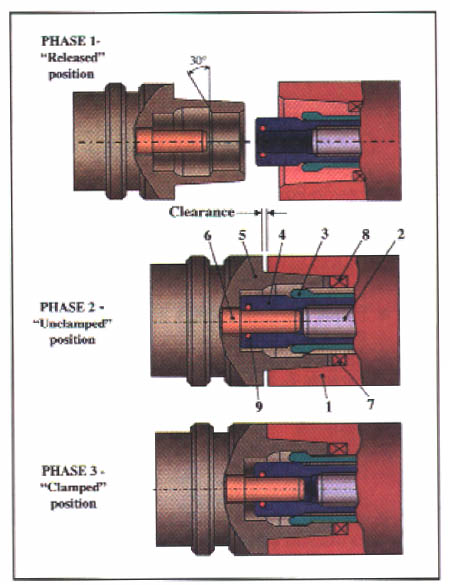
Figure 4: In the first phase of the HSK clamping action (top), the mechanism is in the released position and the shank is out of the receiver. In the second phase (middle), the shank has been inserted, but the mechanism has not yet been actuated. In the final phase (bottom), the drawbar has pulled the sleeve in, pushing the collet segments out to engage with the chamfer on the shank's inner diameter.
An HSK connection depends on a combination of axial clamping forces and taper-shank interference. All these forces are generated and controlled by the mating components' design parameters. The shank and receiver both must have precisely mating tapers and faces that are square to the taper's axis. There are several HSK clamping methods on the market. All use some mechanism to amplify the clamping action of equally spaced collet segments. The steps illustrated in Figure 4 show how a typical clamping mechanism is actuated.
In the first phase of the clamping process, the mechanism is in the unclamped position. The drawbar (2), which is located in the spindle (1) and is rigidly connected to the sleeve (4), is released. This allows the collet segments (3) to contract inside the sleeve's cavities. With the segments in this position, the operator can insert the shank into the receiver, engaging the drive keys (7) and (8) of the spindle with the mating slots on the shank.
In the second phase of the clamping process, the shank is in the receiver, but the clamping mechanism is not yet actuated. Because the gage diameter of the shank is slightly larger than the gage diameter of the receiver, the toolholder does not slide fully into position. As a result, there is some clearance between the flange and the face of the receiver.
In the third phase, the mechanism is actuated. At this point, the drawbar pulls the sleeve in, away from the toolholder. As a result, the collet segments expand radially, and their 30O chamfer engages the mating chamfer on the shank. This amplifies the force of the drawbar. This force is transformed into pullback forces that are equally spaced and applied to the circumference of the 30O chamfer inside the shank.
As the collet segments engage, the pullback force causes the shank to deform slightly, pulling the shank further into the receiver until contact is made between the flange and the receiver's face. The fact that the two tapers are in intimate contact due to the elastic deformation of the shank ensures the positioning accuracy and repeatability of the joint, both radially and axially, to 0.0001". At the end of the clamping cycle, the sleeve engages the coolant nozzle (6). The drive keys (7) and (8) transfer torque.
When the toolholder is clamped into the receiver, the drawbar force at first produces a firm metal-to-metal contact between the tapered shank and the inner diameter of the clamping unit. An additional application of drawbar force positively locks the two elements together into a joint with great radial and axial rigidity. During the clamping process, some of the clamping unit's energy will be spent compressing the shank taper to pull the shank deeper into the receiver. Depending on the amount of clearance, up to 20% of the axial clamping force may be needed to pull the toolholder in. The larger the clearance between the mating faces, the more energy will be needed to bring them together.
Take the connection of an HSK40A toolholder as an example. If the clearance distance is 0.005", the clamping unit will have to exert about 1200 lb. of force to achieve initial face-to-face contact. If the clamping unit is capable of generating a total of 5200 lb. of axial force, it will be able to exert 4000 lb. on the face of the connection after bringing the holder and the receiver together. But if the unit can generate only 2500 lb. of axial force, it will be able to exert only 1300 lb. of force on the connection after using 1200 lb. to close the gap between the flange and the face.
To avoid wide gaps that waste clamping-mechanism energy, the HSK standard dictates tight tolerances for taper gage-line diameters. Such accuracy is needed because each 0.001" deviation in the gage-line diameter will result in a 0.001" error on the face clearance when the taper ratio is 1-to-10.
Centrifugal Strength
So far, this discussion of clamping forces has not taken into consideration the beneficial effect the toolholder's rotation has on the holding power of the mechanism. It is because of this effect that HSK is considered the ideal design not just for the 15,000-rpm milling that passes for high-speed machining today but for the 40,000- to 50,000-rpm operations that will be the standard on the next generation of high-performance machine tools.
The HSK design actually harnesses centrifugal forces to increase joint strength. As the collet segments rotate, the clamping mechanism gains centrifugal force in accordance with the formula:
F=0.000341WRn2
Where F = centrifugal force in pounds, n = the number of revolutions per minute, W = the revolving body's weight in pounds, and R = the perpendicular distance from the axis of rotation to the center of mass in feet (or for practical use, to the revolving body's center of gravity). As a rough example (assuming amplification and friction cancel out each other), let's say the weight of a single collet segment in an HSK50A clamping mechanism is 0.18 lb., and the segment stands 0.51" from the body's center of gravity. At 40,000 rpm, centrifugal force on this segment will be 4200 lb. This force, which rises with the speed of rotation, positively contributes to a dependable connection.
Centrifugal force also causes the relatively thin walls of the tapered shank to deflect radially at a faster rate than the wall of the spindle. This contributes to a secure connection by guaranteeing strong contact between the shank and the spindle. The changes that centrifugal force causes on the inside of the clamping mechanism won't affect the axial position of the cutting edge, because this is determined by the face-to-face contact between the flange and the receiver.
The North American Difference
The Valenite researchers' studies of the HSK connection and the problems that North American users were having with the toolholder led them to conclude that many holders are constructed of inappropriate materials. The DIN specification does not cover materials, so most tooling suppliers make their HSK components out of the same materials they use for steep-taper designs.
A typical rotary adapter is made from alloy steel that is either case hardened or surface treated to create a wear-resistant skin over a strong, relatively ductile core. This traditional technology works well for conventional solid-shank tooling. However, it does not work well for flexible HSK shanks that have smaller structural sections and work under higher stress. In fact, the use of these treated alloys is a major contributor to short tool life and erratic performance under these conditions. As a result of the researchers' findings, Valenite's HSK shanks are made of different steel grades and receive a different heat-treatment than the company's conventional steep-taper shank tooling.
Having been developed in Europe, the HSK standard reflects machining practices on that continent to some degree. When Valenite researchers compared practices in Europe to those in North America, they found typical metal-removal rates in North America to be higher. This difference has a profound impact on the real-world performance of HSK shanks on this side of the Atlantic.
One of the most fundamental requirements for high removal rates is strong connections between the toolholder and the receiver. The most obvious way to achieve sufficient strength is to increase the clamping force. The DIN standard recommends minimum clamping forces that range from 1530 lb. for a No. 40 HSK connection to 10,136 lb. for a No. 100 HSK joint. Valenite recommends increasing these forces wherever possible. The force should be doubled for HSK sizes up to No. 63, and it should be increased 30% for all higher sizes.
Increased clamping force is especially needed at low machining speeds, when centrifugal force does not contribute significantly to the mechanism's holding power. There is some risk in increasing the clamping force, however. The higher force levels can overstress the clamping mechanism's components. It is up to the machine tool builder to ensure that the mechanism's design can withstand this stress. An increase in the clamping force also will compensate for variations in the clearance between the mating faces of the HSK shank and the receiver. The DIN standard allows for a certain degree of deviation in this clearance. For example, the clearance between an HSK63A toolholder and the receiver can range from 0.0015" to 0.0047". The clamping mechanism must exert enough force to pull the toolholder in tightly even at maximum clearance.
Tweaking the Design
Standard HSK tooling may not satisfy every need. In some cases, a shop's existing equipment may force it to machine parts in conditions beyond recommended guidelines, and the HSK design may need to be tweaked to avoid overloading the system. In other cases, a shop may need a different flavor of HSK to reap the benefits of the concept when the dimensional constraints of its equipment or some historical or company preference make it difficult to use standard products.
Many shops would like to take advantage of the HSK design, but they do not have machines equipped with an HSK spindle. Valenite provides a special HSK adapter for these end users. The adapter is mounted on the existing spindle and aligned so that runout is close to 0". In most cases where a spindle adapter is installed, HSK shanks are changed manually. Although the connection is less rigid than an HSK toolholder mounted directly in the spindle, it still offers high precision and fast manual changing.
Valenite offers custom-modified HSK tooling for a broad range of special requirements. Its special tooling can be modified to provide performance characteristics ranging from high-torque resistance for large-diameter milling cutters to high radial stiffness for long, thin boring tools. Even though these special shanks are optimized for specific uses, they all conform to the basic HSK receiver standards and can be used in a common HSK spindle. Valenite produces these specials on a case-by-case basis, optimizing its designs to satisfy each customer's requirements.
Even standard HSK tooling can be improved with small design tweaks. Valenite found that balancing the shank/clamping unit connection could contribute significantly to HSK tooling's high-speed performance. The company developed special static and dynamic balancing techniques to ensure the high-speed stability of the HSK connection. It also is possible to optimize HSK tooling for different applications by making small dimensional changes to the shank. This provides some variation in total clamping force, even though the amount of drawbar pull available in any given machine is essentially a fixed quantity. At this point, there is no need to use this option, but it is available for future applications.
Precision Manufacturing
All HSK tooling manufacturers have been challenged by the extremely tight tolerances the HSK standard demands. To achieve such a high degree of precision, manufacturers must use special inspection technology with extremely fine resolution. Gages and instruments have to be recalibrated to measure in the 0.000010" range. Additionally, the HSK manufacturer must use special high-resolution sensors and processing devices and locate its final grinding operation in a temperature-stable environment. To build HSK products to these demanding standards and still deliver them to end users quickly, Valenite built an integrated design-to-manufacturing system. The system can produce all necessary documentation and NC codes for any tailored-standard custom tool in 30 to 40 minutes. This two-year-old system is currently being used for 100% of the HSK toolholders Valenite produces.
The North American auto industry has adopted Valenite HSK toolholders as the de facto performance standard for this category of products. One of the Big Three used a transfer line completely equipped with Valenite HSK tooling as the benchmark in developing its specification for all future system purchases.
Properly specified and applied, HSK tooling can optimize time in the cut for all machine tools, while it ensures consistent radial and axial accuracy. It is lighter, shorter, stiffer, and more precise than any competitive quick-change tooling technology, and it is the only technology currently available that is designed to perform at tomorrow's spindle speeds. With these advantages going for it, the HSK revolution is ready to begin.
About the Author
Dr. Eugene Kocherovsky is a product research engineer and Bruce Travis is business manager for Valenite Inc., Madison Heights, MI.


