Best ways to choose a touch probe
Best ways to choose a touch probe
For manufacturers looking to reduce setup times, increase machine usage time and improve the dimensional accuracy of the finished workpieces, touch probes can offer great advantages.

 By Heidenhain Corp.
For manufacturers looking to reduce setup times, increase machine usage time and improve the dimensional accuracy of the finished workpieces, touch probes can offer great advantages. In fact, most touch probes on the market offer easy integration with machine tools and CNC controls—particularly milling machines and other multi-axis machining centers.
Sometimes referred to as touch-trigger probes or triggering touch probes, the probes work by touching parts of a workpiece or tool to collect multiple data points that allows the user to more accurately determine the position of the workpiece and update machining settings accordingly.
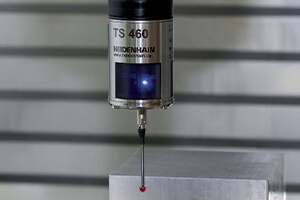
Touch probes are inserted into the tool holder either manually or by a tool changer. Depending on the probing functions of the NC control, they can automatically or manually perform workpiece alignment, preset setting, workpiece measurement and digitizing or inspecting 3-D surfaces.
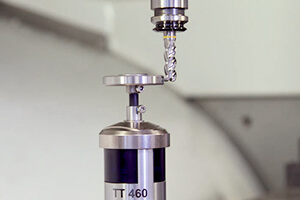
 Other styles of touch probes can allow for more accurate tool measurement—a key factor in the prevention of scrap or rework and the overall quality of the finished workpiece. In this way, touch probes are an ideal solution for monitoring tool wear or breakage during unattended or minimally supervised operation. During operation, the probe contact is deflected from its rest position, sending a trigger signal to the NC control during the 3D probing of a stationary or rotating tool.
Specific applications
When it comes to workpiece or tool monitoring/positioning, there are several specific applications that are common among manufacturers that use touch probes:
Workpiece alignment
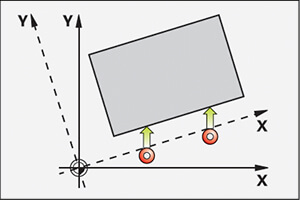
 Exact workpiece alignment parallel to the axes is important for workpieces that have been partially machined so that their existing reference surfaces are in an accurately defined position. Touch probes speed up this process exponentially; the workpiece can be clamped in any position, and the probe goes to work analyzing the position and determining any misalignment. The touch probe transmits the data back to the control, which then compensates for the misalignment by rotating the coordinate system or rotating the rotary table.
Preset setting
Programs for machining a workpiece are referenced to presets. Finding this point quickly and reliably with a workpiece touch probe reduces nonproductive time and increases machining accuracy. Depending on the probing functions of your CNC, touch probes can enable the automated setting of presets.
Workpiece measurement
 Many touch probes are suited for program-controlled workpiece measurement between two machining steps, for example. The resulting position values can be used for tool-wear compensation. Upon completion of the workpiece, the measured values can be used to document dimensional accuracy or to monitor machine trends. The CNC can output the measurement results through its data interface. With the aid of external software, the user can digitize models or measure free-form surfaces right in the machine tool. In this way, users can immediately detect machining errors and correct them without reclamping.
Tool measurement
Consistently high machining accuracy requires an exact measurement of tool data and cyclical inspection of tool wear. Touch probes can measure a variety of tools right on the machine—down to the measurement of individual teeth on a milling cutter, for example. The CNC automatically saves the measured tool data in the tool memory for later use in the part program. Using a cuboid probe contact, you can also measure lathe tools and check them for wear or breakage.
Calibrating rotary axes
Accuracy requirements are becoming more stringent, particularly in the realm of 5-axis machining. Complex parts must be manufactured with both precision and reproducible accuracy, including over extended periods of time. Certain touch probes, along with compatible machines, can calibrate the rotary axes of your machine and minimize measurement error in the machine's kinematic description. This capability makes sustained high-accuracy machining possible—from one-off parts to large production series.
Touch probe for workpiece and tool measurement
Touch probes are available in various types to meet measurement needs for machining centers, milling, boring, reaming, tapping, coun…" title="Operation in which a rotating tool is used to create a round hole in a workpiece. Drilling is normally the first step in machining operations such as boring, reaming, tapping, coun…" aria-label="Glossary: drilling">drilling, and boring machines, as well as on CNC lathes. Here are some things to consider when assessing touch probes for workpiece and tool measurement:
Connectivity
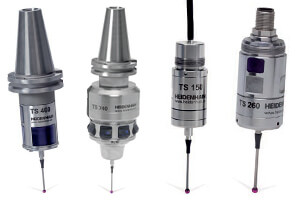
There are touch probes available with wireless signal transmission for machines equipped with automatic tool changers as well as touch probes with cable-bound signal transmission for machines that require manual tool changes.
Sensor
Depending on the sensor type, touch probes gather information in different ways. With an optical switch sensor, a lens system collimates the light emitted by an LED and focuses it onto a differential photocell. Upon deflection of the stylus or probe contact, the differential photocell produces a trigger signal. Thanks to the non-contacting optical switch, the sensor remains free of wear. Users enjoy high long-term stability with constant probe repeatability even after a high number of measuring cycles.
Alternately, touch probes with a high-precision pressure sensor employ force analysis. During probing of a workpiece, the stylus is deflected and a force acts on the sensors. The resulting signals are processed and the trigger signal is generated. The relatively low probing forces involved provide high probe accuracy and repeatability, virtually without the characteristics of tactile probing.
Accuracy and repeatability
When choosing a touch probe, accuracy and repeatability are crucial. But not all probes are created equal in this way. Check to be sure your touch probes are tested and proven. The length and material of the stylus, for example, have a direct influence on the trigger characteristics of a touch probe, and therefore can affect accuracy.
Additional options
When choosing a touch probe for workpiece measurement, users also want to explore options that include features like mechanical collision protection and thermal decoupling. For collision protection, a mechanical adapter between the touch probe and taper shank allows the probe to give slightly during light collisions of its housing against a fixture or workpiece. Simultaneously, the probe sends a signal to the control to stop machine operation. This same feature can prevent overheating on the probe from the spindle.
For more information on Heidenhain touch-probes, phone 847-490-1191 or visit www.heidenhain.us. To download a Heidenhain touch-probe brochure, click here. To read the original blog post, please visit www.heidenhain.us/resources-and-news/which-touch-probe-is-right-for-you.


