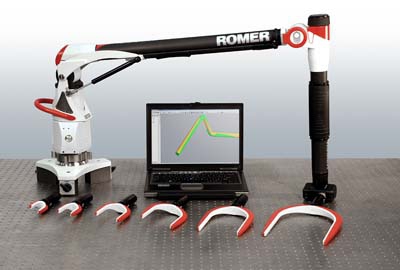
ROMER, a brand of Hexagon Metrology Inc. announced their new line of non-contact tube inspection systems. The enhanced product line provides solutions for a wide array of tube and wire bending applications including tube inspection, bend correction to reduce scrap, reverse engineering, and fixture verification. System enhancements focus on expanded flexibility, simplicity, and ease-of-use to increase shop productivity.
New to the system, a range of non-contact, infrared probes provide operator-assisted visual notification via a laser stripe indicating the measured area. The operator can view where data points are acquired on a tube or wire during the inspection process. The probes are interchangeable with traditional ball probes without the need for re-calibration, delivering true plug-and-play capability. Brackets, flanges, bosses or other geometric features can now be included in the measurement routine. Besides saving time, no re-calibration also provides an additional layer of error proofing in the field. As with ROMER's legacy systems, the non-contact probing feature enables measurement of the most flexible tubes or wires from 4mm to 130mm in diameter, without risk of deflection.
Zvonimir Kotnik, Director of the Business Management group of Hexagon Metrology Inc. sums up the new tube inspection product line, "The straightforward operation of the overall system guarantees simple, flawless operation. By making the measurement process easier for the operator, we have improved efficiency, accuracy, and productivity for the entire tube shop."
ROMER's tube inspection system is based on the patented ROMER Absolute Arm portable CMM. Proprietary absolute encoders are located in the arm's primary axes, so the arm always knows the position of its joints. This eliminates antiquated homing procedures, so the operator can turn on the system and start measuring immediately. The Absolute Encoders provide probing volumetric accuracy down to +/- 0.023mm, depending on the model. The articulating arm also features low profile, Zero-G counterbalance to stabilize its weight for one-handed operation and effortless control above and below its centerline. ROMER's tube inspection system utilizes the Data Overlay Camera System (DOCS) software platform. Pictures can be taken with the arm's onboard digital camera, and DOCS overlays the tube wire frame onto the digital picture. This enables the inspection report to show exactly how the tube was supported or fixtured during measurement. DOCS communicates with most CNC bender interfaces, so corrected bend data can be sent directly to the CNC bending machine, reducing the process of trial and error associated with manual measurements. DOCS user training is generally 2 days as compared to 5 to 6 days for traditional CMM software.
Contact Details
Related Glossary Terms
- computer numerical control ( CNC)
computer numerical control ( CNC)
Microprocessor-based controller dedicated to a machine tool that permits the creation or modification of parts. Programmed numerical control activates the machine’s servos and spindle drives and controls the various machining operations. See DNC, direct numerical control; NC, numerical control.
- fixture
fixture
Device, often made in-house, that holds a specific workpiece. See jig; modular fixturing.
- metrology
metrology
Science of measurement; the principles on which precision machining, quality control and inspection are based. See precision machining, measurement.


