For decades, coordinate measuring machines weren’t found anywhere near the shop floor, where the actual manufacturing was going on. This meant several additional steps were required to inspect a part on a CMM. To advance continuous improvement, portable CMM (PCMM) arms allow shops to bring inspection to where the parts are being machined.
Master Class
There are a variety of PCMMs in use on shop floors today, each offering slightly different capabilities. For example, the Master3DGage, at its heart, is a PCMM arm and the result of collaboration between Hexagon Metrology Inc., North Kingstown, R.I., software developer Verisurf Software Inc., Anaheim, Calif., and the Mastercam reseller distribution network. Hexagon supplies the hardware, Verisurf the software and various resellers provide sales and support for the CAD/CAM package from CNC Software Inc., Tolland, Conn. According to a whitepaper titled “What Your Shop Needs To Know About Portable CMMs,” by Ron Branch, the articulated arm has a reach of 2 ' to 12 ' and can be temporarily mounted on any rigid surface, allowing it to evade the physical size limits common with stationary CMMs. Additionally, the paper continues, the Verisurf software allows the user to make on-the-fly direct measurements (as an alternative to a hand tool), measurements to drawings in accordance with datums, dimensions and GD&T callouts, and direct comparisons to CAD models.
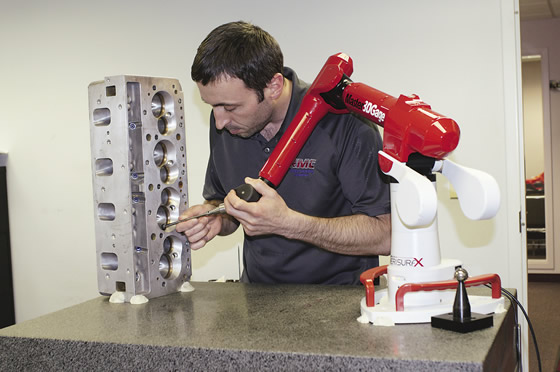
Courtesy of RMC Engine Rebuilding Equipment
RMC Sales Manager Matt Napolatino uses the Master3DGage inspection arm to digitize a GM SB2 Nascar cylinder head.
“It brings full inspection capabilities directly to the parts,” said David Olson, director of sales and marketing at Verisurf. “This becomes particularly critical when parts are large and heavy, such as a steel casting. Imagine it’s loaded up on the machine, but you want to check it before you proceed with secondary operations. With a PCMM, you can quickly run an inspection on the part while leaving it mounted on the machine. There’s no gantry lift, no remounting, no issues repeating the setup and very little delay.”
RMC Engine Rebuilding Equipment Inc., Saginaw, Mich., not only uses the Master3DGage system in its shop, but acts as a reseller, allowing its customers to expand and increase their capacities and capabilities, according to Matt Meyer, manager.
“Our customers use it primarily for reverse engineering cylinder head ports and chambers,” he said. “Inside a cylinder or an engine block, you don’t have any line of sight for laser or optical methods, so it all relies on hard probing, and using the 6-axis arm rather than a traditional CMM table allows them to collect the data quickly and effectively.”
Previously, RMC required a standard CNC machine fitted with Marposs wireless machine probes to collect data on parts and reverse engineer tooling and fixturing for customers; other methods involved cutting a cylinder in half and scanning the inside or making a silicon mold of the inner workings and scanning the resulting impression. The problem with those methods, Meyer explained, lay in realigning them with the original piece.
“With Master3DGage, not only can we get the point-cloud data to make CAD surfaces of the interior, we can also take the exact positions of the valve guide, the seat pocket and the way the valve fits into the head,” he said. “Making sure the ports are aligned 100 percent to the part they are trying to fit to is critical, especially for our high-end racing customers.”
A Scanner Darkly
The basis of the portable CMM arm, according to Burt Mason, product manager–portable arms for Hexagon Metrology, is to allow an operator to reach and touch the part to be measured with a hard probe and collect data. However, Hexagon has added an integrated laser scanner in one model of its Romer Absolute PCMM arms and developed an external laser scanner for another model to allow for multiple measuring techniques from the same arm.
“Scanning has opened up a whole new world for us,” Mason said, “and with the integrated capability, you don’t need to calibrate—you just turn it on and start measuring.”
While the probe may be more accurate than the scanner, with an accuracy of 0.001 "(0.025mm), laser scanners can cover more surface area in a shorter amount of time, making them ideal for large parts with more forgiving tolerances, according to Mason.
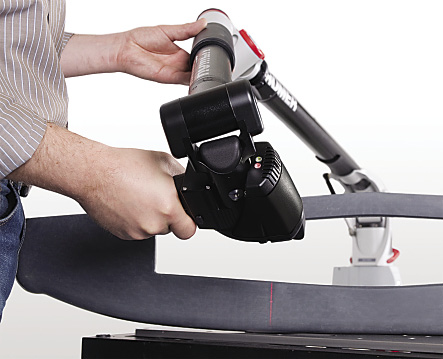
Courtesy of Hexagon Metrology
Hexagon Metrology’s Romer Absolute PCMM arm can use its laser scanner to cover a large surface area.
Nikon Metrology Inc., Brighton, Mich., also offers a portable arm, which can be retrofitted with one of six ModelMaker laser scanners, allowing either touch probing or laser scanning, depending on the application. Business Development Manager Alex Lucas said this allows Nikon to customize the product to specific applications.
“When using a hard probe, you are going to a targeted location and taking individual point measurements,” he explained. “With the laser scanner, you essentially let the system act as a virtual paintbrush. The brush is determined by the width of the laser stripe, and, as it scans over the surface, it digitizes it to create a virtual model.
“The best laser to use depends on what the customer’s job calls for,” he continued. “There’s no cookie-cutter approach to implementing laser scanning into a shop’s inspection routine.”
Teaching Tolerance
In a high-volume production facility, the automation capability of a stationary CMM might make it the advantageous choice, Hexagon’s Mason explained. Additionally, PCMMs cannot typically verify tight tolerances. However, for some applications, the accuracy may not be an issue.
“Most parts don’t require extreme accuracy,” he said. “The quick-change probes are a huge improvement. The fact is that our system is thermally stable so external temperature changes don’t impact the results, and the use of absolute encoders, which eliminate the need to find a zero point, have all increased the accuracy to the point where it’s suitable for most low-volume applications.”
Verisurf’s Olson agreed, positing that while PCMMs cannot hold the same tolerances as their stationary forbearers, they are accurate enough for 90 percent of the work done at 90 percent of machine shops.
“You’d be hard-pressed to find many tolerance callouts that are tighter than [a PCMM] can handle,” he said, noting a portable arm is suitable for any tolerance looser than 0.005 ". “Personally, if I see tolerances tighter than about 0.005 " (0.127mm), I ask the engineer what we need those tolerances for.”
Additionally, Olson said the lack of automation with PCMMs is offset by their on-the-spot capability, making them ideal for first-run part inspection.
Training Day
While many general PCMM concepts will be familiar to anyone with experience operating a traditional CMM, portable arms still typically require some training—if only to help operators use the full potential of the articulated arm.
“One of the biggest differences is the high level of articulation,” said Verisurf’s Olson. “The 6-axis arm can reach down and around inside things much better than the more rigid axes of a stationary CMM, allowing you to do things a traditional CMM can’t really manage, and that can be difficult for seasoned QA guys to wrap their heads around. Usually, though, it’s a simple enough adjustment.”
Verisurf offers PCMM training to its resellers, who in turn train their customers. RMC offers its Master3DGage customers a 3-day training class. According to Meyer, the first day covers the fundamentals and the software, and the second day involves hands-on measurement techniques.
“The third day is spent on application-specific operations,” he said. “We help them collect data on their specific projects and turn that data into something they can use.”
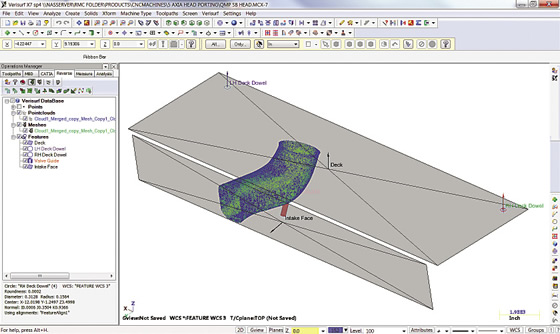
Courtesy of Engine Rebuilding Equipment
A point cloud image of an intake port from the GM SB2cylinder head, collected using a Master3DGage.
The amount of training offered by Hexagon for its portable arms varies based on the product and the customer’s prior knowledge, Mason explained. The software package is a major factor in determining the required level of training.
“We have a system that uses a program called PC-DMIS Touch [a Hexagon software package], which is intuitive—you can create an alignment, measure features and distances, and the only training necessary is an hour-long online class,” Mason said. “On the other end of the spectrum, we have systems that allow for hard probing as well as laser scanning to generate a point cloud for inspection and reverse engineering. For those systems, we offer a 5-day training course.”
Nikon offers training to customers as well, typically in the form of a 2-day session either at the customer’s facility or in a classroom setting at the local Nikon office, Lucas said.
Nikon includes training and the first year of service and maintenance in the price of the PCMM, he added. “We encourage shops to recalibrate the laser scanner every 2 years, but we also include a calibration plate, which can be scanned, and if the data is accurate to within a certain threshold, recalibration is not necessary.”
Master3DGage systems can be sent to a local service center for repairs and calibrations, Verisurf’s Olson said, and the only maintenance required on the customer’s end is to keep it clean and avoid mistreatment. As for Hexagon PCMMs, Mason recommends following ISO calibration standards, and shops also receive a length standard traceable to the National Institute of Standards and Technology (NIST).
“The advantage is that, at any time, an operator can use the length standard to verify the machine is working properly,” Mason said. “If the machine is dropped or there’s some sort of accident in the shop, the NIST length standard lets you know whether your inspection data is going to be accurate before you resume production.”
Applications R Us
In his whitepaper, Branch stated that PCMMs have historically been used in the aerospace industry, but the approach of taking 3D measurements on the floor at the source for immediate feedback and reporting against the engineering quality specifications is a growing trend outside the aerospace industry, a claim others are happy to support.
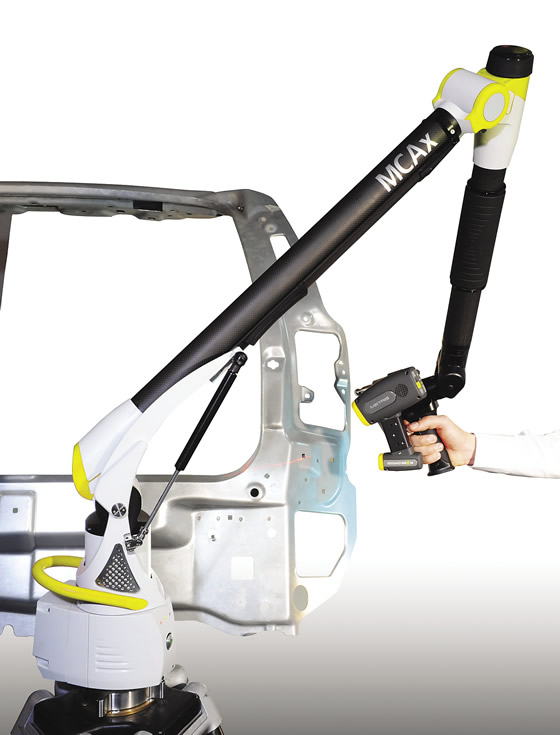
Courtesy of Nikon Metrology
Nikon’s MCAx manual CMM arm can use a ModelMaker MMDx laser scanner to digitize parts, such as this car door.
“The use of PCMMs runs an incredibly wide range,” said Nikon’s Lucas. “Outside of aerospace, we see a lot of automotive customers, as well as a significant presence in heavy machinery and general manufacturing, and even some recent inroads into medical device manufacturers.”
Verisurf’s Olson said PCMMs are well-suited for virtually anything on the shop floor that fits into the inspection envelope—though the value is most easily realized when inspecting large, heavy parts.
RMC’s customers manufacture high-performance automotive parts, and Meyer said PCMMs have streamlined the entire inspection process.
“The flexibility of the articulated inspection arm lets you do things you just can’t do otherwise,” he said. “You not only have the portability of the unit and the flexibility of the articulated arm, you have the software to collect the data, clean it, manipulate it and generate the final CAD surface. With all the twists and turns and curves inside some of these nongeometric engine parts, it would basically be a nightmare on a regular CMM.” CTE
About the Author: Evan Jones Thorne is assistant editor of CTE. Contact him at (847) 714-0177 or [email protected].
Moving and (measuring) grooving—and other part features
Coordinate measuring machines have traditionally kept to themselves, avoiding the hurly burly of the shop floor. “CMMs really weren’t a part of production for a long time,” said John Lewis, marketing manager for Zeiss Industrial Metrology LLC, Maple Grove, Minn. “They were massive, sat on a big granite plate and typically were kept in a climate-controlled metrology lab, nowhere near the production line.”
Courtesy of Zeiss Industrial Metrology
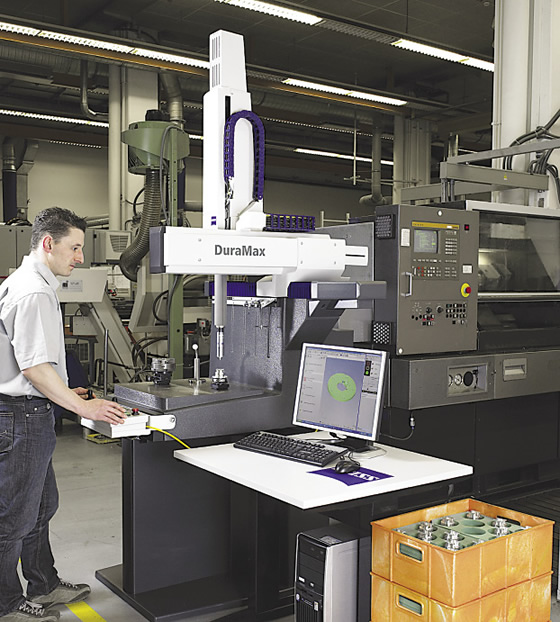
Zeiss Industrial Metrology developed the DuraMax as shop-floor inspection solution.
This created problems for part production, he explained, because when a part was taken out of the line for inspection, production didn’t stop. If a discrepancy was found, all the parts made after taking the inspected part out of the line could end up being scrapped.
While most stationary CMMs can be positioned at least near the production line, something as simple as temperature fluctuations can still throw off the results, he continued, unless they are inside a protective enclosure. This solves one problem, but doesn’t help with mobility. So, Zeiss and other metrology manufacturers created portable CMMs resilient enough to withstand the rigors of the shop floor. The DuraMax is Zeiss’ offering.
“Essentially, it’s just a regular CMM but with measures taken to protect it from all of the environmental factors that surround it and allow it to be moved to other cells,” Lewis explained. “For example, CMMs typically use air bearings to move machine components across the surface, but the DuraMax uses a spindle system with an additional vertical axis, so it is not dependent on having an air supply everywhere in the shop.”
Furthermore, the DuraMax is operated by individuals on the production floor, without the need for an on-site metrologist to program the machine. According to Lewis, Zeiss Calypso software allows programs to be written remotely from a shop’s metrology lab and the results are transmitted to the CMM. All the operator needs to do is know what program to run.
The Zeiss DuraMax has a 3 '× 3 ' (0.9m × 0.9m) footprint, a measuring range of 19.7 ' × 19.7 ' (500mm × 500mm), repeatability of 1.7µm and its accuracy is compliant with ISO 10360 standards.
—E. Jones Thorne
Contributors
Hexagon Metrology Inc.
(401) 886-2000
www.hexagonmetrology.com
Nikon Metrology Inc.
(810) 220-4380
www.nikonmetrology.com
RMC Engine Rebuilding Equipment Inc.
(800) 248-5062
www.rmcengine.com
Verisurf Software Inc.
(888) 713-7201
www.verisurf.com
Zeiss Industrial Metrology LLC
(800) 327-9735
www.zeiss.com
Related Glossary Terms
- calibration
calibration
Checking measuring instruments and devices against a master set to ensure that, over time, they have remained dimensionally stable and nominally accurate.
- computer numerical control ( CNC)
computer numerical control ( CNC)
Microprocessor-based controller dedicated to a machine tool that permits the creation or modification of parts. Programmed numerical control activates the machine’s servos and spindle drives and controls the various machining operations. See DNC, direct numerical control; NC, numerical control.
- computer-aided design ( CAD)
computer-aided design ( CAD)
Product-design functions performed with the help of computers and special software.
- metrology
metrology
Science of measurement; the principles on which precision machining, quality control and inspection are based. See precision machining, measurement.
- tolerance
tolerance
Minimum and maximum amount a workpiece dimension is allowed to vary from a set standard and still be acceptable.


