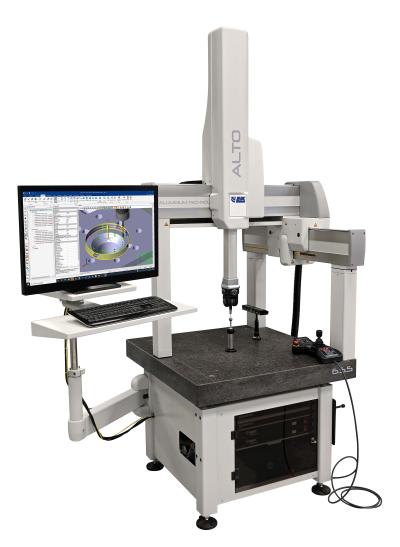
Manufacturers wishing to progress from manual metrology to using a CNC coordinate measuring machine (CMM) have a new option to consider – the new ALTO 6.5.5 from CMM manufacturer LK Metrology, Derby, UK (www.LKmetrology.com). Appealing to the entry-point of the CMM market, the machine has guideways made from aluminium, lowering the capital cost compared with making those components from ceramic, as is the case with most LK CMMs. Several innovative design features have resulted in a surprisingly compact measuring machine, with the high accuracy and rapid throughput normally associated with more expensive systems.
The CMM is of half-gantry design, which improves accuracy by shortening on one side the leg supporting the bridge. Additionally, the fixed aperture created beneath the short leg facilitates easier loading and unloading of components from that side of the machine. Micro-machining of the aluminium elements by fly-cutting them in an unclamped condition eliminates distortion that might occur on releasing conventional workholding fixtures after milling. All of the aluminium parts are hard anodised before assembly of the CMM, creating a 50 µm thick layer that imparts extreme durability and prevents corrosion.
Rapid 5-axis touch-trigger measurement
Designed for touch-trigger probing only, the CMM is capable of capturing precise measurements very rapidly, as it is able to deploy a motorised PH20 5-axis probe head from Renishaw for a three-fold increase in inspection speed. Continuous angular rotation and infinite positioning (similar to the company's top of the range REVO2 probing system) avoids having to move the machine's X, Y, and Z axes at high speed, minimising dynamic errors. For some measurements in a cycle, it is not necessary to move the linear axes at all. The results are better accuracy and repeatability.
Furthermore, 5-axis motion allows larger parts to be measured on the CMM by minimising the space required around the part for head rotation. Unsurprisingly the PH20 is the most expensive probe head on offer. So mindful that price is likely to constrain many potential ALTO purchasers, LK alternatively offers lower-cost motorised and manual head options. Available also is a range of surface roughness probing solutions, as well as stylus change racks with self-calibration and automatic tip correction on changeover.
Advanced CMM construction
The design of the ALTO is optimised around the need for a compact CMM with linear travels of 600 x 500 x 500 mm. All electronics including the PC system are integrated within the base for a small footprint and guideways do not extend beyond the table, as in other designs.
Apart from the use of aluminium in place of ceramic for the guideways, no compromises have been made in the construction of the new machine, which integrates all top-end features of LK's other CMMs. They include a 100 mm thick granite table, low maintenance pre-loaded air bearings and zero-hysteresis friction drives in all axes for smooth motion and exact positioning. Standard equipment are a sub-micron optical measuring scale system with dynamic signal processing for stability, pneumatic counterbalance in the Z-axis and multi-sensor thermal compensation. The machine minimises inspection cycle times due to rapid acceleration at 1,500 mm/s2 up to axis speeds of 500 mm/s.
The machine is capable of measuring a length L to an accuracy of 2.5 + 3.0L/1000 μm to a high degree of repeatability in an environment temperature controlled to between 16 and 26°C. An optional shop-floor pack with a pneumatic anti-vibration system and extended operational temperature range of between 15 and 35°C is available if the CMM is to be deployed in harsher or uncontrolled production environments outside a quality control room.
Simple one-touch software
The world's first all-touch CMM software, TouchDMIS, is supplied with the machine. Requiring just a few hours' training for an operator to become proficient, it deskills CMM programming and measuring through its minimalistic user interface. It offers native import of STEP and IGES files and full CAD capability.
Ergonomically developed to provide maximum productivity for both novice and expert CMM users, the touchscreen graphical user interface incorporates floating toolbars to maximise the area available for graphics, with all principal software actions accessed via eight large buttons. TouchDMIS has no drop-down menus or stacked toolbars and all functionality is simply accessed with a single touch. A choice of reporting options is provided.
Contact Details
Related Glossary Terms
- computer numerical control ( CNC)
computer numerical control ( CNC)
Microprocessor-based controller dedicated to a machine tool that permits the creation or modification of parts. Programmed numerical control activates the machine’s servos and spindle drives and controls the various machining operations. See DNC, direct numerical control; NC, numerical control.
- computer-aided design ( CAD)
computer-aided design ( CAD)
Product-design functions performed with the help of computers and special software.
- gang cutting ( milling)
gang cutting ( milling)
Machining with several cutters mounted on a single arbor, generally for simultaneous cutting.
- metrology
metrology
Science of measurement; the principles on which precision machining, quality control and inspection are based. See precision machining, measurement.
- milling
milling
Machining operation in which metal or other material is removed by applying power to a rotating cutter. In vertical milling, the cutting tool is mounted vertically on the spindle. In horizontal milling, the cutting tool is mounted horizontally, either directly on the spindle or on an arbor. Horizontal milling is further broken down into conventional milling, where the cutter rotates opposite the direction of feed, or “up” into the workpiece; and climb milling, where the cutter rotates in the direction of feed, or “down” into the workpiece. Milling operations include plane or surface milling, endmilling, facemilling, angle milling, form milling and profiling.
- quality assurance ( quality control)
quality assurance ( quality control)
Terms denoting a formal program for monitoring product quality. The denotations are the same, but QC typically connotes a more traditional postmachining inspection system, while QA implies a more comprehensive approach, with emphasis on “total quality,” broad quality principles, statistical process control and other statistical methods.


