MarForm MFU 200 Aspheric 3D Measuring Station
MarForm MFU 200 Aspheric 3D Measuring Station
Mahr Federal Inc. has introduced a new high-precision measuring station to measure and evaluate optical components, including freeform, aspheric, and spherical lenses.

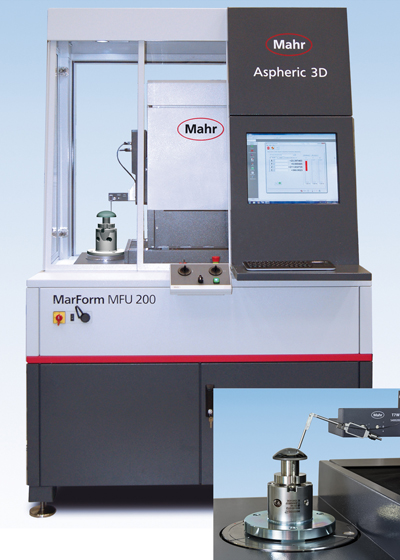
Mahr Federal Inc. has introduced a new high-precision measuring station to measure and evaluate optical components, including freeform, aspheric, and spherical lenses. Developed to provide quick 2D and 3D testing to support the entire lens production process, the MarForm MFU 200 Aspheric 3D is CNC operated with nine motorized axes, including four measuring axes, and delivers the highest measuring speed available and ultraprecise path control. The system includes both an interferometric point sensor for fully non-contact measurements, and a tactile probing system for surfaces in early stages of production that do not allow the interferometer to interact well with the rough surface.
The high precisionMarForm MFU 200 Aspheric 3D ensures very low measurement uncertainties while quickly measuring the complete topography of optical components. For the complete 3D measurement of a lens, one or more linear profiles are measured over the zenith of the lens, then several concentric circular profiles at different radii are recorded by turning the C-axis. All of these measuring points are combined to create the 3D topography. Interrupted surfaces can also be measured easily with the MFU 200 since the probe can automatically move over the interruption. The system includes built-in vibration isolation and a full machine enclosure to ensure minimal effects from the external environment.
When measuring aspheric lenses the measuring data is recorded and compared to the nominal data of the lens, and the RMS value, PV value, and slope error are all reported. Individual parameters for the asphere, such as degree of curvature R0, conic constant k, and aspheric coefficients Ai can be adjusted to the measuring results to determine sources of error, or held fixed to determine total error as compared to the nominal lens design data. The differential topography between the recorded measuring values and the nominal lens definition is depicted as a color-coded height image for an easy-to-understand graphical representation of the measured errors.
Several popular brands of processing machines can be used directly with the MFU 200 to provide closed loop control of lens grinding and polishing processes. The ability to exchange data is included as part of the standard software of the MFU 200. This includes the ability to get the desired nominal profile directly from the machining center and return the error map resulting from the MFU 200 measurement to the machining center. When used in this manner, the MFU 200 can help the machining centers reduce the overall processing time required for each operation resulting in significant time and cost reductions.
Freeform, and even unknown form, optics can also be easily measured by the MFU 200 since it can be used in a measuring mode where it will track the contour of the freeform surface and allow for the measurement of surfaces with large departures from a spherical or aspherical shape. The resulting data set can be exported in a variety of formats for comparison to CAD nominal geometries.


