END USER: Waltz Brothers Inc., (847) 520-1122, www.waltzbros.com.
CHALLENGE: Produce flight-critical hydraulic pumps more rapidly and precisely.
SOLUTION: A multifeed honing system.
SOLUTION PROVIDER: Sunnen Products Co., (800) 325-3670, www.sunnen.com.
When Waltz Brothers Inc. needed to create flight-critical hydraulic pumps, it initially relied on standard horizontal honing equipment, which depends heavily on operator skill. The operator needed to hone one bore, clean the part, air gage it at three different levels and then at 90°—bottom, middle and top—to check for issues, such as tapering that may need to be feathered out. If one bore is incorrectly honed, it can result in a scrapped part.
But when the Wheeling, Ill., machine shop switched to the SV-1015 vertical CNC honing machine from St. Louis-based Sunnen Products Co., the nine-bore components were consistently produced with only 0.000020" (0.5µm) variation—a quarter of the allowable tolerance.

Courtesy of Sunnen Products
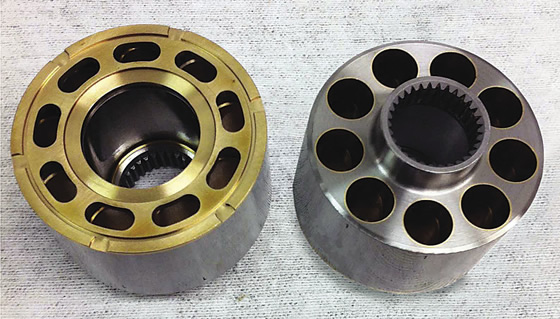
The piston bores of the pump body are not through-holes, but have kidney-shaped slots cut through the bottom.
This accuracy is largely the result of Sunnen’s “smart” tooling technology, which combines controlled-force tool-feed capabilities with its existing controlled-rate feed system, according to Sunnen. This and other automation capabilities, such as robotic part indexing and in-process air gaging, have allowed Waltz Brothers to increase accuracy while decreasing cycle times.
“Our focus is close-tolerance, precision parts requiring many operations that typically conclude with grinding, honing or lapping,” President Larry Waltz said. “If a part is machined between centers, most shops will not be too concerned about variation in the centers, which will affect how consistently the part locates in a grinding fixture. But we want to control these factors, which include straightness, hardness and stock allowance.”
The rotors of Waltz’s piston pumps begin as a turned blank up to 8" (203.2mm) in diameter. Then, nine circumferential piston bores from 0.1875" to 1.5" (4.8mm to 38.1mm) in diameter, depending on rotor diameter, are roughed on a machining center. The bores are not through-holes, but have kidney-shaped slots cut through the bottom. Some designs require heat treating, bronze bore liners or bronze plating on the bottom of the part. Liners may be cast in or produced on the shop’s screw machines, then anchored into retaining grooves with a ballizing process or swaging.

Courtesy of Sunnen Products
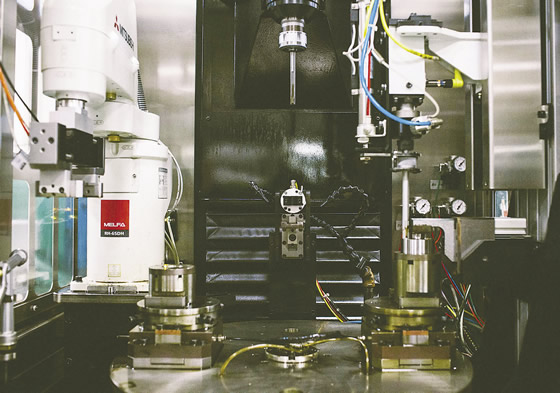
The work envelope of the Sunnen SV-1015 honing machine shows an air-bearing index table in the foreground, a robot to the left, the honing spindle and tool in the center and an air gage to the right.
Production honing processes are typically set up for one set of specific part conditions with tool expansion and the final size programmed based on the rate of time. However, when a batch of parts comes in with a different heat treatment, distortion or a size variation, the operator must intervene or the tool may expand too quickly and be damaged. When honing softer materials, the tool may expand at the programmed rate when it might have otherwise been able to expand faster to reduce cycle time.
The SV-1015 can compensate for these variables by controlling the force in the tool-feed system. This feature works in concert with the machine’s standard rate-feed system and functions like cruise control to maintain the optimal cutting load, regardless of the part’s hardness, geometry or size variation.
The machine has a single 5-hp AC spindle with a 10-hp servo stroking system and an X-Y air bearing table. The operator loads the workpiece in a dedicated fixture that uses a kidney slot on the part as a locating feature.
The table indexes 90° after each bore to an Etamic air gaging station, where the necessary readings are taken and stored. If the bore passes inspection, the table moves the part to a robot that indexes it for the next bore. The routine is duplicated eight times to complete the part. A fixed-position master set ring inside the machine’s work envelope ensures correct gage calibration for the environmental conditions.
“On a recent project with an allowable bore tolerance of 0.000240", we easily held a tolerance of 0.000060"—that’s 25 percent of the total allowable tolerance. And we tripled the previous production rate while reducing the labor component by 80 percent, so the operator can do other work in the cell,” Waltz said. “From reinspecting the parts on our coordinate measuring machine, we know that the results correlate well. The process capability and data reporting features in the machine have been a great advantage to us and our customers, allowing that data to be downloaded to a spreadsheet or SPC software.”
Related Glossary Terms
- calibration
calibration
Checking measuring instruments and devices against a master set to ensure that, over time, they have remained dimensionally stable and nominally accurate.
- centers
centers
Cone-shaped pins that support a workpiece by one or two ends during machining. The centers fit into holes drilled in the workpiece ends. Centers that turn with the workpiece are called “live” centers; those that do not are called “dead” centers.
- computer numerical control ( CNC)
computer numerical control ( CNC)
Microprocessor-based controller dedicated to a machine tool that permits the creation or modification of parts. Programmed numerical control activates the machine’s servos and spindle drives and controls the various machining operations. See DNC, direct numerical control; NC, numerical control.
- feed
feed
Rate of change of position of the tool as a whole, relative to the workpiece while cutting.
- fixture
fixture
Device, often made in-house, that holds a specific workpiece. See jig; modular fixturing.
- grinding
grinding
Machining operation in which material is removed from the workpiece by a powered abrasive wheel, stone, belt, paste, sheet, compound, slurry, etc. Takes various forms: surface grinding (creates flat and/or squared surfaces); cylindrical grinding (for external cylindrical and tapered shapes, fillets, undercuts, etc.); centerless grinding; chamfering; thread and form grinding; tool and cutter grinding; offhand grinding; lapping and polishing (grinding with extremely fine grits to create ultrasmooth surfaces); honing; and disc grinding.
- hardness
hardness
Hardness is a measure of the resistance of a material to surface indentation or abrasion. There is no absolute scale for hardness. In order to express hardness quantitatively, each type of test has its own scale, which defines hardness. Indentation hardness obtained through static methods is measured by Brinell, Rockwell, Vickers and Knoop tests. Hardness without indentation is measured by a dynamic method, known as the Scleroscope test.
- lapping
lapping
Finishing operation in which a loose, fine-grain abrasive in a liquid medium abrades material. Extremely accurate process that corrects minor shape imperfections, refines surface finishes and produces a close fit between mating surfaces.
- machining center
machining center
CNC machine tool capable of drilling, reaming, tapping, milling and boring. Normally comes with an automatic toolchanger. See automatic toolchanger.
- statistical process control ( SPC)
statistical process control ( SPC)
Statistical techniques to measure and analyze the extent to which a process deviates from a set standard.
- tolerance
tolerance
Minimum and maximum amount a workpiece dimension is allowed to vary from a set standard and still be acceptable.
- work envelope
work envelope
Cube, sphere, cylinder or other physical space within which the cutting tool is capable of reaching.


