When finishing parts, shops may want to hit them with their best shot. While commercial shot peening equipment looks and is used like the small abrasive blasting machines most shops use to clean, remove slag, scale and corrosion, or provide texture on parts, the process has other purposes: to significantly improve part performance and life.
In the process, metallic, glass or ceramic shot impacts a surface to plastically deform it. Essentially, each particle functions as a tiny ball-peen hammer. A peened surface spreads plastically, changing its mechanical properties.

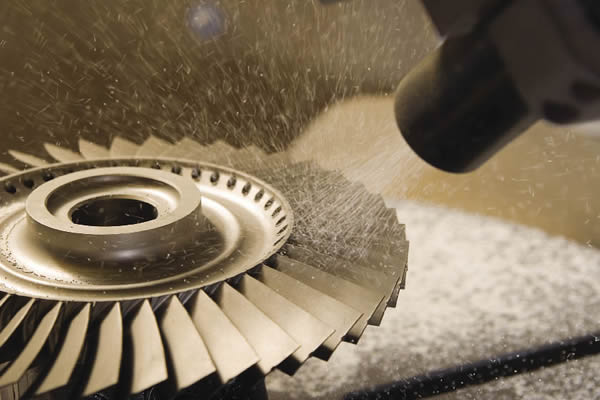
Multiaxis, robotic, closed-loop process control shot peening of an aircraft engine component. Image courtesy of Progressive Technologies.
Shot peening is widely used on highly stressed parts to remove detrimental tensile surface stresses and replace them with compressive stresses that resist operating forces and cyclic stresses. It is one of the easiest, least expensive and safest part finishing processes, and accommodates almost any part geometry and work material.
With proper peening, heavily stressed parts can withstand higher cyclic stresses, reducing the potential for fatigue fracture and extending part life. In turn, the higher fatigue strength may allow specifications of slightly lighter parts, which saves material and transportation costs for conventional parts and reduces jet fuel consumption in aircraft applications.
Repeated cycles of twisting, bending or flexing a part cause fatigue failures if loads are too high. Fatigue cracks originate from surface flaws, but peening closes them; in some instances, it actually welds them together, thus eliminating them as immediate sources of cracks and failures.
Shot Peening Applications
The most common users of shot peening are producers of automotive transmission gears, highly stressed coil and leaf springs, welded joints and turbine blades. Peening is particularly useful on turbine blades because they operate continuously under large centrifugal forces that try to tear the blades apart. Chemical plants use peening to reduce stress-corrosion cracking in piping and vessels subject to stress corrosion. Fastener makers use it to reduce fretting corrosion. Shot peening is also used on aluminum die-cast transmission housings and gearboxes to close pores, preventing lubricant loss through the porous walls.
Shot peening effectiveness depends upon several factors. Longer peening time increases surface hardness and compressive stresses—up to a point. Shot size, shape, density, hardness and velocity are major factors in how the shot impacts the surface and in the effects of the peening process. Distance of the nozzle from the part affects particle velocity at impact.

Courtesy of Electronics
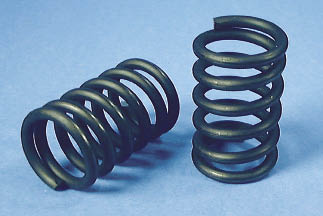
Coil springs are one of the common parts that are shot peened to increase their life.
The impact of shot size and velocity that each particle delivers to the part is expressed by the equation E=1/2mv2, where E is the energy produced when an individual shot particle hits, m is the mass (weight) of the shot particle, and v is the velocity at which it hits the part. Most of that energy stretches the metal at the point of impact beyond its elastic limit so the part stores the energy of the impact as plastic deformation at and just below the part surface. That plastic deformation causes compressive stresses.
Aerospace Materials Specification 2431 describes seven types of peening media: cast iron shot, cast steel shot, carbon and stainless steel cut wire, peening balls, glass shot and ceramic shot. Shot media must be as hard or harder than the workpiece. Peening needs smooth-edged (normally almost round) particles to provide uniform plastic deformation.
Cast steel shot varies in hardness from 45 to 52 HRC, so it is used for parts softer than 45 HRC (a 55 to 62 HRC version of cast shot is also available). Carbon steel cut wire lasts longer than cast materials, so it is more economical in many instances. Stainless steel cut wire is used where carbon steel would leave corrosion-causing particles.
Typical shot blasting media comes in standard sizes (Table 1). Peening balls vary in size from 1⁄8 " to ½ ". Cut steel wire shot is defined by cut wire numbers from 20 to 62, with a CW20 corresponding to a 0.020 "-dia. wire, each about 0.020 " long. Glass and ceramic beads are chemically inert and use different SAE, Mil Spec and company size numbering systems. Glass beads are available from 0.0015 " to 0.0661 " in diameter. The smaller sizes allow the shot to reach into small crevices and root sections. Ceramic shot ranges from 0.008 " to 0.046 " in diameter and lasts longer than glass. Detailed information about glass beads is available on the Media Blast & Abrasive Inc. Web site: www.mediablast.com/glass-bead-conversion.asp.
After shot has been used once, it begins to break down into smaller particles. Because used shot is not of uniform size, it must be continuously sieved to remove undersized particles.
Shot Blasting Equipment
Tyler Cotton, president of Blast Abrade Inc., Elyria, Ohio, said small, simple shot blasting equipment costs about $30,000, while a larger, more automated machine can cost up to $250,000. Heavy-duty, large-scale, high-production units may cost several million dollars. All machines need special screening classifiers and air-wash separators to remove undersize media and dust from the shot operating mix.
The cost of shot media varies. The least expensive is glass-bead shot, which costs less than 40 cents/lb. Cast steel shot typically sells for 35 to 45 cents/lb., depending on the size grade and order quantity. Hard cast steel shot may have a process and price premium of 6 to10 percent. Carbon steel cut wire shot costs about $1.50/lb., while stainless steel cut wire shot costs about $3.50/lb.
Table 1: Cast steel shot sizes and equivalent cut wire shot sizes.
| Cast steel size | U.S. standard sieve ranges | Average diameter (inches) | Equivalent cut wire size |
|
S-70 |
45 to 80 mesh |
0.0117 |
CW 12* |
|
S-110 |
40 to 50 mesh |
0.0139 |
CW 14* |
|
S-130 |
35 to 45 mesh |
0.0165 |
CW 17* |
|
S-170 |
30 to 40 mesh |
0.0197 |
CW 17, CW 20* |
|
S-190 |
25 to 35 mesh |
0.0234 |
CW 20, CW 23* |
|
S-230 |
20 to 30 mesh |
0.0278 |
CW 23, CW 28* |
|
S-280 |
18 to 25 mesh |
0.0331 |
CW 28, CW 32* |
|
S-330 |
16 to 20 mesh |
0.0394 |
CW 32, CW 35*, CW 41 |
|
S-390 |
14 to 18 mesh |
0.0469 |
CW 41, CW 47* |
|
S-460 |
12 to 16 mesh |
0.0555 |
CW 47, CW 54* |
|
S-550 |
10 to 14 mesh |
0.0661 |
CW 62, CW 66* |
|
S-660 |
8 to 12 mesh |
0.0787 |
CW 80* |
* Recommended cut wire size for equivalent peening intensities and coverage rates. Shotpeener.com
Shot peening machines can process from five to 500 parts per hour, depending upon required coverage, part size and part geometry. Shops typically charge between $100 and $300 per hour for standard shot peening services. Specialized machines for peening parts, such as aircraft landing gear components, have rates up to $2,000 per hour.
There are two main types of peening machines: those that throw shot using compressed air and those that sling shot with a centrifugal wheel. The compressed air design allows users to move the nozzles to cover different areas of the part or to apply different levels of impact to different areas. The nozzles can be directed manually, by hard automation or by CNC. Some specifications essentially prevent manual adjustments because hand placement does not ensure consistent control.
Parts are presented to the peening media via several approaches. They include a slack belt that tumbles the parts like a barrel, parts fixtured on a rotating table, hung from spinning hangers like parts to be painted on an overhead line and parts lying on a continuous mesh belt. For low-volume processes, operators in heavy gloves can manually position parts under a stream of shot media.
Measurement and Control
There are several ways to measure and control peening. To measure peening intensity, one side of a sample Almen strip is blasted at the same conditions used on the part. The strip will curve in one direction as a result of stress changes at the surface caused by the peening. The degree of curvature provides a relative value of the blasting intensity. The Almen strip process is cheap, simple and provides both visual and quantitative information. Users test variations of peening on an Almen sample until they believe they have a combination that works.
The standard Almen sample is made from SAE 1070 cold-rolled spring steel tempered to 44 to 50 HRC and hot pressed to remove residual stresses. Using a steel like 1070 provides users with a clear understanding of process effects, as opposed to part effects. A similar specimen can then be made of the material in question to compare process effects. Separate analysis must be made on actual parts to determine if the objective was reached, but the samples save time and money and allow easy comparisons.
To measure hard-to-reach areas, a fluorescent tracer lacquer can be applied; when the area has been peened, the lacquer will be fully removed and its presence or absence readily detected by ultraviolet, or black, light.
To meet peening specifications, shot size and material, shot flow rate, Almen sample results and part position must be controlled. Adhering to process requirements is not difficult and most shop personnel can be quickly trained to provide consistent results.
Shot peening does imbed minute particles in the workpiece. This is usually not an issue, but can be.
Peening roughens most surfaces. This may be an advantage for some gears because the small pockets will hold oil better then slick surfaces. It is not an advantage for most parts and must be planned for. Fine-particle shot peening, a variation on the process, provides a much smoother surface than conventional peening. For example, Mitsubishi researcher A. Inoue tested an unpeened 7050-T7451 aircraft aluminum part with a surface finish of 0.2µm Ra. Conventional shot peening roughened the surface to 4.6 µm Ra while fine particle shot peening produced a 0.9µm Ra surface finish while increasing the residual compressive stress from 103 to 174 MPa. Vibratory finishing after peening removes the peaks of the indentations, generally without affecting the compressive stresses that peening induces.
Shot peening typically deforms thin samples unless both sides can be processed to prevent that deformation.
Four keys to successful use of shot peening include:
• Know exactly what the customer or application needs,
• Closely define the process parameters (in writing),
• Train and certify operators, and
• Provide a QA approach that controls the process and validates the part requirements.
Advances in Peening
There have been four significant advances over the past 10 years in blasting processes and two new nonparticle peening processes that advance peening capabilities.
Hard shot peening utilizes shot that is harder (58 to 64 HRC) than conventional shot peening media (40 to 62 HRC) and throws it at a higher velocity (100 m/sec.) than typical shot peening machines (~60 m/sec.). The hard shot approach can increase fatigue life by a factor of two.

Courtesy of Electronics
Almen strip being blasted and gaged. Three standard thicknesses of Almen samples are also shown.
Fine-particle shot peening throws fine shot sizes (20µm to 200µm in diameter) with hardness values of 62 HRC and harder at velocities of 200 m/sec. The finer sizes produce a smoother surface finish, which reduces friction on contact surfaces. For example, on 7050-T7451 aluminum with a beginning roughness of 2.9µm Ra, conventional shot peening produced a 5.3µm Ra finish while fine-particle shot peening slightly improved finish to 2.8µm Ra. FPSP is widely used for Japanese automotive steel springs and gears, and it is being developed for use in 7050-T7451 aluminum aircraft parts. Using FPSP, fatigue life for aluminum parts improved 10 times above that obtained with conventional shot peening, according to Inoue. Conventional shot peening improved fatigue life more than five times that of parts that were machined and not peened.
Ricochet peening. Some surfaces are hidden by part features, making direct impact with shot impossible. As an example, consider milled pockets that undercut the top surface. Peening can blast the bottom of the pocket, but the stream of particles cannot directly hit the side walls or the backside (top) portion of the undercut. In these situations, ricochet peening is a novel approach to reaching otherwise obstructed areas.
The process takes advantage of the fact that shot bounces when it hits a surface and it will still carry energy and velocity as it careens off one surface onto the next. If the correct angle is used, much of the shot bounces off the bottom and hits side walls or hidden areas. Higher part hardness increases the reflection angle. Higher shot elasticity reduces the reflection angle. For example, when ricochet peening is applied to tool steel and the incoming stream is directed at a 45° angle to the bottom surface, the shot will bounce up at a reflection angle of 33° to the bottom surface. The reflection angle in softer mild steel will be about 24° and about 22° in aluminum.
Vibratory and peening combination. Hammond Roto-Finish Co., Kalamazoo, Mich., introduced a vibratory finishing machine in 2002 that tumbles the parts in media while they pass in front of a blasting nozzle(s). The combination of these two approaches provides a fixtureless blasting system that presents many sides of the part to the shot, and at the same time the vibratory scrubbing cleans the parts in a single operation.
Rotating peening. For finishing cavities or deep holes, 3M Corp., St. Paul, Minn., introduced the Roto Peen tool, which embeds tungsten-carbide shot on a rotating flap. A machining center can insert the flexible flap in the part feature, begin rotating, move the shank-mounted flap up and down for a specified time, remove the device and peen a fixtured Almen sample on the machine bed for the same amount of time to validate the peening intensity. It is not as fast as shot peening, but it does provide a similar effect in otherwise hard-to-reach areas.
Ultrasonic shotless peening (also called cavitation peening, or CP), which reduces stress corrosion cracking, injects high-speed waterjets into a water-filled chamber. The resulting cavitation bubbles burst, producing a high-pressure, confined shock wave on the part surface. The cavitation jet is fed over the part in a back-and-forth motion.
CP can produce higher stresses than conventional shot peening and longer fatigue life, according to H. Soyama of Tohoku University. It also reduces the number of surface cracks on steel dies compared to other processes. The residual stress depth from this process is about two to seven times deeper than conventional shot peening, but less than half of laser shock peening (see sidebar on page 47) in 304 stainless steel, according to Manchester University’s S. Clitheroe.
Jack Champagne, president of Electronics Inc., Mishawaka, Ind., a leading authority on shot peening, noted that, “Shot peening advances are providing lighter, stronger and more durable metal components. Better regulation of nonferrous media flow rate, nondestructive testing methods for measuring peening intensity, online inspection of peening coverage, continual enhancement of specifications and standards and specialized Almen strip test coupons for unique applications are examples of current enhancement efforts.”
Shot peening is one of the simplest and least expensive methods for improving part properties. Its ability to extend fatigue life at a low cost makes it a process shops may want to investigate. CTE
About the Author: LaRoux K. Gillespie has a 40-year history as an engineer and manager with precision part production to government controls. He can be e-mailed at [email protected].

Courtesy of Industrial Laser Solutions
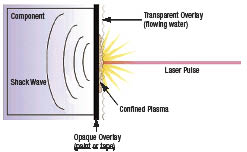
Laser shock peening schematic
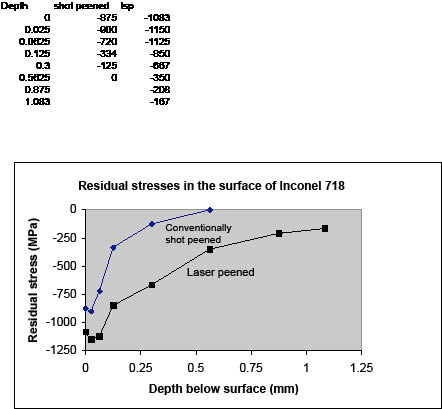
Laser shock peening (LSP) is one of the newest industrial processes for plastically deforming part surfaces. When a laser beam is pulsed on a metal surface, it produces a shock wave that travels through the workpiece; that shock wave plastically deforms a layer near the surface. To enhance the effect, two interface layers are added between the laser and the part. The beam is sent into a thin transparent overlay (normally water, but it also can be glass or quartz) and then through an absorbent coating (a thin black paint or tape). The absorbent coating vaporizes and forms a plasma, which in turn produces a high-amplitude, short-duration pressure wave. With correct settings, the pressure of the shock wave exceeds the dynamic yield strength of the metal, causing plastic deformation just like conventional shot peening. The coating also prevents the metal surface from ablating or melting. The depth of deformation and the amount of residual stress left in the part is typically deeper than that produced by any other surface treatment, according to S. Clitheroe of Manchester University and Charles S. Montross of the University of Sydney. As a result, the process potentially provides much better fatigue life and allows higher stresses for a given fatigue life.
LSP was initially applied in preventive maintenance procedures in Japanese nuclear power plants to prevent stress corrosion cracking. GE Aircraft used the process in 1997 in engines for the B-1 bomber to reduce the damage from foreign objects hitting fan blades. Today, it is also used on titanium turbine fan blades and is being considered for sealing Yucca Mountain nuclear material storage canister weld enhancements to reduce stress corrosion cracking over centuries. In the latter environment, LSP has produced residual stresses as deep as 4mm, which is 10 to 20 times deeper than that of normal shot peening, according to Michael Hill of the University of California Davis and Allan Clauer of Laser Shock Peening Technologies, Dublin, Ohio. For thin parts, both sides of the part must be processed at the same time to prevent visible distortion (bulging).
The laser makes a spot from 3mm to 10mm in diameter. To completely process a surface, the laser feeds across the part similar to a shot peening nozzle moving back and forth over a surface. Small spot diameters result in shallower depths of residual stress, but if only small areas are peened, the spot can be controlled to 1mm in diameter.
The process is effective in producing high residual compressive stresses for 2024-T3 aircraft skin aluminum, gray cast iron and high-strength steels such as AF1410. Aluminum experiences stresses in the range of -350 MPa, while high-strength steel can see values as high as -1,000 MPa. Like conventional shot peening, LSP improves corrosion resistance in treated parts.
—L. Gillespie

Courtesy of Data from C.S. Montross, University of Sydney
Comparison of residual stresses by type of peening.
Contributors
Blast Abrade Inc.
(440) 353-0001
www.blastabrade.com
Electronics Inc.
(800) 832-5653
www.electronics-inc.com
Progressive Technologies Inc.
(800) 968-0871
www.ptihome.com
Related Glossary Terms
- abrasive
abrasive
Substance used for grinding, honing, lapping, superfinishing and polishing. Examples include garnet, emery, corundum, silicon carbide, cubic boron nitride and diamond in various grit sizes.
- computer numerical control ( CNC)
computer numerical control ( CNC)
Microprocessor-based controller dedicated to a machine tool that permits the creation or modification of parts. Programmed numerical control activates the machine’s servos and spindle drives and controls the various machining operations. See DNC, direct numerical control; NC, numerical control.
- corrosion resistance
corrosion resistance
Ability of an alloy or material to withstand rust and corrosion. These are properties fostered by nickel and chromium in alloys such as stainless steel.
- elastic limit
elastic limit
Maximum stress that a material can sustain without deforming.
- fatigue
fatigue
Phenomenon leading to fracture under repeated or fluctuating stresses having a maximum value less than the tensile strength of the material. Fatigue fractures are progressive, beginning as minute cracks that grow under the action of the fluctuating stress.
- fatigue life
fatigue life
Number of cycles of stress that can be sustained prior to failure under a stated test condition.
- fatigue strength
fatigue strength
Maximum stress that can be sustained for a specified number of cycles without failure, the stress being completely reversed within each cycle unless otherwise stated.
- hardness
hardness
Hardness is a measure of the resistance of a material to surface indentation or abrasion. There is no absolute scale for hardness. In order to express hardness quantitatively, each type of test has its own scale, which defines hardness. Indentation hardness obtained through static methods is measured by Brinell, Rockwell, Vickers and Knoop tests. Hardness without indentation is measured by a dynamic method, known as the Scleroscope test.
- machining center
machining center
CNC machine tool capable of drilling, reaming, tapping, milling and boring. Normally comes with an automatic toolchanger. See automatic toolchanger.
- mechanical properties
mechanical properties
Properties of a material that reveal its elastic and inelastic behavior when force is applied, thereby indicating its suitability for mechanical applications; for example, modulus of elasticity, tensile strength, elongation, hardness and fatigue limit.
- nondestructive testing ( NDT)
nondestructive testing ( NDT)
Same as nondestructive inspection but implying use of a method in which the part is stimulated and its response measured quantitatively or semiquantitatively.
- peening
peening
Mechanical working of a metal by hammer blows or shot impingement.
- plastic deformation
plastic deformation
Permanent (inelastic) distortion of metals under applied stresses that strain the material beyond its elastic limit.
- process control
process control
Method of monitoring a process. Relates to electronic hardware and instrumentation used in automated process control. See in-process gaging, inspection; SPC, statistical process control.
- residual stress
residual stress
Stress present in a body that is free of external forces or thermal gradients.
- shot peening
shot peening
Cold working a metal’s surface by metal-shot impingement.
- undercut
undercut
In numerical-control applications, a cut shorter than the programmed cut resulting after a command change in direction. Also a condition in generated gear teeth when any part of the fillet curve lies inside of a line drawn tangent to the working profile at its point of juncture with the fillet. Undercut may be deliberately introduced to facilitate finishing operations, as in preshaving.
- web
web
On a rotating tool, the portion of the tool body that joins the lands. Web is thicker at the shank end, relative to the point end, providing maximum torsional strength.
- yield strength
yield strength
Stress at which a material exhibits a specified deviation from proportionality of stress and strain. An offset of 0.2 percent is used for many metals. Compare with tensile strength.


