Following the theme of last month’s column, here are some additional tips and tricks for operating a CNC lathe.

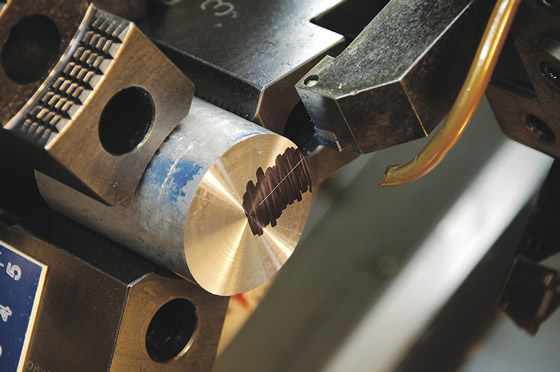
Using a turning tool, scratch a line a tenth or two deep along the turret axis. It allows you to twist a boring bar around and have something for lining up the cutting edge.
■ Try turning off the constant cutting speed when turning tricky plastics. Having manual control over the cutting speed can provide better control of the stringy chips. Chip control in a CNC lathe can be a real roadblock to unattended machining on some types of plastics. You can increase the chip load by slowing the spindle or increasing the feed rate to thicken the chip. Even a simple task like turning off the coolant can sometimes help with chip control.
■ Setting the fine serration top jaws in a CNC lathe power chuck is a common challenge. The 1mm serrations make it easy to set one tooth off and screw up the centering on a blank. Also, it’s difficult to measure three jaws and set them to the middle of the jaw travel. I made special labels that have the basic sizes engraved on them so I can quickly set the jaws to a diameter range and hit all the serrations at the same radius. It cost $5 and a little time to engrave on a mill. Be sure to thoroughly clean the part of the jaws where these labels stick on. Make it a habit to remove the fine jaw serrations from the jaw with a scratch brush when reinstalling the top jaws.

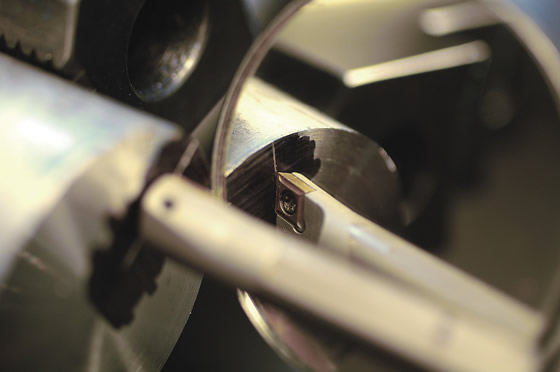
Use a mirror to see a workpiece upside down to align a tool with the scribed centerline.

For bar pulling operations, it’s better to have a spindle liner that is close to your raw stock size. Pictured is a simple spindle liner.
■ Sometimes it’s hard to align a boring bar with the machine axis and centerline when the manufacturer doesn’t provide flats on a tool. To get around this problem, I face the end of a setup bar and darken it with a marker. Using a turning tool, I scratch a line a tenth or two deep along the turret axis. This line is pretty accurately on center and aligned with the turret X-axis angle. It allows me to twist the little boring bar around and have something for lining up the cutting edge. I use a mirror so I can see upside down to align the tool with the scribed centerline.
■ Once you have set up and used a tool, do yourself a favor: When you remove it from the lathe, record at least the X-axis offset on the storage tube or directly on the tool. This will speed the setup of that tool the next time you use it. The offset won’t be perfect, but it can be darn close.
■ For all my external boring tools, I add a back stop screw that butts against the turret. This allows me to retain an accurate X offset if I take the holder out of the machine. During the next setup of that tool, I retain the X offset.

A few welds puts the finishing touch on an inexpensive spindle liner.
■ If you have enough machine X-axis travel and the control will allow it, you can run the spindle in reverse and take a light test cut on the OD of a part with an internal tool to set an accurate X offset without having to make and measure a bore. On my machine, I enter the offset as a negative X value because the tool is into the negative X quadrant. Be sure to check the control to see if it will accept a negative value and still correctly do the offset math. It’s almost always easier to accurately measure an OD than a bore or hole.
■ For bar pulling operations, it’s better to have a spindle liner that is close to your raw stock size. I made single spindle liners that drop into the headstock. They use common off-the-shelf pipe and tubing sizes. Have the waterjet or laser cutter zip out a bunch of disc blanks next time you have less than a minimum cutting order. Toss them on the shelf, and the next time you need a special liner diameter, half the work is already done. Chop off a piece of tube and weld the discs in place. A couple of quick welds and you have an inexpensive spindle liner for that oddball size you need to run. CTE
About the Author: Tom Lipton is a career metalworker who has worked at various job shops that produce parts for the consumer product development, laboratory equipment, medical services and custom machinery design industries. He has received six U.S. patents and lives in Alamo, Calif. For more information, visit his blog at oxtool.blogspot.com and video channel at www.youtube.com/user/oxtoolco. Lipton’s column is adapted from information in his book “Metalworking Sink or Swim: Tips and Tricks for Machinists, Welders, and Fabricators,” published by Industrial Press Inc., South Norwalk, Conn. The publisher can be reached by calling (888) 528-7852 or visiting www.industrialpress.com. By indicating the code CTE-2014 when ordering, CTE readers will receive a 20 percent discount off the book’s list price of $44.95.Related Glossary Terms
- boring
boring
Enlarging a hole that already has been drilled or cored. Generally, it is an operation of truing the previously drilled hole with a single-point, lathe-type tool. Boring is essentially internal turning, in that usually a single-point cutting tool forms the internal shape. Some tools are available with two cutting edges to balance cutting forces.
- boring bar
boring bar
Essentially a cantilever beam that holds one or more cutting tools in position during a boring operation. Can be held stationary and moved axially while the workpiece revolves around it, or revolved and moved axially while the workpiece is held stationary, or a combination of these actions. Installed on milling, drilling and boring machines, as well as lathes and machining centers.
- centering
centering
1. Process of locating the center of a workpiece to be mounted on centers. 2. Process of mounting the workpiece concentric to the machine spindle. See centers.
- chuck
chuck
Workholding device that affixes to a mill, lathe or drill-press spindle. It holds a tool or workpiece by one end, allowing it to be rotated. May also be fitted to the machine table to hold a workpiece. Two or more adjustable jaws actually hold the tool or part. May be actuated manually, pneumatically, hydraulically or electrically. See collet.
- computer numerical control ( CNC)
computer numerical control ( CNC)
Microprocessor-based controller dedicated to a machine tool that permits the creation or modification of parts. Programmed numerical control activates the machine’s servos and spindle drives and controls the various machining operations. See DNC, direct numerical control; NC, numerical control.
- coolant
coolant
Fluid that reduces temperature buildup at the tool/workpiece interface during machining. Normally takes the form of a liquid such as soluble or chemical mixtures (semisynthetic, synthetic) but can be pressurized air or other gas. Because of water’s ability to absorb great quantities of heat, it is widely used as a coolant and vehicle for various cutting compounds, with the water-to-compound ratio varying with the machining task. See cutting fluid; semisynthetic cutting fluid; soluble-oil cutting fluid; synthetic cutting fluid.
- cutting speed
cutting speed
Tangential velocity on the surface of the tool or workpiece at the cutting interface. The formula for cutting speed (sfm) is tool diameter 5 0.26 5 spindle speed (rpm). The formula for feed per tooth (fpt) is table feed (ipm)/number of flutes/spindle speed (rpm). The formula for spindle speed (rpm) is cutting speed (sfm) 5 3.82/tool diameter. The formula for table feed (ipm) is feed per tooth (ftp) 5 number of tool flutes 5 spindle speed (rpm).
- feed
feed
Rate of change of position of the tool as a whole, relative to the workpiece while cutting.
- lathe
lathe
Turning machine capable of sawing, milling, grinding, gear-cutting, drilling, reaming, boring, threading, facing, chamfering, grooving, knurling, spinning, parting, necking, taper-cutting, and cam- and eccentric-cutting, as well as step- and straight-turning. Comes in a variety of forms, ranging from manual to semiautomatic to fully automatic, with major types being engine lathes, turning and contouring lathes, turret lathes and numerical-control lathes. The engine lathe consists of a headstock and spindle, tailstock, bed, carriage (complete with apron) and cross slides. Features include gear- (speed) and feed-selector levers, toolpost, compound rest, lead screw and reversing lead screw, threading dial and rapid-traverse lever. Special lathe types include through-the-spindle, camshaft and crankshaft, brake drum and rotor, spinning and gun-barrel machines. Toolroom and bench lathes are used for precision work; the former for tool-and-die work and similar tasks, the latter for small workpieces (instruments, watches), normally without a power feed. Models are typically designated according to their “swing,” or the largest-diameter workpiece that can be rotated; bed length, or the distance between centers; and horsepower generated. See turning machine.
- milling machine ( mill)
milling machine ( mill)
Runs endmills and arbor-mounted milling cutters. Features include a head with a spindle that drives the cutters; a column, knee and table that provide motion in the three Cartesian axes; and a base that supports the components and houses the cutting-fluid pump and reservoir. The work is mounted on the table and fed into the rotating cutter or endmill to accomplish the milling steps; vertical milling machines also feed endmills into the work by means of a spindle-mounted quill. Models range from small manual machines to big bed-type and duplex mills. All take one of three basic forms: vertical, horizontal or convertible horizontal/vertical. Vertical machines may be knee-type (the table is mounted on a knee that can be elevated) or bed-type (the table is securely supported and only moves horizontally). In general, horizontal machines are bigger and more powerful, while vertical machines are lighter but more versatile and easier to set up and operate.
- outer diameter ( OD)
outer diameter ( OD)
Dimension that defines the exterior diameter of a cylindrical or round part. See ID, inner diameter.
- turning
turning
Workpiece is held in a chuck, mounted on a face plate or secured between centers and rotated while a cutting tool, normally a single-point tool, is fed into it along its periphery or across its end or face. Takes the form of straight turning (cutting along the periphery of the workpiece); taper turning (creating a taper); step turning (turning different-size diameters on the same work); chamfering (beveling an edge or shoulder); facing (cutting on an end); turning threads (usually external but can be internal); roughing (high-volume metal removal); and finishing (final light cuts). Performed on lathes, turning centers, chucking machines, automatic screw machines and similar machines.


