Understanding and controlling Abbé errors can be crucial when operating machine tools. Named after Ernst Abbé, a 19th century German physicist and former director of research at Zeiss Optical Works, Abbé errors are linear positioning errors caused by a dimensional offset between the location where a position measurement is made and the location of the desired position. This offset amplifies any angular error in the motion.
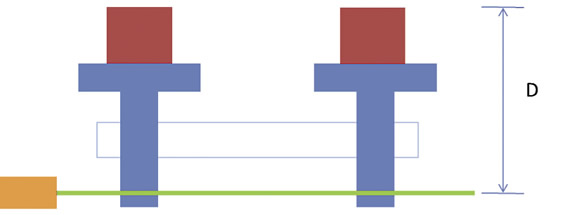
Figure 1 shows a schematic representation of a machine tool table (blue) in two different positions. The workpiece (red) is attached to the top of the table. The table travels along a guide way (white box). As the screw rotates in a fixed nut on the table, the table is driven along the guide way. The screw provides the thrust along the direction of travel, and the guide way normally controls the position perpendicular to the direction of travel.

All images courtesy of S. Smith
Figure 1. Motion of a machine tool table with a straight guide way, where D is the dimensional offset.
In many machine tools, an encoder attached to the screw determines the table position, and the table position is known by measuring the rotation of the screw. Essentially, the table position is measured along the screw axis, but this is not the position of interest. The position of interest is somewhere on the workpiece, say, the center of the top surface. The dimensional offset is indicated in the figure by the letter D. If a guide way is straight and parallel to the screw axis (Figure 1), the motion of the center of the top surface of the workpiece is the same as the motion measured along the screw axis.
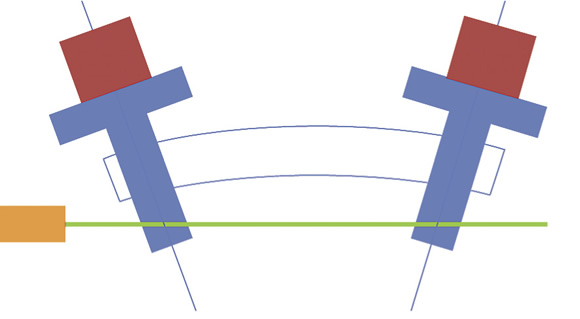
However, a guide way is usually not straight or parallel to the screw axis. If a guide way is curved, as shown in an exaggerated way in Figure 2, the motion of the point of interest is different from the measured motion. This difference between measured and desired travel is an Abbé error. The Abbé error increases as the angular error of a guide way increases and as the length of the dimensional offset increases. The magnitude of the Abbé error is the product of the offset and the tangent of the angular error. The equation is offset × tan (angle) = Abbé error. For example, if the offset is 500mm (19.7"), and the angular error is 0.006° (about 22 arc-seconds), the Abbé error is about 0.05mm (about 0.002").

Figure 2. Motion of a machine tool table with an angular error in the guide way, which causes an Abbé error.
Angular errors in a guide way may arise during manufacture of the machine bed or because of differential thermal expansion between a guide way and the bed. Similar angular errors are caused by varying preload between the ballscrew and nut, backlash and deformations because of the moving weight of the workpiece, among other reasons. Two basic strategies exist to minimize the Abbé error in machine tools: eliminate the causes or compensate the result.
To eliminate the causes, the machine should be built as accurately as possible. The builder should take great care to ensure the guide ways are straight and aligned with the screws. The guide ways and the bed should be made of materials with very similar coefficients of thermal expansion, and the environmental temperature of the machine should be well controlled. In addition, a travel measurement should be made as close as possible to the point of interest, minimizing the offset D. For example, instead of using a rotary encoder mounted on the screw for positional measurement, a linear scale mounted along a guide way is preferable.
Alternatively or additionally, the linear positioning error resulting from the angular error and offset can be measured and corrected via software if the error is static (not changing with time). A device, such as a laser interferometer, can be used to measure the position of the point of interest prior to machine operation. The commanded position can be modified to achieve the desired position offline by changing the motion program or in real time while the machine is in operation.
Essentially like a screw error compensation or many other error compensations, an end user makes a lookup table or an equation that represents the measured error as a function of position. The controller modifies the command by adding or subtracting the measured error to achieve the desired position. The reason to do this offline is that the point of interest may change as machining progresses or as the part or tool changes. Corrections in the controller assume a fixed point of interest. CTE
 About the Author: Dr. Scott Smith is a professor and chair of the Department of Mechanical Engineering at the William States Lee College of Engineering, University of North Carolina at Charlotte, specializing in machine tool structural dynamics. Contact him via e-mail at [email protected].
Related Glossary Terms
- backlash
backlash
Reaction in dynamic motion systems where potential energy that was created while the object was in motion is released when the object stops. Release of this potential energy or inertia causes the device to quickly snap backward relative to the last direction of motion. Backlash can cause a system’s final resting position to be different from what was intended and from where the control system intended to stop the device.
- parallel
parallel
Strip or block of precision-ground stock used to elevate a workpiece, while keeping it parallel to the worktable, to prevent cutter/table contact.


